What is the “More connections” section in Origin OS 6 Settings?
The screenshot shows the More connections menu (with the blue chain-link icon) inside the main Settings app on a device running Origin OS 6 (Vivo’s Android 16-based skin). This is the dedicated hub for secondary and advanced connectivity options that sit outside the primary Wi-Fi, Mobile network, and Bluetooth panels.
It consolidates tools for sharing your connection, securing traffic, managing app network access, and enabling short-range technologies. Exact items can vary slightly by region, carrier, and hardware, but the core set is consistent across recent OriginOS releases.

1) Airplane mode in Origin OS 6

The screenshot shows the Networks subsection inside Settings → More connections.
What Airplane Mode Does
When you turn Airplane mode on:
- All radio transmitters on the phone are disabled: – Cellular (mobile data + voice/SMS) – Wi-Fi – Bluetooth – NFC – GPS radio (in most implementations)
- The phone can no longer connect to mobile networks, Wi-Fi hotspots, or other wireless devices.
- Calls, messages, mobile data, and most location services stop working.
- Battery drain from radios is reduced, which is why some users enable it overnight or in low-signal areas.
You can still use the phone offline (apps, media, files, etc.). In Origin OS 6 you can usually re-enable Wi-Fi or Bluetooth individually after Airplane mode is on if the system allows it (common on modern Android skins).
How to Use It
- Open Settings → More connections.
- Under the Networks heading, toggle Airplane mode on or off.
- Alternatively (faster):
- Swipe down from the top-right to open the Control Centre.
- Tap the Airplane mode icon.
- Long-press the icon to jump straight to this settings page.
Related Behaviour in Origin OS 6
- Status-bar icon: A small airplane appears when the mode is active.
- Quick re-enable: After turning Airplane mode on, many users re-enable Wi-Fi or Bluetooth from the Control Centre without leaving the mode.
- No data or calls: Even if Wi-Fi is later turned back on, cellular services remain blocked until Airplane mode is fully switched off.
- Location & other sensors: GPS and some sensors may still work in a limited way, but network-based location is disabled.
When to Use It
| Situation | Recommendation |
|---|---|
| Flying / airline regulations | Required by most airlines |
| Poor signal / battery saving | Useful overnight or in dead zones |
| Focusing / avoiding interruptions | Quick way to silence all radios |
| Troubleshooting network issues | Reset radios by toggling on/off |
Notes Specific to Origin OS 6
- The placement under More connections → Networks is consistent with Vivo’s organisation of secondary network tools (Hotspot, VPN, NFC, Data Saver, etc. appear on the same or adjacent screens).
- Airplane mode overrides most other connection settings while active.
- Turning it off restores the previous states of Wi-Fi, mobile data, and Bluetooth (unless you changed them manually while it was on).
2) Quick Share Settings Explained (Origin OS 6 / Android)

The screen shows Google’s Quick Share (formerly Nearby Share) interface. This is the built-in system tool for quickly sending and receiving files, photos, links, and other content between nearby Android devices (and some Chromebooks) over Wi-Fi Direct, Bluetooth, or mobile data. Below is a clear breakdown of every element visible in the screenshot.
Top Action Buttons
| Button | Function |
|---|---|
| Receive | Puts your phone into receiving mode. Nearby devices that support Quick Share will see your device name and can send content to you. A notification or prompt appears when someone tries to send something. |
| Send | Opens the content picker so you can choose files, photos, videos, or text to share. After selecting items, the phone scans for nearby devices and lets you choose a recipient. |
These two buttons are the primary entry points for using the feature.
Account
- Current value: username@gmail.com (with profile picture)
- What it means: Quick Share is linked to the Google account signed in on the device. The account is used for identity verification, contact matching, and (in some cases) cross-device continuity.
- Why it matters: Sharing with “Contacts” relies on this account matching the contacts list. Changing the Google account on the phone will update this field.
Device name
- Current value: User name’s phone
- What it means: This is the name other nearby devices see when your phone is discoverable for receiving.
- How to change it: Tap the field (or go to the full Quick Share settings) and enter a new name. A clear, recognizable name makes it easier for friends or family to identify your device in the list of available receivers.
Who can share with you
- Current value: Contacts
- Available options (typical):
- Everyone – Any nearby Android device can send to you (least private).
- Contacts – Only people in your Google Contacts list can send (recommended balance of convenience and privacy).
- Your devices – Only other devices signed into the same Google account.
- No one / Hidden – Your phone does not appear as a receiver.
- What it controls: Visibility and who is allowed to initiate a transfer to your phone. “Contacts” is the most common everyday setting because it limits sharing to people you already know while still allowing quick transfers.
Use mobile data
- Current state: On (toggle enabled)
- Description shown: “Continue sharing even when Wi-Fi isn’t available. Data charges may apply.”
- What it does:
- When On: Quick Share can fall back to mobile data (or a mix of Bluetooth + mobile data) if a direct Wi-Fi connection between the two devices cannot be established. Transfers continue outdoors or in places without Wi-Fi.
- When Off: Sharing only works over Wi-Fi Direct / local Wi-Fi. Transfers stop or fail if a pure local wireless link is unavailable.
- Practical impact: Turning this on improves reliability but can consume mobile data (especially with large files or videos). Most users leave it on for convenience and only disable it when on a limited data plan or roaming.
Quick Tips for Everyday Use
- Keep Bluetooth and Location services enabled — Quick Share needs them for device discovery.
- For the fastest transfers, both phones should be unlocked and relatively close (ideally under 5–10 meters).
- Large files transfer more reliably when both devices are on the same Wi-Fi network or when “Use mobile data” is enabled as a fallback.
- You can also access Quick Share from the Share sheet inside almost any app (Gallery, Files, Chrome, etc.) without opening this dedicated page.
3) Personal Hotspot Settings Explained (Origin OS 6)

This screen controls your phone’s mobile hotspot (also called Personal Hotspot or Wi-Fi tethering). It lets other devices connect to your phone and use its mobile data connection for internet access. Below is a clear explanation of every element shown.
Main Toggle – Personal hotspot
- Current state: On (blue toggle)
- Description: “Prioritize Wi-Fi tethering. Mobile data tethering may incur charges.”
- What it does: Turns the hotspot on or off. When enabled, the phone creates a Wi-Fi network that other devices can join. Origin OS prioritizes sharing via Wi-Fi. Using mobile data for tethering can consume your data allowance and may lead to extra charges from your carrier.
- Tip: You can also toggle this quickly from the Control Centre.
QR Code
- What it is: A scannable QR code generated from your current hotspot name and password.
- Purpose: Allows nearby devices (phones, tablets, laptops) to connect instantly by scanning the code — no need to type the network name or password.
- How to use: Open the camera or Wi-Fi settings on the other device and scan the code. It automatically joins the network.
Hotspot configuration
- Name: This is the Wi-Fi network name (SSID) that other devices will see. You can change it to something more personal or easier to recognize.
- Password: The current password required to join the hotspot. It is shown in plain text for convenience. Tap this row to edit both the name and password, change the security type (usually WPA2/WPA3), or adjust other advanced options such as the frequency band (2.4 GHz or 5 GHz).
Connection management
Maximum number of connections
- Current value: 4
- What it means: Limits how many devices can connect to your hotspot at the same time.
- Note: “Your hotspot restarts if changed.” Changing this value will briefly disconnect any currently connected devices and restart the hotspot service.
- Recommendation: 4–8 is typical. Higher numbers can slow down the connection for everyone if your mobile data speed is limited.
Connected devices
- Current value: 0
- What it shows: A list of devices currently joined to your hotspot (with their names or MAC addresses when available).
- Usefulness: Lets you see who is using your data and, on many Origin OS versions, allows you to disconnect individual devices.
Blocklist
- Current value: 0
- What it does: Stores devices you have previously blocked from connecting.
- How it works: If a device is added to the blocklist, it cannot rejoin the hotspot even if someone knows the password. Useful for preventing unwanted reconnections.
Practical Tips
- Keep the password strong and avoid sharing the QR code publicly.
- Monitor data usage — hotspoting can consume large amounts of mobile data quickly.
- For better speed and stability, prefer the 5 GHz band when both the phone and the connecting devices support it (available inside Hotspot configuration on most models).
- Enable “Auto turn off” options (if present in deeper settings) to save battery when no devices are connected.
These controls give you full management over who can use your connection, how many devices are allowed, and how easily others can join.
3.1) Hotspot Configuration Settings Explained (Origin OS 6)

This screen lets you customize the Wi-Fi network created by your phone’s Personal Hotspot. Every option here directly affects how other devices discover, connect to, and perform on your shared connection. Below is a detailed breakdown of each setting.
Network name
- Current value: iQOO Neo 10
- What it is: The Wi-Fi network name (also called SSID) that appears in the list of available networks on other devices.
- Why it matters: A clear, recognizable name makes it easy for you and trusted people to identify your hotspot. Avoid generic names if you are in a crowded area.
- Recommendation: Change it to something personal (e.g., “Sam Hotspot”) so it stands out. You can use letters, numbers, and some symbols.
Password
- Current value: t6betfg848846
- Requirement shown: “Your password must contain at least 8 characters.”
- What it is: The security key required to join the hotspot.
- Why it matters: A strong password prevents unauthorized devices from connecting and using your mobile data.
- Best practice: Use a mix of upper- and lower-case letters, numbers, and symbols. Avoid simple or easily guessable passwords. The current password meets the minimum length but can be made stronger if desired.
Security
- Current value: WPA2/WPA3-Personal
- What it means: The encryption protocol used to protect the connection between your phone and connected devices.
- Available options (typical on Origin OS):
- WPA2/WPA3-Personal (recommended) – Supports both modern and older devices. Offers strong security and good compatibility.
- WPA3-Personal – Highest security, but some older devices may not connect.
- WPA2-Personal – Widely compatible but slightly less secure than WPA3.
- None – No password required (not recommended for security reasons).
- Advice: Keep the current WPA2/WPA3-Personal setting unless you have a specific compatibility problem with older devices.
AP band
- Current value: 2.4 GHz band
- What it controls: The radio frequency your hotspot uses.
- Comparison of the two main options:
| Band | Advantages | Disadvantages | Best for |
|---|---|---|---|
| 2.4 GHz | Longer range, better wall penetration, works with almost all devices | Slower speeds, more interference from other networks, microwaves, etc. | Compatibility and coverage |
| 5 GHz | Higher speeds, less interference | Shorter range, may not work with older devices | Speed when devices are close |
- Current choice: 2.4 GHz prioritizes maximum compatibility and range.
- When to switch: Choose 5 GHz if all connecting devices support it and you want faster performance in the same room.
Support Wi-Fi 6
- Current state: Off
- Description: “Provides faster connection. Some older devices may not work with Wi-Fi 6 (802.11ax).”
- What it does: Enables the Wi-Fi 6 (802.11ax) standard on the hotspot when turned on.
- Benefits when enabled:
- Higher data rates
- Better efficiency when multiple devices are connected
- Improved performance in crowded environments
- Trade-off: Some older phones, laptops, or IoT devices that only support Wi-Fi 4/5 may fail to connect or experience issues.
- Recommendation: Turn it on only if every device you regularly connect supports Wi-Fi 6. Otherwise leave it off for broader compatibility.
How to Save Changes
Tap the checkmark (✓) in the top-right corner to apply your modifications. The hotspot will usually restart briefly after major changes (especially band or security settings).
3.2) More Hotspot Settings Explained (Origin OS 6)

This screen provides additional controls for managing data usage, battery life, and alternative ways to share your phone’s internet connection beyond the standard Wi-Fi hotspot. Below is a clear explanation of every option.
One-time mobile data limit
- Current value: 1000 MB
- What it does: Sets a data cap for the current hotspot session. Once the connected devices collectively use 1000 MB of mobile data, the hotspot automatically stops sharing internet (or notifies you, depending on the exact behavior).
- Purpose: Prevents accidental overuse of your mobile data plan, especially useful when sharing with multiple people or during travel.
- How to adjust: Tap the row to choose a different limit (common options include 500 MB, 1 GB, 2 GB, 5 GB, or Unlimited).
- Note: This is a one-time limit for the current session. Turning the hotspot off and on again usually resets the counter.
Auto-off when no device connected
- Current value: 10 minutes
- Description: “Turn off hotspot automatically when no devices are connected.”
- What it does: If no devices remain connected to the hotspot for the selected time period, the phone automatically disables the hotspot.
- Benefits:
- Saves battery
- Reduces unnecessary mobile data background usage
- Improves security by not leaving an open hotspot running
- Common options: 5 minutes, 10 minutes, 15 minutes, 30 minutes, or Never.
- Recommendation: 5–10 minutes is a good balance for most users. Choose a longer time only if devices frequently disconnect and reconnect.
Other tethering modes
These options let you share your phone’s internet connection using methods other than Wi-Fi.
Bluetooth tethering
- Current state: Off
- Description: “Pair your phone with your PC or other devices to access the network of your phone from your PC or other devices.”
- How it works: After pairing via Bluetooth, the other device can use your phone’s mobile data through the Bluetooth connection.
- Pros: Lower power consumption than Wi-Fi hotspot; works without creating a visible Wi-Fi network.
- Cons: Significantly slower speeds than Wi-Fi hotspot; limited to one or very few devices.
- Best for: Light browsing or when Wi-Fi hotspot is restricted (e.g., some public places or corporate environments).
USB tethering
- Current state: Off
- Description: “Connect USB and enable this feature, then select ‘iQOO Neo 10’ from your PC’s network services to share the network.”
- How it works: Plug your phone into a computer with a USB cable, turn this toggle on, and select the phone as a network connection on the computer.
- Pros: Fast and stable connection; charges the phone at the same time; no Wi-Fi interference.
- Cons: Requires a physical cable; mainly useful for computers rather than other mobile devices.
- Best for: Sharing internet with a laptop or desktop.
Ethernet tethering
- Current state: Off (grayed out)
- Description: “Share the phone’s network connection via Ethernet.”
- What it means: Allows sharing the internet connection through a wired Ethernet adapter (usually via USB-C to Ethernet).
- Why it is grayed out: Your current device or the connected accessory does not support this feature, or no compatible Ethernet adapter is detected.
- When it becomes available: Typically appears when a supported USB-C Ethernet adapter is plugged in.
Summary of Recommendations
- Keep a reasonable One-time mobile data limit if you are on a restricted data plan.
- Enable Auto-off when no device connected to protect battery and data.
- Use USB tethering for the most reliable connection to a computer.
- Use Bluetooth tethering only when you need a low-power, cable-free alternative and speed is not critical.
These settings give you finer control over data consumption, power usage, and alternative sharing methods. Adjust them according to whether you prioritize data savings, convenience, or maximum compatibility.
4) Origin OS 6 Data Management Explained

The screenshot shows the Data management page in Origin OS 6. This screen provides a clear overview of mobile data consumption for the selected SIM and offers quick access to tools that help control, diagnose, and reduce data usage. It is reached from the main Mobile network page by tapping “Data management.”
Below is a detailed explanation of every visible element.
Header and Top Controls
- Gear/settings icon (top right)
- Opens additional configuration options for data management. Common items behind this icon include setting a monthly data limit/warning threshold, choosing the billing cycle start date, resetting statistics, or adjusting how usage is calculated.
- SIM 1 badge (green label in the top-right of the usage card)
- Indicates that the displayed statistics apply to SIM 1. On dual-SIM devices you can usually switch between SIMs here or on the previous screen so each card’s usage is tracked separately.
Main Usage Summary Card
- 8.80 GB – This month’s total
- The total mobile data consumed on the selected SIM during the current monthly cycle. The number updates in near real time.
- An information (i) icon next to the label usually opens a short explanation of how the total is calculated or when the cycle resets.
- Practical tip: Compare this figure regularly against your carrier plan allowance to avoid overage charges.
- Used today: 278.2 KB
- Data consumed since midnight (or the start of the current day) on mobile data. The very low value shown suggests minimal activity so far today.
- Average daily usage: 360.4 MB
- The calculated average amount of mobile data used per day across the current month. This helps you project whether you are on track to stay within your plan limit.
- View details >
- Opens a more granular breakdown. Typical content includes:
- Daily or hourly usage graphs
- Per-app data consumption ranking (which apps used the most data)
- Foreground vs background data split
- Ability to restrict individual apps from using mobile data
- Opens a more granular breakdown. Typical content includes:
This is the most useful place to identify data-hungry applications.
Quick-Access Tool Cards
- Network management (blue Wi-Fi/gear icon)
- Opens advanced network controls. Common options inside include:
- Restricting background data for specific apps
- Managing which apps can use mobile data when the screen is off
- Dual-SIM data switching rules
- App-level network permissions
- Sometimes hotspot or VPN-related settings
- Use this when you want fine-grained control over which apps consume data rather than just viewing statistics.
- Opens advanced network controls. Common options inside include:
- Wi-Fi diagnostics (green first-aid/medical kit icon)
- Launches tools that check Wi-Fi performance and connectivity. Typical features:
- Signal strength and channel analysis
- Speed or latency tests on the current Wi-Fi network
- Suggestions to improve Wi-Fi stability
- Detection of interference or weak coverage
- Although this is a Wi-Fi tool, it appears here because many users switch between Wi-Fi and mobile data; diagnosing Wi-Fi problems can reduce unnecessary mobile data use.
- Launches tools that check Wi-Fi performance and connectivity. Typical features:
- Data-saving mode
- Activates a system-wide data restriction feature. When enabled it typically:
- Limits background data for most apps
- Reduces image and video quality in supported apps (or blocks auto-play)
- Restricts automatic updates and syncing over mobile data
- May compress data on some services
- A further settings page is usually available after tapping the row so you can choose which apps are exempt from the restrictions. Enable this when traveling, near the end of a billing cycle, or on a limited data plan.
- Activates a system-wide data restriction feature. When enabled it typically:
Overall Guidance for This Screen
- The large monthly total and average daily usage give an at-a-glance health check of your data consumption.
- “View details” and “Network management” are the two most powerful tools for identifying and controlling heavy users.
- Data-saving mode is the fastest way to reduce future consumption without manually restricting every app.
- Wi-Fi diagnostics helps ensure you stay on Wi-Fi whenever possible, which is the most effective long-term data-saving strategy.
- On dual-SIM phones, always confirm the correct SIM badge is selected so the numbers match the plan you are monitoring.
This screen is designed for quick monitoring and one-tap access to the most common data-control features in Origin OS 6.
4.1) Origin OS 6 Data Management Settings Explained

The screenshot shows a secondary configuration page within Data management on Origin OS 6. This screen focuses on how the phone tracks, limits, and displays mobile data usage information. It is typically reached by tapping the gear/settings icon on the main Data management page or by selecting certain advanced options.
Below is a clear explanation of every visible setting.
Header
- Data management (with back arrow): Returns to the previous Data management overview screen that shows monthly totals, daily usage, and quick-access tools.
Billing and Limit Controls
- Billing date: 1
- Sets the day of the month when your data usage cycle resets (in this case, the 1st).
- Most carriers bill on a specific date each month. Matching the phone’s cycle to your actual billing date makes the “This month’s total” and average daily usage figures accurate.
- Tapping the row usually opens a calendar or number picker so you can change the reset day (for example, to the 15th or 28th).
- Why it matters: An incorrect billing date causes the monthly counter to reset on the wrong day, making it harder to stay within your plan limit.
- Sets the day of the month when your data usage cycle resets (in this case, the 1st).
- Data usage limit:
- Lets you set a monthly mobile-data ceiling and optional warning threshold. Typical options behind this entry include:
- Turning the limit on or off
- Choosing a maximum amount (for example, 10 GB or 20 GB)
- Setting a warning level (for example, alert at 80 % of the limit)
- Choosing what happens when the limit is reached (notification only, or automatically restrict data)
- Practical use: Highly recommended for users on limited data plans. The phone will notify you before you exceed your allowance and can help prevent overage charges.
- Lets you set a monthly mobile-data ceiling and optional warning threshold. Typical options behind this entry include:
Display and Notification Options
- Show real-time network speed (toggle currently on)
- When enabled, the phone displays the current upload and download speed in real time.
- The speed is usually shown in the status bar, notification shade, or as a floating indicator (exact placement depends on the Origin OS build and other display settings).
- Useful for checking whether you are getting expected 4G/5G performance or diagnosing slow connections.
- Turning it off can slightly reduce visual clutter and very minor system overhead.
- When enabled, the phone displays the current upload and download speed in real time.
- Show data usage (toggle currently on)
- Description shown: “Show data usage information at the bottom of the notification bar.”
- When enabled, a small data-usage summary (for example, today’s usage or monthly total) appears at the bottom of the notification shade / Control Center.
- This gives quick visibility without opening the Settings app.
- Disabling it removes the information line for a cleaner notification panel.
- Description shown: “Show data usage information at the bottom of the notification bar.”
Overall Guidance
These four controls let you align the phone’s tracking with your actual carrier bill, set protective limits, and decide how much live data information you want to see on screen.
For most users the recommended setup is:
- Correct billing date matching the carrier cycle
- A data usage limit set slightly below the plan allowance
- Real-time speed and notification-bar usage display turned on for easy monitoring
Changes take effect immediately. After adjusting the billing date or limit, return to the main Data management page to see the updated totals and averages.
4.2) Origin OS 6 Data Usage Limit Settings Explained
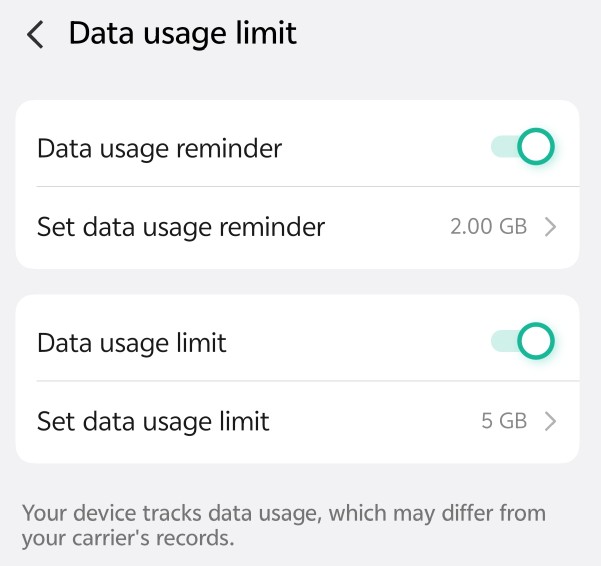
The screenshot shows the dedicated Data usage limit configuration page in Origin OS 6. This screen lets you set warning thresholds and hard caps on mobile data consumption so the phone can alert you or restrict usage before you exceed your plan. It is reached from the Data management settings by selecting “Data usage limit.”
Below is a clear explanation of every visible option.
Header
- Data usage limit (with back arrow): Returns to the previous Data management settings page. All changes made here take effect immediately for the selected SIM.
Reminder Controls
- Data usage reminder (toggle currently on)
- Enables or disables the early-warning notification system.
- When turned on, the phone monitors usage and sends a notification once the reminder threshold is reached.
- When turned off, no reminder alerts are issued (the hard limit below can still function independently).
- Recommended setting: Keep this enabled so you receive advance notice before approaching your plan allowance.
- Enables or disables the early-warning notification system.
- Set data usage reminder:
- Defines the specific data amount that triggers the reminder notification.
- In the example shown, the phone will alert you when 2.00 GB has been used in the current billing cycle.
- Tapping the row opens a number picker or slider so you can change the value (for example, to 5 GB, 8 GB, or any other amount).
- Practical tip: Set this value noticeably lower than your actual plan limit (commonly 70–80 % of the allowance) to give yourself time to adjust usage.
- Defines the specific data amount that triggers the reminder notification.
Hard Limit Controls
- Data usage limit (toggle currently on)
- Enables or disables the strict monthly data ceiling.
- When turned on, the phone enforces the limit you set below. Once the limit is reached, it can restrict further mobile data use or show a strong warning (exact behavior depends on the Origin OS build).
- When turned off, the phone only tracks usage and issues reminders (if enabled) but does not block data.
- Recommended setting: Enable this on limited or prepaid plans to prevent unexpected overage charges.
- Enables or disables the strict monthly data ceiling.
- Set data usage limit: 5 GB
- Sets the maximum amount of mobile data allowed in the current billing cycle.
- In the example, the hard limit is 5 GB.
- Tapping the row lets you choose a different value.
- Practical tip: Match this closely to your carrier plan (or set it slightly lower for safety). The reminder threshold should always be lower than this hard limit.
- Sets the maximum amount of mobile data allowed in the current billing cycle.
Important Disclaimer
- “Your device tracks data usage, which may differ from your carrier’s records.” This note appears at the bottom of the page.
- The phone measures data at the device level. Carriers may count usage differently (for example, due to rounding, network overhead, or billing system differences).
- Always treat the phone’s figures as a helpful guide rather than an exact match to your official bill.
- For the most accurate accounting, cross-check with your carrier’s app or website near the end of the cycle.
Overall Guidance
A typical effective setup looks like this:
- Data usage reminder → On, set to roughly 70–80 % of your plan
- Data usage limit → On, set to your actual plan allowance (or slightly below)
These controls work together with the billing date setting on the previous screen. After adjusting the values, return to the main Data management page to see how the monthly total and average daily usage relate to your new limits. The system will notify you at the reminder point and can help protect you from exceeding the hard limit.
4.3) Origin OS 6 Data Usage Detail Explained
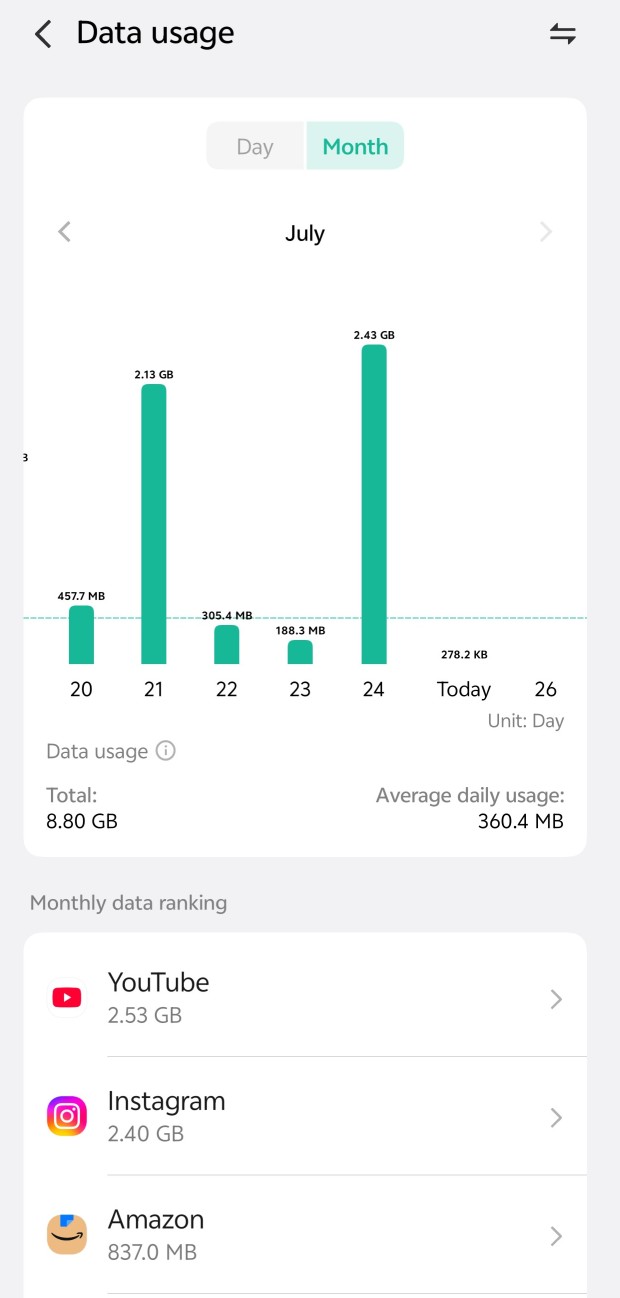
The screenshot shows the detailed Data usage view in Origin OS 6. This page provides a visual breakdown of mobile data consumption over time and ranks the apps that used the most data. It is typically reached by tapping “View details” on the main Data management screen.
Below is a clear explanation of every visible element and control.
Header and Top Controls
- Data usage (title with back arrow): Returns to the previous Data management overview page.
- Sort / filter icon (top right, two horizontal arrows): Opens options to change how the data is sorted or filtered (for example, by mobile network data usage, or WiFi data usage).
Time Period Selector
- Day / Month toggle (Month currently selected and highlighted in green)
- Switches the chart and statistics between daily and monthly views.
- Day shows hourly or detailed single-day breakdowns.
- Month (current selection) displays a bar chart of daily totals across the selected month. Tapping the other option immediately updates the entire page.
- Switches the chart and statistics between daily and monthly views.
- Month navigation (July with left and right arrows)
- Moves between months. The left arrow goes to the previous month; the right arrow goes to the next month (if data exists). The current month is shown in the center.
Usage Chart
- Bar chart (green vertical bars for days 20–26)
- Visual representation of mobile data used each day in the selected month.
- Each bar’s height corresponds to the amount of data consumed that day.
- Exact values are labeled above the taller bars (for example, 2.13 GB on the 21st, 2.43 GB on the 24th).
- Shorter bars show lower usage (457.7 MB, 305.4 MB, 188.3 MB, 278.2 KB).
- “Today” is clearly marked and currently shows very low usage (278.2 KB).
- A horizontal dashed line indicates the average daily usage level for quick visual comparison.
- The Y-axis is automatically scaled; the X-axis shows calendar days.
- Visual representation of mobile data used each day in the selected month.
- Unit: Day
- Confirms that the chart is displaying daily totals.
Summary Statistics
- Data usage (i)
- The information icon opens a short explanation of how the phone calculates the figures (device-side measurement that may differ slightly from carrier records).
- Total: 8.80 GB
- The cumulative mobile data used on the selected SIM for the entire current month so far.
- Average daily usage: 360.4 MB
- The calculated average amount of data consumed per day across the days shown in the chart. This helps project whether you are on track relative to your plan limit.
Monthly Data Ranking Section
- Monthly data ranking header
- Lists apps ranked by total mobile data consumed during the current month (highest first).
- Individual app rows (YouTube 2.53 GB, Instagram 2.40 GB, Amazon 837.0 MB)
- Each row shows:
- App icon and name
- Total data used by that app in the month
- Right arrow (>) that opens a deeper per-app detail page
- Tapping an app typically reveals:
- Daily breakdown for that app
- Foreground vs background usage split
- Option to restrict the app from using mobile data
- Option to restrict background data only
- Each row shows:
This ranking is one of the most useful tools for identifying which apps are responsible for the majority of your data consumption.
Overall Guidance
This screen combines a clear visual history (the bar chart) with actionable insights (the app ranking). Use the Month/Day toggle and month arrows to explore different periods. Tap any app in the ranking to investigate or restrict its data use. The total and average figures help you stay aware of overall consumption relative to the limits you may have set on the previous Data usage limit page.
All numbers are measured by the device and may differ slightly from your carrier’s official records.
4.4) Origin OS 6 Network Management Explained

The screenshot shows the Network management page in Origin OS 6. This screen gives fine-grained control over which installed apps are allowed to use mobile data (or Wi-Fi). It is typically reached from the Data management page by tapping “Network management.”
The page helps reduce unwanted data consumption, improve privacy, and prevent background apps from using the network when you do not want them to.
Header and Description
- Network management (title with back arrow)
- Returns to the previous Data management screen.
- Description text: “Once allowed, apps can use the data or Wi-Fi network.”
- Explains the purpose of the toggles. When an app’s switch is turned on, it is permitted to access the selected network type. When turned off, the app is blocked from using that network (it may still work on the other network type if allowed there).
Network Type Tabs
- Data network (currently selected, underlined in green)
- Controls which apps are allowed to use mobile data (cellular internet).
- This is the most important tab for users who want to limit data usage or prevent apps from consuming mobile data in the background.
- Wi-Fi (unselected)
- Switches the list to control which apps are allowed to use Wi-Fi.
- Tapping it shows the same app list but with independent on/off switches for Wi-Fi access. An app can be allowed on Wi-Fi but blocked on mobile data (or vice versa).
Master Control
- Allow all (toggle currently off)
- A global switch that turns network access on or off for every app in the list at once.
- When turned on, all apps are granted permission for the selected network type (Data network or Wi-Fi).
- When turned off (current state), you must enable apps individually. Practical tip: Leave this off if you want strict control. Turning it on is useful only when you want to quickly restore full access after restricting many apps.
- A global switch that turns network access on or off for every app in the list at once.
Individual App Controls
Each row shows an app icon, name, and a toggle switch. The switch determines whether that specific app can use the currently selected network (in this case, mobile data).
- Windy (toggle on)
- Weather app is currently allowed to use mobile data. It can fetch live weather updates, location-based forecasts, and maps over the cellular network.
- WPS Office (toggle off)
- Office suite is currently blocked from using mobile data. It cannot upload/download documents, sync files, or access cloud services while on mobile data (it can still do so on Wi-Fi if permitted on the Wi-Fi tab).
- WhatsApp (toggle on)
- Messaging app is currently allowed to use mobile data. It can send/receive messages, calls, media, and status updates over the cellular network.
Tapping any app row (or just using the toggle) immediately applies the change. Restricted apps will typically show a network error or “no connection” message when they try to use the blocked network type.
Overall Guidance and Best Practices
- Use the Data network tab to protect your mobile data plan by blocking non-essential or high-consumption apps.
- Keep essential apps (messaging, navigation, banking) enabled and turn off apps that only need occasional updates.
- Switch to the Wi-Fi tab to apply a different set of rules for Wi-Fi networks.
- The “Allow all” master switch is convenient for temporary full access but should normally stay off for better control.
- Changes take effect immediately and do not require a restart.
This page is one of the most effective tools in Origin OS 6 for managing data usage and preventing unwanted background network activity. After adjusting the toggles, you can return to the main Data management or Data usage screens to monitor the impact on overall consumption.
4.5) Origin OS 6 Data-Saving Mode Explained

The screenshot shows the Data-saving mode configuration page in Origin OS 6. This feature helps reduce mobile data consumption by restricting background activity for most apps while still allowing important ones to function normally. It is typically accessed from the main Data management screen.
Below is a detailed explanation of every visible element.
Header
- Data-saving mode (title with back arrow) Returns to the previous Data management page. All changes made here apply system-wide to mobile data usage.
Descriptive Text
- Main description: “Block apps from using data in the background when data is limited.”
- Explains the core purpose of the feature. When Data-saving mode is active, the system prevents most apps from sending or receiving data while they are running in the background. This significantly lowers overall mobile data usage, especially from apps that frequently sync, refresh, or check for updates.
- Note: “Non-trustlisted background apps won’t get new messages, and images load only when tapped.”
- Provides important behavioral details:
- Apps that are not on the trustlist will stop receiving new messages, notifications, or updates while in the background.
- Images and media in those apps will not load automatically; they appear only when you actively open the app and tap on them. This trade-off saves data but can delay notifications for non-essential apps.
- Provides important behavioral details:
Main Controls
- Data-saving mode (toggle currently off)
- The master switch that turns the entire feature on or off.
- Off (current state): Apps can use background data normally (subject to any individual restrictions set elsewhere).
- On: Background data is restricted for non-trustlisted apps. Foreground use (when the app is open on screen) remains unrestricted.
- When to enable it: Useful on limited data plans, while roaming, near the end of a billing cycle, or whenever you want to minimize mobile data consumption without manually restricting every app.
- The master switch that turns the entire feature on or off.
- App trustlist
- Opens a separate list where you can choose which apps are exempt from the background-data restrictions.
- Apps added to the trustlist continue to receive background data even when Data-saving mode is on.
- This is the key customization tool: keep messaging, navigation, or other critical apps on the trustlist so they still deliver timely updates. Tapping the row takes you to the full trustlist management screen.
- Opens a separate list where you can choose which apps are exempt from the background-data restrictions.
Bottom Note
- “Most-used social, music, and map apps are trustlisted by default to allow timely message delivery using background data.”
- Indicates that Origin OS automatically adds commonly used categories of apps (social media, music streaming, and maps/navigation) to the trustlist.
- This default behavior ensures that popular apps such as WhatsApp, Instagram, Spotify, Google Maps, or similar services continue to work smoothly in the background without requiring manual setup. You can still remove or add apps later via the App trustlist.
Overall Guidance
Data-saving mode offers a balanced way to cut mobile data use: it aggressively limits background activity for most apps while protecting the ones you rely on most.
Recommended approach:
- Turn the main toggle on when data is limited.
- Review the App trustlist and keep only essential apps enabled.
- Remember that images and new messages for non-trustlisted apps will be delayed until you open them.
Changes take effect immediately. After enabling the mode, you can monitor the impact on the main Data management or Data usage screens.
4.6) Origin OS 6 App Trustlist Explained

The screenshot shows the App trustlist page in Origin OS 6. This screen lets you choose which apps are exempt from the restrictions of Data-saving mode. It is reached by tapping “App trustlist” on the Data-saving mode page.
When Data-saving mode is enabled, only the apps you turn on here continue to receive background data normally. All other apps have their background data blocked.
Header and Description
- App trustlist (title with back arrow)
- Returns to the previous Data-saving mode screen.
- Three-dot menu (top right)
- Opens additional options. Common choices include selecting multiple apps at once, resetting the list to defaults, or searching for a specific app.
- Description text: “When Data-saving mode is on, apps with the switch turned on can still use data normally.”
- Clearly states the purpose of the list.
- Switch on = the app is trusted and can use mobile data in the background even while Data-saving mode is active.
- Switch off = the app is restricted; it cannot use background data when Data-saving mode is on (new messages and automatic image loading are delayed until the app is opened).
- Clearly states the purpose of the list.
Individual App Controls
Each row displays an app icon, name, and a toggle switch that controls trustlist status.
- ChatGPT (toggle currently off)
- The ChatGPT app is not on the trustlist.
- When Data-saving mode is enabled, it will be blocked from using background data. It will not receive new responses or updates until you open the app.
- Chrome (toggle currently on)
- Google Chrome is on the trustlist.
- Even when Data-saving mode is active, Chrome can still use mobile data in the background (for example, to sync tabs, prefetch pages, or update content). This keeps browsing smoother but uses more data.
- Clock (toggle currently off)
- The system Clock app is not on the trustlist.
- Background data access (such as automatic world-clock or weather updates if supported) will be restricted when Data-saving mode is on.
Tapping any toggle immediately adds or removes the app from the trustlist. The change takes effect at once.
Overall Guidance
The App trustlist is the customization layer for Data-saving mode.
Recommended approach:
- Keep only essential apps turned on (messaging, navigation, critical productivity tools, or browsers you actively use).
- Leave non-essential or high-data apps turned off so they cannot consume background data.
- Review the list periodically, especially after installing new apps.
Apps that are trustlisted by default (many social, music, and map apps) will already appear with their switches on. You can freely change any of them.
After adjusting the trustlist, return to the Data-saving mode page and enable the main toggle if you want the restrictions to apply. You can then monitor the effect on overall data usage from the main Data management screens.
5) VPN Settings Explained
This is the system VPN management page found under Settings → More connections → VPN. It is currently empty because no VPN profiles have been added yet.

Add VPN network
- What it is: The primary action button on this page.
- What it does: Opens a form where you can manually create a new VPN connection profile.
- Typical information you will need to enter:
- Name – A label for the connection (e.g., “Work VPN” or “ProtonVPN”).
- Type – The VPN protocol (common options include IKEv2/IPSec, IPSec Xauth, L2TP/IPSec, PPTP — though PPTP is outdated and less secure).
- Server address – The hostname or IP address provided by your VPN service.
- Username / Password (or other authentication details such as IPSec pre-shared key, certificates, etc.).
- Additional advanced options depending on the protocol (DNS servers, forwarding routes, proxy settings, etc.).
- After saving: The new VPN profile appears in a list on this page. You can then turn it on/off with a single tap, edit it, or delete it.
Important Notes About VPN on Origin OS 6
- You can only have one system-level VPN active at a time.
- Many commercial VPN apps (NordVPN, ExpressVPN, Surfshark, Proton VPN, etc.) create and manage their own profiles automatically — you often do not need to use this manual “Add VPN network” page when using those apps.
- A screen lock (PIN, pattern, password, or biometric) is usually required before you can add or modify a VPN profile for security reasons.
- Once a VPN is connected, a key icon typically appears in the status bar.
When to Use This Page
- You have been given manual VPN configuration details by your workplace, school, or a self-hosted VPN server.
- You prefer to configure a VPN without installing a third-party app.
- You want to enable the system “Always-on VPN” feature for stronger protection.
This screen is intentionally simple until you add your first profile. After adding one or more VPNs, the page will list them so you can quickly connect, disconnect, edit, or remove them.
5.1) Add VPN Network Settings Explained
This is the form used to manually create a system VPN profile. Each field corresponds to a specific part of the VPN configuration. Below is a clear explanation of every option shown on the screen.

Always on
- Current state: Off
- What it does: When enabled, the phone forces all internet traffic through this VPN. If the VPN disconnects, the phone blocks regular internet access until the connection is restored.
- Use case: Strong privacy or security requirement (e.g., corporate policy or public Wi-Fi protection).
- Note: Only one VPN can be set as Always-on at a time.
Type
- Current value: IKEv2/IPSec MSCHAPv2
- What it means: The VPN protocol and authentication method.
- Common options on Origin OS / Android:
- IKEv2/IPSec MSCHAPv2 (most modern and recommended for many services)
- IKEv2/IPSec PSK
- IKEv2/IPSec RSA
- IPSec Xauth PSK
- IPSec Xauth RSA
- IPSec Hybrid RSA
- L2TP/IPSec PSK
- L2TP/IPSec RSA
- PPTP (outdated and insecure — avoid if possible)
- Advice: Choose the exact type specified by your VPN provider or IT administrator.
Name
- Status: Required
- What it is: A friendly label for this VPN profile (e.g., “Work VPN”, “Home Server”, “ProtonUK”).
- Purpose: Helps you identify the connection later in the VPN list. It does not affect the actual connection.
Server address
- Status: Required
- What it is: The hostname or IP address of the VPN server (example: vpn.company.com or 203.0.113.45).
- Source: Provided by your VPN service or network administrator.
IPSec identifier
- Current placeholder: Enter content
- What it is: Also called the “IPSec ID” or “Local ID”. Some VPN servers require a specific identifier (often the same as the username or a group name).
- When needed: Required by certain corporate or advanced IKEv2/IPSec configurations. Leave blank if your provider does not mention it.
IPSec CA certificate
- Current value: Don’t verify server
- What it controls: How the phone verifies the VPN server’s identity.
- Options:
- Don’t verify server – Skips certificate checking (convenient but less secure).
- Select a installed certificate – Uses a CA certificate you previously installed on the phone.
- Recommendation: Use a proper CA certificate when available for better security.
IPSec server certificate
- Current value: From server
- What it means: Determines where the server certificate comes from.
- Typical options:
- From server – Accepts the certificate presented by the VPN server during connection.
- Select a installed certificate – Uses a specific certificate stored on the device.
- Most common choice: “From server” unless your organization requires a pinned certificate.

Username
- Status: Enter username
- What it is: The login name / account ID required by the VPN server.
Password
- Status: Enter password
- What it is: The corresponding password for the username above.
Remember the username and the password
- Current state: Unchecked
- What it does: When enabled, the phone stores the credentials so you do not have to re-enter them every time you connect.
- Security note: Convenient, but anyone with access to an unlocked phone can connect to the VPN.
Advanced options

DNS search domains
- Current value: Not used
- What it is: A list of domain suffixes the system appends when resolving short hostnames (e.g., corp.local).
- When to change: Only if your VPN provider or IT department specifically requires it. Most users leave this as “Not used”.
DNS server
- Current value: 8.8.8.8
- What it is: The DNS server the phone will use while the VPN is connected.
- Common values:
- 8.8.8.8 / 8.8.4.4 (Google)
- 1.1.1.1 / 1.0.0.1 (Cloudflare)
- Custom DNS provided by your VPN service
- Effect: All domain name lookups go through this server while the VPN is active.
Forwarding route
- Current value: 10.0.0.0/8
- What it means: Defines which IP traffic is sent through the VPN tunnel.
- Examples:
- 0.0.0.0/0 – Send all traffic through the VPN (full tunnel).
- 10.0.0.0/8 – Only send traffic destined for the 10.x.x.x private range through the VPN (split tunnel).
- Importance: Incorrect routes can cause the VPN to work only partially or not at all. Use the exact value given by your VPN provider.
How to Complete the Setup
- Fill in all Required fields and any others specified by your VPN provider.
- Tap the checkmark (✓) in the top-right corner to save the profile.
- Return to the main VPN page and toggle the new connection on.
Important: Enter only the exact details provided by your VPN service or network administrator. Incorrect values (especially Type, Server address, certificates, or routes) will prevent a successful connection.
6) Private DNS Settings Explained
Private DNS (also known as DNS over TLS) encrypts the DNS queries your phone makes when looking up website and app domain names. This improves privacy and can add basic ad/tracking protection, depending on the provider you choose. Below is a clear explanation of every option on this screen.

Informational Note
“Private DNS can provide secure transmission, but the connection may cause network delays.”
This system message warns that while Private DNS encrypts your DNS traffic (making it harder for your ISP or public Wi-Fi operators to see which sites you visit), it can occasionally introduce a small delay in connection speed or cause compatibility issues with some networks.
Off
- What it does: Disables Private DNS completely.
- Behavior: The phone uses the DNS servers automatically assigned by your mobile carrier or the Wi-Fi network you are connected to (unencrypted in most cases).
- When to use: – Troubleshooting connection problems – When a network blocks or does not work well with Private DNS – If you prefer the default carrier/Wi-Fi DNS
Auto
- What it does: Lets the system decide whether to use Private DNS.
- Behavior: Origin OS will attempt to use an encrypted DNS connection when the network supports it, and fall back to the standard DNS if it does not.
- When to use: A balanced “set and forget” option for most users who want some privacy benefits without manual configuration.
Private DNS provider (Currently selected)
- What it does: Forces the phone to always use a specific encrypted DNS server that you specify.
- Behavior: All DNS queries go through the hostname you enter below, using DNS over TLS (port 853). This gives you consistent privacy and filtering regardless of which network you join.
- Current status: Enabled (blue radio button).
Provider hostname
- Current value: dns.adguard-dns.com
- What it is: The address of the DNS server that will handle all your domain lookups.
- What AdGuard DNS does (in this case):
- Encrypts DNS traffic
- Blocks many ads, trackers, and malicious domains
- Offers a relatively fast and privacy-focused service
- How to change it: Tap the row and enter a different hostname. Popular alternatives include:
| Provider | Hostname | Main Benefit |
|---|---|---|
| Cloudflare | one.one.one.one or 1dot1dot1dot1.cloudflare-dns.com | Speed + privacy |
| dns.google | Reliability | |
| AdGuard (Current) | dns.adguard-dns.com | Ad & tracker blocking |
| Quad9 | dns.quad9.net | Security-focused |
| NextDNS | Custom hostname from NextDNS | Highly customizable filtering |
Important: Enter only the hostname (no https:// or extra paths). After changing it, the phone will test the connection. If the hostname is invalid or unreachable, Private DNS will fail and you may lose internet access until you correct it or switch back to Off/Auto.
Summary of Recommendations
- Use Private DNS provider + a trusted hostname (such as the current AdGuard one) for better privacy and ad blocking.
- Switch to Auto if you want a low-maintenance option.
- Use Off only when troubleshooting or on networks that break with encrypted DNS.
After making changes, it is a good idea to browse a few websites or run a quick speed test to confirm everything works smoothly.
7) Android Auto Settings Explained
This is the full Android Auto configuration page. It controls how your phone connects to a vehicle’s infotainment system, what appears on the car screen, and how notifications, media, and voice features behave while driving. Below is a clear explanation of every setting shown.
Connection

| Setting | Explanation |
|---|---|
| + Connect a vehicle | Starts the process of pairing a new car. You can connect via USB cable or wirelessly (if both the phone and car support wireless Android Auto). |
| Vehicles | Lists all previously connected cars. Tap a vehicle to see details, forget it, or manage connection preferences. |
| Connection help | Opens troubleshooting guides and tips for common connection problems (USB issues, wireless pairing failures, etc.). |
Startup

| Setting | Current Value | Explanation |
|---|---|---|
| Start Android Auto automatically | Default (set by the vehicle) | Controls whether Android Auto launches by itself when the phone is connected. “Default” lets the car decide. Other options usually include Always or Never. |
| Start Android Auto while locked | On | Allows Android Auto to start and show content on the car screen even if the phone is locked. Useful for convenience, but slightly reduces security. |
| Start music automatically | On | Automatically resumes or starts media playback (music, podcasts, etc.) as soon as Android Auto connects and you begin driving. |
Display

| Setting | Current Value | Explanation |
|---|---|---|
| Customize launcher | — | Lets you choose which apps appear on the Android Auto home screen and rearrange their order. Only driving-optimized apps are allowed. |
| Taskbar widgets | Off | When enabled, shows quick-control widgets (media, navigation, etc.) in the taskbar on the car screen for faster access. |
Digital Assistant

| Setting | Explanation |
|---|---|
| “Hey Google” detection | Enables or manages the hands-free hotword so you can say “Hey Google” to issue voice commands while driving. |
| Manage your digital assistant | Opens deeper Google Assistant settings related to Android Auto (voice preferences, routines, permissions, etc.). |
Maps

| Setting | Current Value | Explanation |
|---|---|---|
| Day/Night mode for maps | Automatic | Controls the map color scheme. Automatic switches between day and night themes based on time or the car’s headlights. Manual Day or Night options are usually also available. |
Messaging

| Setting | Current Value | Explanation |
|---|---|---|
| Show message notifications | On | Displays incoming message notifications on the car screen. |
| Show group conversations | On | Allows group chats to appear in the messaging interface. |
| Show first line of messages | Off | When off, only the sender’s name is shown (more privacy). When on, a short preview of the message text appears. |
| Play message chime | On | Plays a sound when a new message arrives. |
| Notifications with Assistant | On | Lets Google Assistant read messages aloud and allows you to reply by voice. The description notes that notifications are sent to Google for this feature. |
Advanced

| Setting | Current Value | Explanation |
|---|---|---|
| Driver seat location | Default (set by the vehicle) | Tells Android Auto whether the driver sits on the left or right side. This affects the on-screen layout. Most users leave it on Default. |
| Change layout | Navigation closer to driver | Adjusts the overall arrangement of elements on the car screen (for example, placing the navigation map nearer to the driver side). |
Quick Tips
- Keep Start Android Auto while locked and Start music automatically enabled for the smoothest daily experience.
- Turn Show first line of messages off if you prefer greater privacy while driving.
- Use Customize launcher to remove apps you never use in the car — this reduces distraction.
- Wireless Android Auto requires both the phone and the car head unit to support it; otherwise a high-quality USB cable is needed.
These settings give you precise control over convenience, privacy, and safety while using Android Auto. Adjust them according to your vehicle and personal preferences.
8) Screen Mirroring Settings Explained
This page manages wireless screen casting and media sharing from your phone to large-screen devices such as smart TVs, monitors, or streaming sticks. Origin OS supports both full screen mirroring and a more efficient “local file mirroring” mode. Below is a clear explanation of every element on the screen.

Main Illustration & Description
- The graphic shows a phone connected to a TV with a casting icon in between.
This section simply introduces the two main ways you can share content.
Local file mirroring
- What it is: A dedicated mode for sending photos, videos, music, or documents to a compatible TV or display without mirroring the entire phone screen.
- How it works: – You select specific files on your phone. – Only those files are streamed or transferred to the big screen. – The phone screen itself is not shown, which saves battery and bandwidth and keeps your personal notifications private.
- When to use it: Ideal for watching videos, showing a photo slideshow, or playing music on a TV without revealing everything that appears on your phone.
- Tap action: Opens a file browser or media picker so you can choose what to cast.
Available devices
- What it shows: A live list of compatible display devices currently detected on your network (smart TVs, Chromecast, Miracast receivers, etc.).
- Refresh icon (circular arrow): Manually rescans for nearby devices if something does not appear automatically.
- How connection works:
- Make sure your phone and the TV are on the same Wi-Fi network (or that the TV supports the required wireless standard).
- Tap a device in the list to start full screen mirroring or to begin local file mirroring.
- Accept the connection prompt on the TV if one appears.
Key Differences at a Glance
| Feature | Full Screen Mirroring | Local File Mirroring |
|---|---|---|
| What is shown | Entire phone screen | Only selected files/media |
| Privacy | Lower (notifications visible) | Higher (phone screen stays private) |
| Battery & data usage | Higher | Lower |
| Best for | Presentations, demos, apps | Photos, videos, music |
Practical Tips
- Both devices must normally be on the same Wi-Fi network for discovery and stable performance.
- Some TVs require you to enable “Screen Mirroring”, “Miracast”, “Wireless Display”, or a brand-specific casting feature first.
- For the best experience, keep the phone unlocked and the screen on while casting (or enable the relevant battery optimization exceptions).
- If no devices appear, tap the refresh icon, confirm Wi-Fi connectivity, or restart both the phone and the TV.
This page gives you flexible options for sharing your phone’s content on a bigger screen while letting you choose between full control (screen mirroring) and more private, efficient media playback (local file mirroring).
8.1) More Settings – Screen Cast Explained

This page contains two important options that control privacy and convenience while using Screen Mirroring (casting your phone to a TV or other large display). Both settings are currently turned on.
Privacy protection
- Current state: On
- Description: “Private info like floating notifications stay hidden during screen mirroring.”
- What it does: When enabled, sensitive or personal elements on your phone screen are automatically hidden from the mirrored display. This typically includes:
- Floating notifications / heads-up notifications
- Incoming call banners
- Password or PIN entry screens (in many cases)
- Other private system overlays
- Benefit: Prevents personal messages, caller IDs, or confidential information from appearing on the big screen (useful in meetings, living rooms, or public spaces).
- When to turn it off: Only if you specifically want every notification and overlay to be visible on the TV (rarely recommended).
Off-screen mirroring
- Current state: On
- Description: “Screen mirroring continues when your phone is off. No need to unlock to wake it.”
- What it does: Allows the screen casting session to keep running even after the phone’s display turns off (screen timeout or manual power button press). You do not need to keep unlocking or waking the phone for the content to stay visible on the TV.
- Benefit:
- Saves battery (the phone screen can stay off)
- More convenient for long video playback or presentations
- Reduces the chance of accidental interruptions
- Note: The phone itself must remain powered on and connected to the network. “Off” here refers only to the phone’s display, not a full shutdown.
- When to turn it off: If you prefer the mirroring session to stop automatically when the phone screen turns off (for extra security or to force the phone to stay active).
Summary
| Setting | Recommended State | Main Purpose |
|---|---|---|
| Privacy protection | On | Hides notifications and private info |
| Off-screen mirroring | On | Keeps casting alive with phone screen off |
Both options improve the everyday experience of screen mirroring — one protects your privacy, the other improves convenience and battery life. Most users leave them enabled.
8.2) Local File Mirroring Options Explained
This page lets you cast specific types of media from your phone to a compatible TV or large-screen device without mirroring the entire phone screen. It is more private and efficient than full screen mirroring because only the selected content is sent.

Video mirroring
- Description: “Select local videos to mirror to the TV.”
- What it does: Opens your phone’s video library (or file manager) so you can choose one or more video files stored on the device.
- How it works: The selected video(s) play directly on the TV. Playback controls (play, pause, seek, volume) usually appear on both the phone and the TV interface.
- Best for: Watching movies, recorded videos, or personal clips on the big screen while keeping the rest of your phone private.
- Note: Only videos stored locally on the phone are supported here (not streaming apps like YouTube or Netflix).
Image mirroring
- Description: “Select local images to mirror to the TV.”
- What it does: Lets you pick photos or images from your gallery or file storage.
- How it works: The selected images are displayed on the TV, often as a slideshow. You can usually swipe or use on-screen controls to move between photos.
- Best for: Sharing photo albums, showing pictures to a group, or creating a simple digital photo frame effect on the TV.
- Advantage: Notifications and other phone activity remain hidden.
Music mirroring
- Description: “Select local music to mirror to the TV.”
- What it does: Opens your music library so you can choose songs or playlists stored on the phone.
- How it works: The selected audio plays through the TV’s speakers (or connected audio system). Album art and basic playback controls are typically shown on the TV.
- Best for: Playing personal music collections on a better sound system without using a full screen mirror or third-party casting apps.
- Note: This works with locally stored audio files; streaming music services usually have their own casting methods.
Key Points About Local File Mirroring
- All three options only work with files stored on your phone (not cloud-only or streaming content).
- Your phone and the TV must be on the same Wi-Fi network.
- Because the full phone screen is not shared, battery usage is lower and privacy is higher.
- You can switch between video, image, and music modes as needed once connected to a device.
These dedicated modes give you simple, focused ways to enjoy your personal media on a larger screen.
9) Connection Center Explained
Connection Center is Vivo/iQOO’s central hub for managing cross-device connections. It allows your phone to discover, link, and interact with other devices (phones, tablets, computers, earbuds, etc.) that are signed into the same account or have been manually added.

Top Bar Icons
| Icon | Function |
|---|---|
| Gear (Settings) | Opens additional Connection Center preferences (auto-connect behavior, privacy options, notification settings, etc.). |
| Question mark (?) | Opens help or official guidance about how Connection Center works and how to add or troubleshoot devices. |
Illustration & Description
- Text explanation: “iQOO devices bound to the same account will be automatically displayed on the list of added devices. You can manage added devices.” This means any iQOO or Vivo device logged into the same Vivo/iQOO account will appear here automatically. You can also manually add or remove other compatible devices.
My devices
This section lists all devices currently linked to your phone through Connection Center.
| Device Shown | Meaning |
|---|---|
| LenovoY540 | A computer (Lenovo laptop model Y540) that has been previously paired or connected. The small information (i) icon next to it lets you view details, connection status, or remove the device. |
What You Can Typically Do in Connection Center
- View and manage all linked devices in one place
- Start screen mirroring or file transfer to a selected device
- Connect to Vivo/iQOO earbuds, tablets, or other phones
- Use Office Kit features (file sharing, clipboard sync, etc.) with a computer
- Quickly access device-specific controls
Key Points
- Devices signed into the same Vivo/iQOO account appear automatically.
- Non-Vivo devices (such as the Lenovo laptop shown) can still be added manually if they support the required connection protocols.
- The list updates in real time when devices come online or go offline.
- Tapping a device in the list usually opens quick actions (mirror screen, send files, disconnect, etc.).
Connection Center serves as the main control panel for Vivo’s multi-device ecosystem, making it easier to switch between or share content across your phone, computer, and other gadgets.
9.1) Connection Center – Device Options Explained
This screen appears when you expand a connected device (in this case, the Lenovo Y540 laptop) inside Connection Center. It shows the cross-device features available between your iQOO/Vivo phone and the linked computer.

Super Clipboard
- What it does: Enables a shared clipboard across devices.
- How it works: Anything you copy on your phone (text, links, or small images) becomes available to paste on the computer, and vice versa.
- Use case: Quickly move text or links between phone and PC without sending messages or emails to yourself.
Task handoff
Task Handoff is a cross-device feature that lets your iQOO/Vivo phone and computer work together more seamlessly. It automatically sends certain phone activities to the linked computer so you can view or continue them on the larger screen.
The page you shared is the official explanation screen. Here is a clear breakdown of what Task Handoff supports:
Overview
Office Kit can hand off the following from your phone to the computer:
- Notifications
- Screenshots
- Photos taken with the camera
These items appear on the computer for quick viewing and management.
A) Call Handoff
- Incoming calls on your phone are mirrored to the computer.
- A call notification appears on the PC screen.
- You can answer or reject the call directly from the computer.
- Useful when your phone is in another room or you prefer using a headset connected to the PC.
B) Notification Handoff
- When your phone receives a floating (heads-up) notification while unlocked, it is also pushed to the computer.
- Clicking the notification on the PC can open a mirrored view of the phone screen and take you directly to the related app or page.
- Helps you stay on top of important alerts without constantly checking your phone.
C) Image Handoff
- Screenshots taken on the phone and photos captured with the camera are automatically sent to the computer.
- On the PC you can:
- Click the image to open it
- Click Copy to copy it to the clipboard
- Click Save to store it on the computer
- Limitations (as noted on the screen): The following cannot be handed off:
- Scrolling screenshots
- Area (partial) screenshots
- Screen recordings
- Burst photos
- Recorded videos
Requirements for Task Handoff to Work
- Both devices must be linked in Connection Center / Office Kit.
- Devices should normally be on the same Wi-Fi network.
- The computer needs the Office Kit client (or equivalent Vivo multi-device software) installed and running.
- The phone and computer should be signed into the same Vivo/iQOO account for the best experience.
Task Handoff is designed to reduce friction when moving between phone and computer, especially for calls, quick notifications, and newly captured images.
Transfer files between devices
- What it does: Provides a direct way to send files (photos, videos, documents, folders, etc.) between the phone and the computer.
- How it works: Opens a file transfer interface. You can select items on one device and send them to the other over the local network or the established connection.
- Use case: Quickly move large files or batches of photos without using USB cables, cloud storage, or third-party apps.
Notes sync
- What it does: Keeps notes synchronized between the phone’s Notes app and the computer.
- How it works: Notes created or edited on one device appear on the other (provided both are signed into the same account and the feature is active).
- Use case: Maintain a single set of notes that you can access and edit from either your phone or computer.
Start mirroring
- What it does: Begins screen mirroring from the phone to the computer (or in some cases the reverse, depending on support).
- How it works: The phone’s display is shown on the computer screen in real time, allowing you to view and sometimes control the phone from the larger display.
- Use case: Present content from your phone on the computer, watch phone videos on a bigger screen, or demonstrate apps.
Summary of the Features
| Feature | Main Purpose | Best For |
|---|---|---|
| Super Clipboard | Shared copy-paste | Moving text and links quickly |
| Task handoff | Continue work across devices | Seamless app continuation |
| Transfer files between devices | Direct file sharing | Moving photos, videos, documents |
| Notes sync | Synchronized notes | Keeping notes up to date |
| Start mirroring | Screen casting | Viewing phone content on PC |
These options form part of Vivo’s multi-device ecosystem (often linked with Office Kit). They work best when both devices are on the same Wi-Fi network and signed into the same Vivo/iQOO account. Availability of each feature can depend on the computer software (Office Kit or related client) being installed and up to date.
9.2) Add My Device – Options Explained (Origin OS 6 Connection Center)
This screen lets you manually add different types of devices to Connection Center so you can use cross-device features with them. Each category is optimized for a specific kind of hardware.

Computer
- What it is for: Windows or macOS computers (laptops and desktops).
- Typical features unlocked:
- File transfer
- Super Clipboard (shared copy-paste)
- Task handoff
- Notes sync
- Screen mirroring
- Office Kit integration
- How it usually works: Requires the Vivo Office Kit (or related multi-device software) installed on the computer. Both devices should be on the same Wi-Fi network and preferably signed into the same account.
Large-screen devices
- What it is for: Smart TVs, monitors, streaming devices, or other big displays that support screen casting / mirroring.
- Typical features unlocked:
- Full screen mirroring
- Local file mirroring (videos, photos, music)
- How it usually works: Devices on the same Wi-Fi network appear automatically, or you can connect via supported protocols (Miracast, etc.).
Tablet
- What it is for: Vivo/iQOO tablets or other compatible Android tablets.
- Typical features unlocked:
- File sharing
- Screen mirroring / extension
- Clipboard and notification sync
- Multi-device continuity features
- Note: Best results occur when the tablet is also from the Vivo/iQOO ecosystem and signed into the same account.
Earphones
- What it is for: Wireless earbuds and headphones (especially Vivo/iQOO TWS models).
- Typical features unlocked:
- Fast pairing
- Battery status display
- Touch control customization
- Seamless switching between devices
- How it usually works: Puts the earbuds into pairing mode, then selects them from the list. Official Vivo/iQOO earbuds offer the deepest integration.
Watch
- What it is for: Smartwatches (primarily Vivo Watch models).
- Typical features unlocked:
- Pairing and synchronization
- Health data sync (via Origin Health)
- Notification forwarding
- Call and message handling
- Note: Full functionality is usually limited to official Vivo wearable devices.
Printer
- What it is for: Wireless or network printers that support mobile printing.
- Typical features unlocked:
- Direct printing of documents, photos, and web pages from the phone
- How it usually works: Discovers printers on the same Wi-Fi network or via supported standards (such as IPP or manufacturer-specific protocols).
Summary Table
| Category | Main Purpose | Best With |
|---|---|---|
| Computer | Productivity & file continuity | Windows/macOS + Office Kit |
| Large-screen devices | Screen & media casting | Smart TVs / displays |
| Tablet | Multi-device Android continuity | Vivo/iQOO tablets |
| Earphones | Audio accessory management | Vivo/iQOO TWS earbuds |
| Watch | Wearable pairing & health sync | Vivo Watch |
| Printer | Mobile printing | Wi-Fi printers |
Tap the relevant category to begin the connection process for that type of device. Official Vivo/iQOO hardware generally receives the deepest feature support.
9.3) One-Tap Transfer Explained
One-tap transfer is Vivo/iQOO’s quick file-sharing feature that uses NFC (and falls back to Bluetooth/Wi-Fi) to send files between two compatible phones with almost no setup. It is designed for fast, close-range transfers.

Models supporting One-tap transfer via NFC
- What it is: A link that opens a list (or help page) of Vivo and iQOO phone models that officially support One-tap transfer using NFC.
- Why it matters: Not every device has full NFC support for this feature. Tapping the link shows which models can use the fastest NFC-based method.
Transfer files from phone to phone
- Description: “You can select files in File Manager or Albums on your phone, open file details, or enter the share panel, and transfer files to another phone via the NFC area.”
- How it works step-by-step:
- On the sending phone, open File Manager or Albums.
- Select the file(s) you want to send.
- Tap the Share button or open the file details and choose the share option.
- Bring the NFC area of your phone close to the NFC area of the receiving phone (usually near the top or back).
- The phones detect each other via NFC and begin the transfer (often switching to Bluetooth or Wi-Fi automatically for speed).
- Advantage: Extremely fast initiation — no need to search for devices, enter passwords, or open a separate app in most cases.
Unsure of where your phone’s NFC area is?
- What it is: A help link that shows the exact location of the NFC antenna on your specific phone model.
- Why it’s useful: NFC only works when the correct area of both phones is held close together (usually within a few centimeters). Knowing the precise spot avoids failed connection attempts.
Key Points
- Works best between two Vivo/iQOO phones that support the feature.
- NFC is used mainly for quick pairing; the actual file transfer usually happens over Bluetooth or Wi-Fi Direct for better speed.
- Both phones should have NFC turned on (normally found under Settings → More connections → NFC).
- Ideal for quickly sharing photos, videos, documents, or other files when the two phones are right next to each other.
One-tap transfer is one of the fastest ways to move files between compatible Vivo/iQOO devices without cables or complicated setup.
10) Print Settings Explained
This is the system printing page. It allows you to send photos and documents from your phone directly to a compatible wireless printer. Below is a clear explanation of every element on the screen.

Both the phone and the printer must be on the same Wi-Fi network (or use Wi-Fi Direct) for discovery and printing to work.
Print (Master Toggle)
- Current state: On
- What it does: Enables or disables the entire printing service on your phone.
- When turned on: The phone can discover printers and send print jobs.
- When turned off: Printing features are disabled and printers will not appear.
Print photos
- Description: “Select local photos in Albums to print”
- What it does: Opens your Gallery/Albums app so you can choose one or more photos stored on the phone.
- How it works: After selecting photos, you pick a printer, adjust settings (paper size, quality, color, etc.), and send the print job.
- Best for: Printing pictures directly without transferring them to a computer first.
Print documents
- Description: “Select local files in File Manager to print”
- What it does: Opens the File Manager so you can browse and select documents (PDF, Word, images, etc.) stored on the phone.
- How it works: Choose the file(s), select a printer, adjust print options, and start printing.
- Best for: Printing PDFs, office documents, or other files saved locally on the device.
Available printers
- What it shows: A list of compatible printers currently detected on your network.
- Refresh icon (circular arrow): Manually rescans for printers if none appear or if a newly powered-on printer is missing.
- How connection works:
- Ensure the printer is powered on and connected to the same Wi-Fi (or has Wi-Fi Direct enabled).
- Wait for it to appear in the list (or tap refresh).
- Tap the printer to select it for the current print job.
Quick Tips
- Most modern printers that support Google Cloud Print alternatives, IPP, or manufacturer mobile printing standards will appear here.
- For the most reliable results, keep both devices on the same 2.4 GHz or 5 GHz Wi-Fi band.
- Some printers require you to enable “Mobile Print”, “AirPrint-like”, or a brand-specific wireless printing feature in their own settings.
- Complex documents or high-resolution photos may take longer to process and send.
This page gives you a simple, built-in way to print directly from your phone without needing extra manufacturer apps in most cases.
10) Link to Windows Settings Explained
Link to Windows is Microsoft’s official feature that connects your iQOO/Vivo phone (running Origin OS 6) to a Windows 10 or Windows 11 PC. It appears under Settings → More connections (or sometimes under Bluetooth & devices). Once linked, you can manage phone content and some functions directly from your computer.
Main Purpose
It creates a bridge between your Android phone and Windows PC so you can:
- View and reply to phone notifications and messages on the PC
- Make and receive phone calls from the computer
- Access recent photos and screenshots
- Mirror the phone screen to the PC
- Run selected phone apps in windows on the desktop (on supported devices)
- Transfer files and share clipboard content (in newer versions)
- Remotely lock the PC from the phone (recent updates)
Typical Settings & Options You Will Find
| Setting / Option | What It Does |
|---|---|
| Link to Windows toggle | Master switch that enables or disables the entire service. |
| Sign in / Add computer | Starts the pairing process. You sign in with the same Microsoft account on both devices and usually scan a QR code. |
| Connected devices list | Shows the Windows PCs currently linked to your phone. You can disconnect or manage each one. |
| Features / Permissions | Individual toggles for Notifications, Messages, Calls, Photos, Apps, Screen mirroring, etc. You can turn specific features on or off. |
| Background running | Allows Link to Windows to stay active in the background so the connection remains ready. |
| Always-on connection or auto-connect options | Keeps the link active when both devices are on the same network or Bluetooth range. |
How to Set It Up (Typical Steps)
- On the Windows PC, open the Phone Link app (search for it in the Start menu).
- On the phone, go to Settings → More connections → Link to Windows (or open the Link to Windows app).
- Sign in with the same Microsoft account on both devices.
- Scan the QR code shown on the PC with your phone (or pair manually with a code).
- Grant the requested permissions (Notifications, Contacts, Phone, SMS, Storage, etc.).
- Once connected, the features become available in the Phone Link app on Windows.
Important Requirements
- Windows 10 (recent versions) or Windows 11
- Phone running Android 9 or higher (Origin OS 6 fully supports it)
- Both devices signed into the same Microsoft account
- Stable internet or same Wi-Fi network for the best experience
- Link to Windows app up to date on the phone
Relationship with Vivo’s Own Features
Origin OS 6 also includes Office Kit and Connection Center, which offer similar or complementary cross-device tools (file transfer, Super Clipboard, Task Handoff, screen mirroring, etc.).
- Link to Windows focuses on deep Microsoft Phone Link integration (notifications, calls, messages, apps).
- Office Kit / Connection Center focuses on Vivo’s own ecosystem features and often works with both Windows and macOS.
You can use both at the same time if desired.
Tips
- Keep the Link to Windows app allowed to run in the background and unrestricted by battery optimization for a reliable connection.
- For the richest feature set, keep both the phone app and the Windows Phone Link app updated.
- If features are missing, check the individual toggles inside Link to Windows settings and the Phone Link settings on the PC.
11) Office Kit Settings Explained
Office Kit is Vivo/iQOO’s official cross-device productivity platform. It connects your phone with Windows PCs and iPads for file access, screen mirroring, data sync, and other continuity features.

Key point: You must install the companion Office Kit software on the computer (or the iPad app) for the full experience. The phone side is built into Origin OS.
Device connectivity
- Description: “Sign in to your iQOO account on your phone to auto-connect to a nearby PC or iPad signed in to the same account and on the same network.”
- What it means: When both devices use the same iQOO/Vivo account and are on the same Wi-Fi network, they can detect and connect to each other automatically.
- The small question-mark icon opens additional help about account requirements and auto-connect conditions.
Connected Device Section
| Element | Explanation |
|---|---|
| Len****540 | The name of the currently linked computer (a Lenovo laptop in this example). The middle characters are hidden for privacy. |
| Connected status | Shows that the phone and computer are actively linked and ready to use Office Kit features. |
| Disconnect button | Immediately ends the connection with this device. You can reconnect later when needed. |
Main Features Enabled by Office Kit
Once connected, you typically gain access to:
- Cross-device file access and transfer
- Screen mirroring (phone to PC/iPad or vice versa)
- Super Clipboard (shared copy-paste)
- Task handoff
- Notes sync
- Data sync between devices
Requirements for Best Performance
- Same iQOO/Vivo account signed in on phone and computer/iPad
- Both devices on the same Wi-Fi network
- Office Kit software installed and running on the PC or iPad
- Bluetooth and Location services enabled (for discovery)
Office Kit is Vivo’s own multi-device ecosystem solution and works alongside (or as an alternative to) Microsoft’s Link to Windows. It is especially useful if you want deeper integration with Vivo’s file, clipboard, and continuity tools.
11.1) Office Kit Settings Explained

This is the settings page for Vivo’s Office Kit cross-device service. It controls how your phone connects to computers or iPads and how files are transferred.
Ask when the phone is connected
- Current state: Off
- Description: “Require phone confirmation for computer or iPad connections.”
- What it does:
- When turned On: Every time a computer or iPad tries to connect to your phone via Office Kit, you must manually approve the connection on the phone.
- When turned Off (current setting): The phone can automatically accept connections from trusted devices (especially those signed into the same iQOO/Vivo account and on the same network) without asking for confirmation each time.
- Recommendation:
- Keep it Off for convenience if you regularly use the same computer/iPad.
- Turn it On if you want stricter control and prefer to approve every new or reconnection attempt.
Transfer using data network
- Current state: On
- Description: “Allow sending and receiving files transferred from the cloud via data network.”
- What it does:
- Allows Office Kit to send and receive files using your mobile data connection when a Wi-Fi network is not available or when files are routed through the cloud.
- When enabled, file transfers can continue even if the phone and computer are not on the same local Wi-Fi network.
- Important notes:
- This can consume mobile data, especially with large files.
- When turned Off, transfers are limited to Wi-Fi (local network or Wi-Fi-based cloud transfer only).
- Recommendation:
- Keep it On if you want maximum flexibility and don’t mind possible data usage.
- Turn it Off if you are on a limited data plan or want to restrict transfers to Wi-Fi only.
Summary
| Setting | Current | Effect when On | Best for |
|---|---|---|---|
| Ask when the phone is connected | Off | Requires manual approval for each connection | Higher security / control |
| Transfer using data network | On | Allows file transfer over mobile data | Convenience when Wi-Fi is unavailable |
These two options give you control over connection security and data usage when using Office Kit with a computer or iPad.
12) NFC Settings Explained
This page controls the Near Field Communication (NFC) feature on your phone. NFC enables short-range wireless communication used for contactless payments, quick pairing, access cards, and One-tap file transfer.

NFC (Master Toggle)
- Current state: On
- What it does: Enables or disables the entire NFC hardware and related functions.
- When On: You can use contactless payments, read NFC tags, pair compatible devices quickly, use One-tap transfer, and access card features.
- When Off: All NFC functions are disabled (saves a very small amount of battery).
Contactless payments
- What it opens: The payment settings page (usually linked to Google Wallet / Tap & pay).
- What you can do here:
- Choose the default payment app (Google Wallet or another supported app)
- Set which card is used for contactless payments
- Manage payment preferences
- Requirement: NFC must be turned on, and a payment card must be added to the selected app.
Access Card
- Description: “Add your access card to your phone (only when Access Card is selected in Tap & pay).”
- What it does: Allows you to store certain physical access cards (office badges, building entry cards, transit cards in supported regions, etc.) digitally in the phone.
- How it works:
- You must first select “Access Card” as the active option in Tap & pay / Contactless payments.
- Then you can add and use the digital version of the card by tapping the phone on compatible readers.
- Note: Support depends on the card type and region. Not all physical access cards can be digitized.
Help
- Opens official help articles or tips about using NFC, troubleshooting connection issues, locating the NFC sensor, and supported features.
Quick Summary
| Setting | Purpose | When to Use |
|---|---|---|
| NFC toggle | Turns the NFC radio on/off | Keep On for payments & quick sharing |
| Contactless payments | Manage Google Wallet / Tap & pay | Everyday contactless payments |
| Access Card | Digitize supported physical access cards | Office/building entry (if supported) |
| Help | Official guidance and troubleshooting | When something doesn’t work |
NFC is essential for contactless payments, One-tap transfer, and quick device pairing. Keep the toggle on unless you specifically want to disable all short-range NFC functions.
12.1) Contactless Payments Settings Explained
This page manages how your phone handles NFC-based contactless payments (Tap & Pay). You can choose between SIM-based payment cards or wallet apps.

Top Illustration & Description
- Text: “Register card info in NFC-enabled apps and tap NFC devices like POS terminals, metro fare gates, bus readers, etc. to make payments.”
- Meaning: To use contactless payments, you must first add a payment card to a compatible app (such as Google Wallet or a banking app). Then simply hold the back of your phone close to any NFC payment reader.
SIM card payment settings
| Option | Current Status | Explanation |
|---|---|---|
| SIM card payment | “NFC payment card not detected” | This section is for carrier-based NFC payment cards that are built into or linked to your SIM card (common in some regions for transit or banking services). |
- Current status meaning: No compatible NFC payment card was detected on your SIM.
- If your carrier supports SIM-based contactless payments and you have an enabled SIM card, this section would allow you to activate or manage it.
- In most regions this feature is limited or unavailable, so the “not detected” message is normal.
Wallet app payment settings
This is where you choose which app (or feature) handles contactless payments when you tap the phone on a reader.
| Option | Current Status | Explanation |
|---|---|---|
| None | Unselected | No wallet app is set as the default for contactless payments. Tapping the phone on a reader will not trigger any payment. |
| Access Card | Selected | Uses the Access Card feature for NFC taps. This is intended for digital access cards (office badges, building entry, some transit cards) rather than regular credit/debit card payments. |
Important notes about the current selection:
- Because Access Card is selected, the phone will prioritize access-card functions when tapped on an NFC reader.
- For normal credit/debit card payments (Google Wallet, bank apps, etc.), you would normally select the corresponding wallet app here instead of “Access Card” or “None”.
- Only one option can be active at a time.
13) Cross-Device Services Explained
This is Google’s system-level feature that lets devices signed into the same Google Account work together more seamlessly. It powers several continuity and sharing functions across phones, tablets, Chromebooks, and other Google devices.

Use cross-device services (Master Toggle)
- Current state: On
- What it does: Enables or disables the entire cross-device services framework.
- When On: Your phone can be discovered by other devices signed into the same Google Account and can participate in features such as Call casting, Internet sharing, Quick Share improvements, and device groups.
- When Off: Most of the features listed below stop working (Quick Share still works independently).
What your devices can do
| Feature | Explanation |
|---|---|
| Call casting | Allows you to move an ongoing video call (for example from Google Meet or supported apps) from another device to this phone, or vice versa. |
| Internet sharing | Lets other devices signed into your Google Account automatically detect and connect to this phone’s hotspot or Wi-Fi network more easily. |

Device groups with this phone
- Username1@gmail.com
- Shows that this phone (named I2405) and 1 other device are already part of a device group under this Google Account.
- Devices in the same group can more easily find and interact with each other.
More device groups
- username2@gmail.com
- Another Google Account detected on the device.
- Option to “Add I2405 to this group” so the phone also joins the device group belonging to that second account.

How you’ll appear
- Device name: I2405
- This is the name other devices see when they discover your phone through cross-device services or Quick Share.
- You can usually change it in the main Quick Share or About phone settings.
Sharing permissions
Who can find and share with you
- Current setting: Contacts
- Meaning: Only people in your Google Contacts can discover your device and send you content via features such as Quick Share.
- Other possible options (depending on the device) usually include Everyone, Your devices only, or Hidden.
Information Note (bottom section)
When cross-device services are turned On:
- Apps can offer cross-device sharing options.
- People allowed by your sharing permission (currently Contacts) can find you in Quick Share and invite you to experiences.
- Other devices may see your device name and limited device information.
- Other devices signed into the same Google Account can recognize this phone until you turn the service off.
- Turning the service Off does not stop people from finding you through the normal Quick Share settings.
12.1) Set Up Your Device Group – Explained
This screen lets you create or manage a device group under your Google Account. Devices in the same group can use Google’s cross-device services (Call casting, Internet sharing, easier Quick Share, etc.) more seamlessly with each other.

Header Explanation
“Devices with the same Google Account can be added to a device group and use cross-device services together.”
This is the purpose of the screen — to group your devices so they can discover and work with one another.
Account Information
- Username
- username@gmail.com
This is the Google Account that will own the device group. All selected devices must be signed into this same account.
Add this device
| Device | Status | Meaning |
|---|---|---|
| I2405 | Checked (green ✓) | This is the current phone. It is already selected and will be added to the group. |
Invite your other devices
This section lists other devices that are signed into the same Google Account and can be invited into the group.
| Device | Status | Meaning |
|---|---|---|
| I2207 | Added | This device is already part of the group. |
| I2405 | Unchecked | Another entry for a device with the same name (possibly an older record or duplicate). Not selected. |
| Vivo iQOO Z7 5G | Checked (green ✓) | This device is selected and will be invited to join the group. |
Note at the bottom: “You’ll be asked to confirm on each device you select.” When you tap OK, a confirmation prompt will appear on the other selected devices (such as the iQOO Z7 5G). You must accept the invitation on those devices for them to join the group.
Bottom Buttons
| Button | What it does |
|---|---|
| Skip this group | Closes the setup without creating or modifying the device group. Cross-device services will still work, but without a formal group. |
| OK | Confirms the selection. The current device (I2405) and the checked devices (Vivo iQOO Z7 5G) will be added/invited to the group. |
14) iQOOshare Settings Explained
iQOOshare is Vivo/iQOO’s cross-platform file transfer tool. It allows your phone to send and receive files to/from both Android devices and iPhones nearby without using mobile data (it uses Wi-Fi Direct or a similar local connection).

Top Illustration & Description
- Text: “Send files to nearby iPhone and Android devices via ‘Share’ or receive files from them without using data.”
- Meaning:
- You can share files through the normal Android Share menu.
- Transfers happen over a local wireless connection, so no mobile data is consumed.
- Works with both iPhones and other Android phones (including non-Vivo devices).
iQOOshare (Master Toggle)
- Current state: On
- What it does: Enables or disables the entire iQOOshare service.
- When On: Your phone can appear as a receiver and can send files using iQOOshare.
- When Off: The feature is completely disabled and will not appear in the Share menu or accept incoming transfers.
Received files
- What it does: Opens a folder or list of all files you have received through iQOOshare.
- Useful for: Quickly finding photos, videos, documents, or other items that were sent to your phone via this feature.
Help & feedback
- Opens a help page with instructions on how to use iQOOshare.
- Also provides a way to send feedback or report problems to Vivo/iQOO.
User Agreement
- Displays the legal terms and conditions for using the iQOOshare service.
- Includes information about data handling, permissions, and user responsibilities.
How to use it:
- Keep the iQOOshare toggle On.
- On the sending device, select files → Share → choose iQOOshare (or the nearby device).
- On iPhones, the other person may need to install the complementary app or use the supported sharing method shown on screen.
- Accept the transfer on the receiving phone.
iQOOshare is particularly useful when you need to move files between an iQOO/Vivo phone and an iPhone without cables or cloud services.
OTG Setting Explained

OTG Toggle
- Current state: On
- Full description: “It can be better compatible with OTG devices and will automatically turn off after five minutes of inactivity.”
What OTG Means
OTG stands for On-The-Go. It allows your phone to act as a USB host so you can connect external devices directly to it, such as:
- USB flash drives
- External keyboards and mice
- Game controllers
- USB headphones
- Card readers
- Other USB peripherals (using a USB-C OTG adapter or cable)
What This Setting Does
| State | Effect |
|---|---|
| On (current) | Improves compatibility with OTG devices. The phone is more likely to correctly detect and work with USB peripherals. The feature automatically turns off after 5 minutes of inactivity to save battery. |
| Off | OTG support is disabled or runs in a more basic mode. Some devices may not be recognized properly. |
Key Points
- Turning this on can solve cases where a USB drive or other accessory is not detected.
- The automatic 5-minute timeout helps prevent unnecessary battery drain when no OTG device is in use.
- You still need a compatible USB-C OTG adapter or cable to connect standard USB-A devices.
- After the 5-minute auto-off, simply reconnect the device or toggle the setting again if needed.
Recommendation: Keep this setting On if you occasionally use USB flash drives, keyboards, or other OTG accessories with your phone.