Origin OS 6 Mobile Network settings covers access methods, key options (network type/preferred mode, 5G, APNs, dual-SIM management, roaming), quick toggles, troubleshooting, and related advanced controls. It draws from Vivo’s support documentation patterns, Origin OS navigation conventions, and common Android 16 behaviors observed on recent Vivo devices.

Accessing Mobile Network Settings
Primary path on Origin OS 6:
- Open the Settings app.
- Tap SIM card & mobile network (sometimes labeled Mobile network, Dual SIM & mobile network, or Network & internet → SIMs / Mobile network).
- Select the relevant SIM (SIM 1, SIM 2, or eSIM if present).
Dual-SIM and eSIM Considerations
Most modern Vivo devices support dual nano-SIM or nano-SIM + eSIM configurations with dual 5G standby on higher models.
- Designate the primary data SIM under SIM card & mobile network.
- 5G support is often stronger or exclusive on the primary slot on some hardware.
- eSIM setup usually occurs via Settings → SIM card & mobile network → Add SIM / Add eSIM (scan QR or enter activation details).
- Switch data SIMs quickly from Control Center once the shortcut is added.
Resetting Network Settings
If connectivity issues persist (no service, data failure, incorrect APNs):
- Go to Settings → System management → Reset (or search “reset”).
- Select Reset network settings (or Reset Wi-Fi, mobile & Bluetooth).
- Confirm. This clears saved Wi-Fi networks, Bluetooth pairings, VPN profiles, and mobile preferences without deleting personal data. Reconnect to Wi-Fi and reconfigure APNs afterward if needed.
Origin OS 6 Mobile Network Settings Explained

The screenshot shows the main Mobile network page in Origin OS 6 (Vivo’s Android 16-based interface). This is the central hub for controlling cellular data, monitoring usage, accessing 5G assistance, and managing the inserted SIM card. The layout uses clean card-style sections typical of Origin OS design.
Below is a detailed breakdown of every visible element, what it controls, practical use cases, and related tips.
Data Connection Section
This section handles the core on/off state of cellular internet and related 5G guidance.
- Data network (toggle switch, currently enabled/blue)
- This is the master switch for mobile data (cellular internet).
- When turned on, the phone can use the carrier’s network for browsing, apps, streaming, and background data.
- When turned off, the device is limited to Wi-Fi (or no internet if Wi-Fi is also off). Voice calls and SMS usually still work. Practical notes:
- Toggle it off to save data or battery when you only need calls/SMS.
- It can also be controlled quickly from the Control Center (swipe down from the top of the screen).
- On dual-SIM devices the toggle typically applies to the currently selected data SIM.
- This is the master switch for mobile data (cellular internet).
- 5G help (arrow to the right)
- This opens a dedicated help or information page about 5G.
Data Management Section
This section provides visibility into consumption and deeper controls over how data is used.
- Data used this month: 8.80 GB
- A live counter showing the total mobile data consumed in the current billing cycle (or calendar month, depending on how the phone is configured).
- The figure updates in near real time.
- It usually resets at the start of the next cycle.
- Tips:
- Tap the row if it is interactive (on some builds it opens a detailed usage graph).
- Compare this number against your carrier plan limit to avoid overage charges.
- Background apps, automatic updates, and high-resolution video are common heavy consumers.
- A live counter showing the total mobile data consumed in the current billing cycle (or calendar month, depending on how the phone is configured).
- Data management (arrow to the right)
- Opens a full data-usage dashboard and control panel. Common options inside include:
- Detailed breakdown by app (which apps used the most data)
- Daily/weekly/monthly graphs
- Data warning or limit alerts (set a custom threshold so the phone notifies you before you exceed your plan)
- Restrict background data for specific apps
- Mobile hotspot usage statistics
- Reset usage statistics Practical value: Use this regularly to identify data-hungry apps, set limits, and prevent surprise bills. It is one of the most useful tools for users on limited data plans.
- Opens a full data-usage dashboard and control panel. Common options inside include:
SIM Settings Section
This section manages the physical or electronic SIM card itself.
- SIM 1 (with SIM icon, phone number, and arrow)
- Displays the primary (or only) SIM card currently in use.
- The purple SIM icon indicates an active nano-SIM or eSIM.
- The number shown is the MSISDN (the phone number associated with the SIM).
- Tapping the row opens the detailed SIM settings page for that card.
- Typical options available after tapping SIM 1 include:
- Enable/disable the SIM
- Preferred network type (5G preferred, 4G/LTE only, 3G, etc.)
- Access Point Names (APN) for internet and MMS
- Data roaming toggle
- VoLTE / HD Voice and Wi-Fi Calling (VoWiFi) switches
- Network operators (manual selection)
- SIM name or nickname editing
- Carrier information and signal details
- Displays the primary (or only) SIM card currently in use.
- Notes for dual-SIM or eSIM devices:
- A second card (SIM 2 or eSIM) would appear as an additional row in this section.
- You can set which SIM is used by default for data, calls, and messages from the deeper SIM menu or from the main dual-SIM management page.
Overall Tips for Using This Screen
- Quick access alternatives: Long-press the mobile data icon in Control Center, or search “Mobile network” or “Data network” in Settings.
- Battery and performance: Leaving Data network on with 5G active in weak coverage areas can increase power consumption. Switch preferred network type (inside SIM 1) to 4G preferred when high speed is not required.
- Troubleshooting starting point: If you have no internet, first confirm Data network is on, then check Data used this month and open Data management or SIM 1 for further diagnosis.
- Privacy note: The phone number displayed is the one registered on the SIM; it is visible only on this device.
This screen is intentionally streamlined in Origin OS 6, pushing deeper configuration (network mode, APNs, roaming, etc.) one level deeper under the SIM entry. Tapping any row with an arrow reveals the next layer of controls.
Origin OS 6 Data Management Explained

The screenshot shows the Data management page in Origin OS 6. This screen provides a clear overview of mobile data consumption for the selected SIM and offers quick access to tools that help control, diagnose, and reduce data usage. It is reached from the main Mobile network page by tapping “Data management.”
Below is a detailed explanation of every visible element.
Header and Top Controls
- Gear/settings icon (top right)
- Opens additional configuration options for data management. Common items behind this icon include setting a monthly data limit/warning threshold, choosing the billing cycle start date, resetting statistics, or adjusting how usage is calculated.
- SIM 1 badge (green label in the top-right of the usage card)
- Indicates that the displayed statistics apply to SIM 1. On dual-SIM devices you can usually switch between SIMs here or on the previous screen so each card’s usage is tracked separately.
Main Usage Summary Card
- 8.80 GB – This month’s total
- The total mobile data consumed on the selected SIM during the current monthly cycle. The number updates in near real time.
- An information (i) icon next to the label usually opens a short explanation of how the total is calculated or when the cycle resets.
- Practical tip: Compare this figure regularly against your carrier plan allowance to avoid overage charges.
- Used today: 278.2 KB
- Data consumed since midnight (or the start of the current day) on mobile data. The very low value shown suggests minimal activity so far today.
- Average daily usage: 360.4 MB
- The calculated average amount of mobile data used per day across the current month. This helps you project whether you are on track to stay within your plan limit.
- View details >
- Opens a more granular breakdown. Typical content includes:
- Daily or hourly usage graphs
- Per-app data consumption ranking (which apps used the most data)
- Foreground vs background data split
- Ability to restrict individual apps from using mobile data
- Opens a more granular breakdown. Typical content includes:
This is the most useful place to identify data-hungry applications.
Quick-Access Tool Cards
- Network management (blue Wi-Fi/gear icon)
- Opens advanced network controls. Common options inside include:
- Restricting background data for specific apps
- Managing which apps can use mobile data when the screen is off
- Dual-SIM data switching rules
- App-level network permissions
- Sometimes hotspot or VPN-related settings
- Use this when you want fine-grained control over which apps consume data rather than just viewing statistics.
- Opens advanced network controls. Common options inside include:
- Wi-Fi diagnostics (green first-aid/medical kit icon)
- Launches tools that check Wi-Fi performance and connectivity. Typical features:
- Signal strength and channel analysis
- Speed or latency tests on the current Wi-Fi network
- Suggestions to improve Wi-Fi stability
- Detection of interference or weak coverage
- Although this is a Wi-Fi tool, it appears here because many users switch between Wi-Fi and mobile data; diagnosing Wi-Fi problems can reduce unnecessary mobile data use.
- Launches tools that check Wi-Fi performance and connectivity. Typical features:
- Data-saving mode
- Activates a system-wide data restriction feature. When enabled it typically:
- Limits background data for most apps
- Reduces image and video quality in supported apps (or blocks auto-play)
- Restricts automatic updates and syncing over mobile data
- May compress data on some services
- A further settings page is usually available after tapping the row so you can choose which apps are exempt from the restrictions. Enable this when traveling, near the end of a billing cycle, or on a limited data plan.
- Activates a system-wide data restriction feature. When enabled it typically:
Overall Guidance for This Screen
- The large monthly total and average daily usage give an at-a-glance health check of your data consumption.
- “View details” and “Network management” are the two most powerful tools for identifying and controlling heavy users.
- Data-saving mode is the fastest way to reduce future consumption without manually restricting every app.
- Wi-Fi diagnostics helps ensure you stay on Wi-Fi whenever possible, which is the most effective long-term data-saving strategy.
- On dual-SIM phones, always confirm the correct SIM badge is selected so the numbers match the plan you are monitoring.
This screen is designed for quick monitoring and one-tap access to the most common data-control features in Origin OS 6.
Origin OS 6 Data Management Settings Explained

The screenshot shows a secondary configuration page within Data management on Origin OS 6. This screen focuses on how the phone tracks, limits, and displays mobile data usage information. It is typically reached by tapping the gear/settings icon on the main Data management page or by selecting certain advanced options.
Below is a clear explanation of every visible setting.
Header
- Data management (with back arrow): Returns to the previous Data management overview screen that shows monthly totals, daily usage, and quick-access tools.
Billing and Limit Controls
- Billing date: 1
- Sets the day of the month when your data usage cycle resets (in this case, the 1st).
- Most carriers bill on a specific date each month. Matching the phone’s cycle to your actual billing date makes the “This month’s total” and average daily usage figures accurate.
- Tapping the row usually opens a calendar or number picker so you can change the reset day (for example, to the 15th or 28th).
- Why it matters: An incorrect billing date causes the monthly counter to reset on the wrong day, making it harder to stay within your plan limit.
- Sets the day of the month when your data usage cycle resets (in this case, the 1st).
- Data usage limit:
- Lets you set a monthly mobile-data ceiling and optional warning threshold. Typical options behind this entry include:
- Turning the limit on or off
- Choosing a maximum amount (for example, 10 GB or 20 GB)
- Setting a warning level (for example, alert at 80 % of the limit)
- Choosing what happens when the limit is reached (notification only, or automatically restrict data)
- Practical use: Highly recommended for users on limited data plans. The phone will notify you before you exceed your allowance and can help prevent overage charges.
- Lets you set a monthly mobile-data ceiling and optional warning threshold. Typical options behind this entry include:
Display and Notification Options
- Show real-time network speed (toggle currently on)
- When enabled, the phone displays the current upload and download speed in real time.
- The speed is usually shown in the status bar, notification shade, or as a floating indicator (exact placement depends on the Origin OS build and other display settings).
- Useful for checking whether you are getting expected 4G/5G performance or diagnosing slow connections.
- Turning it off can slightly reduce visual clutter and very minor system overhead.
- When enabled, the phone displays the current upload and download speed in real time.
- Show data usage (toggle currently on)
- Description shown: “Show data usage information at the bottom of the notification bar.”
- When enabled, a small data-usage summary (for example, today’s usage or monthly total) appears at the bottom of the notification shade / Control Center.
- This gives quick visibility without opening the Settings app.
- Disabling it removes the information line for a cleaner notification panel.
- Description shown: “Show data usage information at the bottom of the notification bar.”
Overall Guidance
These four controls let you align the phone’s tracking with your actual carrier bill, set protective limits, and decide how much live data information you want to see on screen.
For most users the recommended setup is:
- Correct billing date matching the carrier cycle
- A data usage limit set slightly below the plan allowance
- Real-time speed and notification-bar usage display turned on for easy monitoring
Changes take effect immediately. After adjusting the billing date or limit, return to the main Data management page to see the updated totals and averages.
Origin OS 6 Data Usage Limit Settings Explained
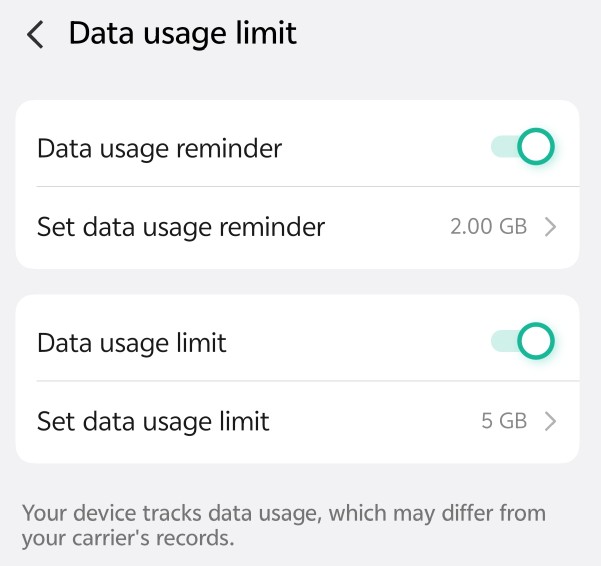
The screenshot shows the dedicated Data usage limit configuration page in Origin OS 6. This screen lets you set warning thresholds and hard caps on mobile data consumption so the phone can alert you or restrict usage before you exceed your plan. It is reached from the Data management settings by selecting “Data usage limit.”
Below is a clear explanation of every visible option.
Header
- Data usage limit (with back arrow): Returns to the previous Data management settings page. All changes made here take effect immediately for the selected SIM.
Reminder Controls
- Data usage reminder (toggle currently on)
- Enables or disables the early-warning notification system.
- When turned on, the phone monitors usage and sends a notification once the reminder threshold is reached.
- When turned off, no reminder alerts are issued (the hard limit below can still function independently).
- Recommended setting: Keep this enabled so you receive advance notice before approaching your plan allowance.
- Enables or disables the early-warning notification system.
- Set data usage reminder:
- Defines the specific data amount that triggers the reminder notification.
- In the example shown, the phone will alert you when 2.00 GB has been used in the current billing cycle.
- Tapping the row opens a number picker or slider so you can change the value (for example, to 5 GB, 8 GB, or any other amount).
- Practical tip: Set this value noticeably lower than your actual plan limit (commonly 70–80 % of the allowance) to give yourself time to adjust usage.
- Defines the specific data amount that triggers the reminder notification.
Hard Limit Controls
- Data usage limit (toggle currently on)
- Enables or disables the strict monthly data ceiling.
- When turned on, the phone enforces the limit you set below. Once the limit is reached, it can restrict further mobile data use or show a strong warning (exact behavior depends on the Origin OS build).
- When turned off, the phone only tracks usage and issues reminders (if enabled) but does not block data.
- Recommended setting: Enable this on limited or prepaid plans to prevent unexpected overage charges.
- Enables or disables the strict monthly data ceiling.
- Set data usage limit: 5 GB
- Sets the maximum amount of mobile data allowed in the current billing cycle.
- In the example, the hard limit is 5 GB.
- Tapping the row lets you choose a different value.
- Practical tip: Match this closely to your carrier plan (or set it slightly lower for safety). The reminder threshold should always be lower than this hard limit.
- Sets the maximum amount of mobile data allowed in the current billing cycle.
Important Disclaimer
- “Your device tracks data usage, which may differ from your carrier’s records.” This note appears at the bottom of the page.
- The phone measures data at the device level. Carriers may count usage differently (for example, due to rounding, network overhead, or billing system differences).
- Always treat the phone’s figures as a helpful guide rather than an exact match to your official bill.
- For the most accurate accounting, cross-check with your carrier’s app or website near the end of the cycle.
Overall Guidance
A typical effective setup looks like this:
- Data usage reminder → On, set to roughly 70–80 % of your plan
- Data usage limit → On, set to your actual plan allowance (or slightly below)
These controls work together with the billing date setting on the previous screen. After adjusting the values, return to the main Data management page to see how the monthly total and average daily usage relate to your new limits. The system will notify you at the reminder point and can help protect you from exceeding the hard limit.
Origin OS 6 Data Usage Detail Explained
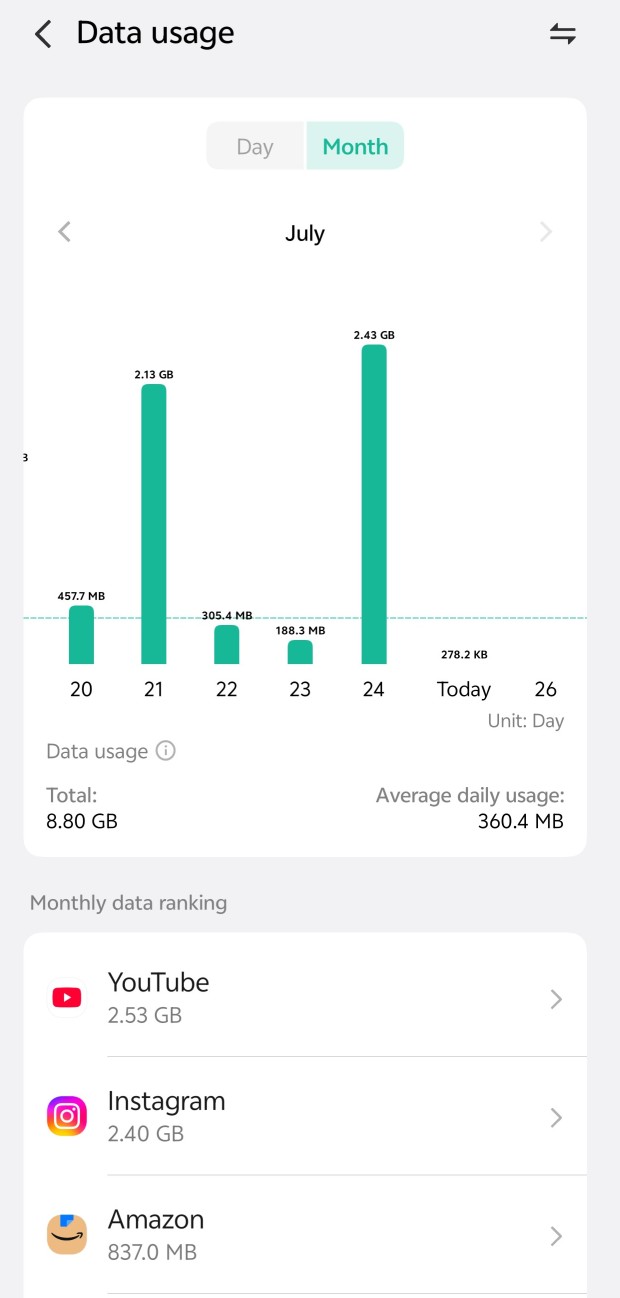
The screenshot shows the detailed Data usage view in Origin OS 6. This page provides a visual breakdown of mobile data consumption over time and ranks the apps that used the most data. It is typically reached by tapping “View details” on the main Data management screen.
Below is a clear explanation of every visible element and control.
Header and Top Controls
- Data usage (title with back arrow): Returns to the previous Data management overview page.
- Sort / filter icon (top right, two horizontal arrows): Opens options to change how the data is sorted or filtered (for example, by mobile network data usage, or WiFi data usage).
Time Period Selector
- Day / Month toggle (Month currently selected and highlighted in green)
- Switches the chart and statistics between daily and monthly views.
- Day shows hourly or detailed single-day breakdowns.
- Month (current selection) displays a bar chart of daily totals across the selected month. Tapping the other option immediately updates the entire page.
- Switches the chart and statistics between daily and monthly views.
- Month navigation (July with left and right arrows)
- Moves between months. The left arrow goes to the previous month; the right arrow goes to the next month (if data exists). The current month is shown in the center.
Usage Chart
- Bar chart (green vertical bars for days 20–26)
- Visual representation of mobile data used each day in the selected month.
- Each bar’s height corresponds to the amount of data consumed that day.
- Exact values are labeled above the taller bars (for example, 2.13 GB on the 21st, 2.43 GB on the 24th).
- Shorter bars show lower usage (457.7 MB, 305.4 MB, 188.3 MB, 278.2 KB).
- “Today” is clearly marked and currently shows very low usage (278.2 KB).
- A horizontal dashed line indicates the average daily usage level for quick visual comparison.
- The Y-axis is automatically scaled; the X-axis shows calendar days.
- Visual representation of mobile data used each day in the selected month.
- Unit: Day
- Confirms that the chart is displaying daily totals.
Summary Statistics
- Data usage (i)
- The information icon opens a short explanation of how the phone calculates the figures (device-side measurement that may differ slightly from carrier records).
- Total: 8.80 GB
- The cumulative mobile data used on the selected SIM for the entire current month so far.
- Average daily usage: 360.4 MB
- The calculated average amount of data consumed per day across the days shown in the chart. This helps project whether you are on track relative to your plan limit.
Monthly Data Ranking Section
- Monthly data ranking header
- Lists apps ranked by total mobile data consumed during the current month (highest first).
- Individual app rows (YouTube 2.53 GB, Instagram 2.40 GB, Amazon 837.0 MB)
- Each row shows:
- App icon and name
- Total data used by that app in the month
- Right arrow (>) that opens a deeper per-app detail page
- Tapping an app typically reveals:
- Daily breakdown for that app
- Foreground vs background usage split
- Option to restrict the app from using mobile data
- Option to restrict background data only
- Each row shows:
This ranking is one of the most useful tools for identifying which apps are responsible for the majority of your data consumption.
Overall Guidance
This screen combines a clear visual history (the bar chart) with actionable insights (the app ranking). Use the Month/Day toggle and month arrows to explore different periods. Tap any app in the ranking to investigate or restrict its data use. The total and average figures help you stay aware of overall consumption relative to the limits you may have set on the previous Data usage limit page.
All numbers are measured by the device and may differ slightly from your carrier’s official records.
Origin OS 6 Network Management Explained

The screenshot shows the Network management page in Origin OS 6. This screen gives fine-grained control over which installed apps are allowed to use mobile data (or Wi-Fi). It is typically reached from the Data management page by tapping “Network management.”
The page helps reduce unwanted data consumption, improve privacy, and prevent background apps from using the network when you do not want them to.
Header and Description
- Network management (title with back arrow)
- Returns to the previous Data management screen.
- Description text: “Once allowed, apps can use the data or Wi-Fi network.”
- Explains the purpose of the toggles. When an app’s switch is turned on, it is permitted to access the selected network type. When turned off, the app is blocked from using that network (it may still work on the other network type if allowed there).
Network Type Tabs
- Data network (currently selected, underlined in green)
- Controls which apps are allowed to use mobile data (cellular internet).
- This is the most important tab for users who want to limit data usage or prevent apps from consuming mobile data in the background.
- Wi-Fi (unselected)
- Switches the list to control which apps are allowed to use Wi-Fi.
- Tapping it shows the same app list but with independent on/off switches for Wi-Fi access. An app can be allowed on Wi-Fi but blocked on mobile data (or vice versa).
Master Control
- Allow all (toggle currently off)
- A global switch that turns network access on or off for every app in the list at once.
- When turned on, all apps are granted permission for the selected network type (Data network or Wi-Fi).
- When turned off (current state), you must enable apps individually. Practical tip: Leave this off if you want strict control. Turning it on is useful only when you want to quickly restore full access after restricting many apps.
- A global switch that turns network access on or off for every app in the list at once.
Individual App Controls
Each row shows an app icon, name, and a toggle switch. The switch determines whether that specific app can use the currently selected network (in this case, mobile data).
- Windy (toggle on)
- Weather app is currently allowed to use mobile data. It can fetch live weather updates, location-based forecasts, and maps over the cellular network.
- WPS Office (toggle off)
- Office suite is currently blocked from using mobile data. It cannot upload/download documents, sync files, or access cloud services while on mobile data (it can still do so on Wi-Fi if permitted on the Wi-Fi tab).
- WhatsApp (toggle on)
- Messaging app is currently allowed to use mobile data. It can send/receive messages, calls, media, and status updates over the cellular network.
Tapping any app row (or just using the toggle) immediately applies the change. Restricted apps will typically show a network error or “no connection” message when they try to use the blocked network type.
Overall Guidance and Best Practices
- Use the Data network tab to protect your mobile data plan by blocking non-essential or high-consumption apps.
- Keep essential apps (messaging, navigation, banking) enabled and turn off apps that only need occasional updates.
- Switch to the Wi-Fi tab to apply a different set of rules for Wi-Fi networks.
- The “Allow all” master switch is convenient for temporary full access but should normally stay off for better control.
- Changes take effect immediately and do not require a restart.
This page is one of the most effective tools in Origin OS 6 for managing data usage and preventing unwanted background network activity. After adjusting the toggles, you can return to the main Data management or Data usage screens to monitor the impact on overall consumption.
Origin OS 6 Data-Saving Mode Explained

The screenshot shows the Data-saving mode configuration page in Origin OS 6. This feature helps reduce mobile data consumption by restricting background activity for most apps while still allowing important ones to function normally. It is typically accessed from the main Data management screen.
Below is a detailed explanation of every visible element.
Header
- Data-saving mode (title with back arrow) Returns to the previous Data management page. All changes made here apply system-wide to mobile data usage.
Descriptive Text
- Main description: “Block apps from using data in the background when data is limited.”
- Explains the core purpose of the feature. When Data-saving mode is active, the system prevents most apps from sending or receiving data while they are running in the background. This significantly lowers overall mobile data usage, especially from apps that frequently sync, refresh, or check for updates.
- Note: “Non-trustlisted background apps won’t get new messages, and images load only when tapped.”
- Provides important behavioral details:
- Apps that are not on the trustlist will stop receiving new messages, notifications, or updates while in the background.
- Images and media in those apps will not load automatically; they appear only when you actively open the app and tap on them. This trade-off saves data but can delay notifications for non-essential apps.
- Provides important behavioral details:
Main Controls
- Data-saving mode (toggle currently off)
- The master switch that turns the entire feature on or off.
- Off (current state): Apps can use background data normally (subject to any individual restrictions set elsewhere).
- On: Background data is restricted for non-trustlisted apps. Foreground use (when the app is open on screen) remains unrestricted.
- When to enable it: Useful on limited data plans, while roaming, near the end of a billing cycle, or whenever you want to minimize mobile data consumption without manually restricting every app.
- The master switch that turns the entire feature on or off.
- App trustlist
- Opens a separate list where you can choose which apps are exempt from the background-data restrictions.
- Apps added to the trustlist continue to receive background data even when Data-saving mode is on.
- This is the key customization tool: keep messaging, navigation, or other critical apps on the trustlist so they still deliver timely updates. Tapping the row takes you to the full trustlist management screen.
- Opens a separate list where you can choose which apps are exempt from the background-data restrictions.
Bottom Note
- “Most-used social, music, and map apps are trustlisted by default to allow timely message delivery using background data.”
- Indicates that Origin OS automatically adds commonly used categories of apps (social media, music streaming, and maps/navigation) to the trustlist.
- This default behavior ensures that popular apps such as WhatsApp, Instagram, Spotify, Google Maps, or similar services continue to work smoothly in the background without requiring manual setup. You can still remove or add apps later via the App trustlist.
Overall Guidance
Data-saving mode offers a balanced way to cut mobile data use: it aggressively limits background activity for most apps while protecting the ones you rely on most.
Recommended approach:
- Turn the main toggle on when data is limited.
- Review the App trustlist and keep only essential apps enabled.
- Remember that images and new messages for non-trustlisted apps will be delayed until you open them.
Changes take effect immediately. After enabling the mode, you can monitor the impact on the main Data management or Data usage screens.
Origin OS 6 App Trustlist Explained

The screenshot shows the App trustlist page in Origin OS 6. This screen lets you choose which apps are exempt from the restrictions of Data-saving mode. It is reached by tapping “App trustlist” on the Data-saving mode page.
When Data-saving mode is enabled, only the apps you turn on here continue to receive background data normally. All other apps have their background data blocked.
Header and Description
- App trustlist (title with back arrow)
- Returns to the previous Data-saving mode screen.
- Three-dot menu (top right)
- Opens additional options. Common choices include selecting multiple apps at once, resetting the list to defaults, or searching for a specific app.
- Description text: “When Data-saving mode is on, apps with the switch turned on can still use data normally.”
- Clearly states the purpose of the list.
- Switch on = the app is trusted and can use mobile data in the background even while Data-saving mode is active.
- Switch off = the app is restricted; it cannot use background data when Data-saving mode is on (new messages and automatic image loading are delayed until the app is opened).
- Clearly states the purpose of the list.
Individual App Controls
Each row displays an app icon, name, and a toggle switch that controls trustlist status.
- ChatGPT (toggle currently off)
- The ChatGPT app is not on the trustlist.
- When Data-saving mode is enabled, it will be blocked from using background data. It will not receive new responses or updates until you open the app.
- Chrome (toggle currently on)
- Google Chrome is on the trustlist.
- Even when Data-saving mode is active, Chrome can still use mobile data in the background (for example, to sync tabs, prefetch pages, or update content). This keeps browsing smoother but uses more data.
- Clock (toggle currently off)
- The system Clock app is not on the trustlist.
- Background data access (such as automatic world-clock or weather updates if supported) will be restricted when Data-saving mode is on.
Tapping any toggle immediately adds or removes the app from the trustlist. The change takes effect at once.
Overall Guidance
The App trustlist is the customization layer for Data-saving mode.
Recommended approach:
- Keep only essential apps turned on (messaging, navigation, critical productivity tools, or browsers you actively use).
- Leave non-essential or high-data apps turned off so they cannot consume background data.
- Review the list periodically, especially after installing new apps.
Apps that are trustlisted by default (many social, music, and map apps) will already appear with their switches on. You can freely change any of them.
After adjusting the trustlist, return to the Data-saving mode page and enable the main toggle if you want the restrictions to apply. You can then monitor the effect on overall data usage from the main Data management screens.
Origin OS 6 SIM Settings Explained

The screenshot shows the detailed SIM settings page for the active SIM card in Origin OS 6. This is the central location for enabling or disabling the SIM, customizing its appearance, selecting network preferences, and controlling advanced calling and data features. It is reached by tapping the SIM entry (for example, “SIM 1”) on the main Mobile network screen.
Header
- SIM settings (title with back arrow)
- Returns to the previous Mobile network page. All changes made here apply only to the selected SIM.
Top Control
- Enable the SIM card (toggle currently on)
- Master switch that activates or deactivates the SIM.
- On: The SIM is fully active for calls, SMS, and mobile data (subject to other settings).
- Off: The SIM is disabled. The phone will not use it for any network services, which can save battery and prevent accidental data use. Use case: Temporarily disable a secondary SIM when you want to use only one line, or turn it off while traveling if you do not need that number.
- Master switch that activates or deactivates the SIM.
SIM Information Section
This section lets you personalize how the SIM appears in the system and view basic details.
- Edit name: SIM 1
- Allows you to change the display name of the SIM (currently “SIM 1”).
- Useful on dual-SIM phones so you can label cards clearly (for example, “Personal”, “Work”, or the carrier name). The custom name appears in quick settings, dual-SIM menus, and notifications.
- Color: Pink
- Assigns a color tag to the SIM for visual identification.
- Origin OS uses this color in the status bar, Control Center, and dual-SIM selection menus so you can quickly tell which line is active. Tapping opens a color picker.
- SIM card number: [phone number]
- Displays the phone number (MSISDN) registered on the SIM.
- Tapping may allow you to view more details or copy the number. This is read from the SIM itself and helps confirm the correct card is inserted.
SIM Settings Section
This is the core functional area for network behavior, roaming, and calling features.
- Network mode: 5G (preferred)
- Sets the preferred radio access technology.
- Current value prioritizes 5G whenever available, falling back to 4G/LTE, 3G, or 2G as needed.
- Tapping opens a list of options such as:
- 5G preferred / 5G auto
- 4G/LTE only or 4G preferred
- Lower generations (rarely needed)
- Considerations: 5G preferred offers the highest speeds but can increase battery use in areas with weak 5G coverage. Switching to 4G preferred often improves stability and battery life when 5G is inconsistent.
- Data roaming (toggle currently off)
- Description: “Use data network when roaming.”
- Controls whether the phone can use mobile data on other carriers’ networks when outside your home coverage area.
- Off (recommended for most users): Prevents unexpected roaming data charges.
- On: Allows data while roaming (only enable if your plan includes roaming or you accept the cost).
- Voice and SMS roaming are usually controlled separately by the carrier.
- VoNR HD call (toggle currently on)
- Description: “Use 5G calling services within SA network coverage areas.”
- Enables Voice over New Radio (VoNR), the native voice-calling technology for standalone (SA) 5G networks.
- When active and supported by both the device and carrier, calls stay on the 5G network instead of falling back to 4G (VoLTE) or older systems. This can provide clearer audio and faster call setup in true 5G SA areas.
- Note: Requires carrier support for 5G SA and VoNR. If the toggle is unavailable or greyed out, the carrier or current network does not support it.
- Carrier video calling (toggle currently on)
- Enables the carrier’s native video-calling service (distinct from apps such as WhatsApp or Google Meet).
- When supported, you can make video calls directly from the Phone app using the carrier’s infrastructure. Quality and availability depend on the carrier and network conditions.
- Wi-Fi calling: Call over Wi-Fi
- Opens settings for Wi-Fi Calling (also known as VoWiFi).
- This feature lets you make and receive calls and SMS over a Wi-Fi network when cellular signal is weak or unavailable.
- Tapping usually reveals a toggle to enable/disable the feature plus any carrier-specific options.
- Requirements: Both the phone and the carrier must support Wi-Fi Calling, and you must be connected to Wi-Fi.
- Carrier:
- Shows the current network operator and any special branding.
- Tapping may open carrier details, network selection (automatic vs manual), or operator-specific settings.
- On some builds this entry also allows manual network operator selection when automatic registration fails.
- Access point name (APN)
- Opens the list of Access Point Names used for mobile data and MMS.
- APNs tell the phone how to connect to the carrier’s data network.
- Most users never need to change these, but manual configuration or resetting to default is sometimes required after switching carriers, using an eSIM, or troubleshooting data connectivity issues.
- Common actions inside include viewing the active APN, adding a new one, or resetting to carrier defaults.
Overall Guidance
This SIM settings page combines personalization (name and color) with essential network and calling controls.
Typical recommended configuration for a modern 5G plan:
- Keep the SIM enabled.
- Network mode set to 5G preferred (or 4G preferred if battery or coverage is a concern).
- Data roaming left off unless needed.
- VoNR HD call and Carrier video calling left on if your carrier supports them.
- Wi-Fi calling enabled for better indoor coverage.
- APN left at the carrier default unless troubleshooting is required.
Changes to network mode, roaming, or calling features usually take effect within a few seconds. After adjusting settings, check the status bar for the expected network icon (5G, LTE, etc.) and test a call or data connection if needed.
This screen gives full control over how the SIM interacts with the mobile network while keeping everyday options easily accessible.