The DiskPart utility is a powerful command-line tool built into Microsoft Windows operating systems, starting with Windows 2000, designed for managing disks, partitions, volumes, and virtual hard disks (VHDs). It replaced the older fdisk utility and offers more advanced functionality, providing granular control over storage configurations compared to graphical tools like the Disk Management console (diskmgmt.msc). DiskPart is particularly useful for system administrators, IT professionals, and advanced users who need to perform disk management tasks through scripts or in environments where a graphical interface is unavailable, such as the Windows Recovery Environment (WinRE).
What is DiskPart?
DiskPart is a command-line disk partitioning and management utility that allows users to perform a wide range of operations on storage devices, including hard disk drives (HDDs), solid-state drives (SSDs), USB flash drives, and virtual hard disks. Unlike the Disk Management graphical tool, DiskPart operates through text-based commands, enabling precise control and automation of disk-related tasks. It is included in all Windows versions since Windows 2000, including Windows XP, Vista, 7, 8, 8.1, 10, 11, and Windows Server editions, as well as ReactOS.
DiskPart is particularly valuable in scenarios where:
- Graphical tools are insufficient for complex tasks (e.g., setting up mirrored volumes or managing disks in a pre-boot environment).
- Automation is required through scripting for repetitive disk management tasks.
- A drive has logical errors or corruption that prevents it from being managed through standard GUI tools.
However, DiskPart is a destructive tool, and commands like clean, delete, or format can result in permanent data loss if used incorrectly. It does not provide confirmation prompts for most operations, so caution is critical.
Key Features of DiskPart
DiskPart provides a comprehensive set of commands for managing storage, offering functionality that surpasses the Disk Management GUI. Its key features include:
- Partition Management:
- Create, delete, resize, and modify partitions (primary, extended, or logical).
- Set a partition as active (for MBR disks) to make it bootable.
- Convert partition styles between Master Boot Record (MBR) and GUID Partition Table (GPT).
- Volume Management:
- Manage volumes, including creating, formatting, extending, shrinking, or deleting them.
- Assign, change, or remove drive letters for volumes or partitions.
- Disk Management:
- Clean disks by removing all partitions and data (writing zeros to every sector).
- Convert disks between basic and dynamic types.
- Manage virtual hard disks (VHDs) and removable media like USB drives.
- Scripting and Automation:
- Execute commands via scripts for automating disk-related tasks, useful in deployment scenarios with tools like unattended Setup or Sysprep.
- Troubleshooting and Recovery:
- Fix corrupted partitions, repair Master Boot Records (MBRs), or recover disk configurations in the Windows Recovery Environment.
- Support for Advanced Configurations:
- Configure RAID volumes, striped volumes, or mirrored volumes.
- Manage disk attributes, such as setting a disk online or offline.
Unlike graphical tools, DiskPart does not operate in single-line mode; it uses a dedicated command interpreter where commands are entered sequentially at the DISKPART> prompt. This allows for precise, step-by-step management of storage objects.
How DiskPart Works
DiskPart operates by giving focus to a specific disk, partition, or volume before executing commands. This focus-based approach ensures that commands are applied to the intended object, reducing the risk of errors when managing multiple disks. Here’s how it works:
- Launch DiskPart:
- Open a Command Prompt or PowerShell with administrative privileges.
- Type diskpart and press Enter to enter the DiskPart command interpreter, which displays the DISKPART> prompt.
- List Objects:
- Use commands like list disk, list partition, or list volume to display available disks, partitions, or volumes. An asterisk (*) indicates the object currently in focus.
- Select an Object:
- Use select disk <number>, select partition <number>, or select volume <number> to give focus to a specific object. For example, select disk 1 sets Disk 1 as the target for subsequent commands.
- Execute Commands:
- Once an object has focus, commands like create, delete, format, or clean are applied to it. Focus remains on the selected object until a new object is selected or a command (e.g., create partition) automatically shifts focus.
- Exit DiskPart:
- Type exit to close the DiskPart interpreter and return to the standard command prompt.
DiskPart commands are executed immediately upon pressing Enter, and most do not prompt for confirmation, making it essential to verify the selected object before running destructive commands.
Common DiskPart Commands
DiskPart supports a wide range of commands (approximately 38 in total), each with specific parameters for managing disks, partitions, and volumes. Below is a detailed list of the most commonly used commands, along with their syntax and purpose, based on information from reliable sources.
sources.
- LIST:
- Purpose: Displays a list of disks, partitions, volumes, or virtual disks.
- Syntax:
- list disk: Lists all disks, showing their number, status, size, free space, and partition style (MBR or GPT). An asterisk (*) indicates the disk in focus.
- list partition: Lists partitions on the selected disk.
- list volume: Lists all volumes across all disks.
- Example:
- SELECT:
- Purpose: Sets focus on a specific disk, partition, or volume.
- Syntax:
- select disk <number>: Selects the specified disk (e.g., select disk 1).
- select partition <number>: Selects the specified partition on the current disk.
- select volume <number or letter>: Selects the specified volume by number or drive letter.
- Example:
- CREATE:
- Purpose: Creates partitions, volumes, or virtual disks.
- Syntax:
- create partition primary [size=<N>]: Creates a primary partition of size N megabytes (MB). If no size is specified, it uses all available space.
- create partition extended: Creates an extended partition for logical drives.
- create partition logical [size=<N>]: Creates a logical drive within an extended partition.
- Example:
- DELETE:
- Purpose: Deletes a partition or volume (cannot delete system, boot, or paging file volumes).
- Syntax:
- delete partition: Deletes the selected partition.
- delete volume: Deletes the selected volume.
- Example:
- FORMAT:
- Purpose: Formats a partition or volume with a specified file system (e.g., NTFS, FAT32).
- Syntax:
- format fs=<filesystem> [label=<name>] [quick]: Formats the selected partition or volume. The quick parameter skips a full format.
- Example:
- CLEAN:
- Purpose: Removes all partitions and data from the selected disk, writing zeros to every sector.
- Syntax: clean
- Example:
- Warning: This command permanently erases all data with no recovery option unless a backup exists.
- CONVERT:
- Purpose: Converts disk types or partition styles.
- Syntax:
- convert basic: Converts an empty dynamic disk to a basic disk (requires deleting all partitions first).
- convert dynamic: Converts a basic disk to a dynamic disk.
- convert gpt: Converts an MBR disk to GPT.
- convert mbr: Converts a GPT disk to MBR.
- Example:
- HELP:
- Purpose: Displays a list of available commands or help for a specific command.
- Syntax:
- help: Lists all commands.
- <command> /?: Shows detailed help for a specific command (e.g., create /?).
- Example:
DISKPART> help
- EXIT:
- Purpose: Exits the DiskPart interpreter.
- Syntax: exit
- Example:
DISKPART> exit







How to Use DiskPart: Step-by-Step Example
Below is a practical example of using DiskPart to clean, partition, and format a disk (e.g., a new USB drive or HDD). This process erases all data, so ensure you back up any important files before proceeding.
- Open DiskPart:
- Press Win + R, type cmd, and press Ctrl + Shift + Enter to open Command Prompt as an administrator.
- Type diskpart and press Enter to launch the DiskPart prompt.
- List and Select the Disk:

- Identify the target disk (e.g., Disk 1, a 32 GB USB drive).
- Select the disk:
- Clean the Disk:
- Remove all partitions and data:

- Convert to GPT (Optional):
- If you want to use the GPT partition style (recommended for modern systems or drives >2TB):

- Create a Primary Partition:
- Create a primary partition using all available space:

- Format the Partition:
- Format the partition with NTFS and assign a label:

- Assign a Drive Letter:
- Assign a drive letter (e.g., F):

- Exit DiskPart:


The USB drive is now cleaned, partitioned, formatted, and ready for use with the drive letter F:.
Common Use Cases for DiskPart
- Formatting a New Drive:
- Use DiskPart to initialize and format new HDDs, SSDs, or USB drives with a specific file system (e.g., NTFS or FAT32).
- Resizing Partitions:
- Extend or shrink partitions to adjust storage allocation without downtime, especially useful when a partition runs out of space.
- Converting Partition Styles:
- Convert MBR to GPT for modern UEFI systems or drives larger than 2TB, or vice versa for compatibility with legacy BIOS systems.
- Cleaning a Drive:
- Use the clean command to wipe a drive before selling, repurposing, or reinstalling an OS. This is critical for removing all partitions and data securely.
- Setting Up Bootable Partitions:
- Mark a partition as active (for MBR disks) to make it bootable, ensuring it contains the necessary boot files.
- Automating Disk Management:
- Create scripts to automate disk setup during Windows deployment, such as creating a recovery partition.
- Troubleshooting in Recovery Environments:
- Use DiskPart in the Windows Recovery Environment to repair disk configurations or prepare drives for system recovery.
MBR vs. GPT Partition Styles
DiskPart supports both Master Boot Record (MBR) and GUID Partition Table (GPT) partition styles, which determine how a disk’s partition information is stored:
- MBR:
- Traditional format, compatible with legacy BIOS systems.
- Supports up to 4 primary partitions or 3 primary + 1 extended partition with logical drives.
- Limited to 2TB disk sizes and lacks redundancy.
- Uses the active command to mark a bootable partition.
- GPT:
- Modern standard for UEFI systems.
- Supports disks larger than 2TB and up to 128 partitions.
- Includes a protective MBR and a backup partition table for recovery.
- Does not use the “active” partition concept; UEFI boot relies on an EFI System Partition (ESP).
Use convert gpt or convert mbr to switch between styles, but note that conversion requires wiping the disk unless third-party tools are used.
Best Practices and Cautions
- Backup Data:
- Always back up data before performing DiskPart operations, as commands like clean, delete, or format are irreversible without recovery tools.
- Verify Disk Selection:
- Double-check the disk number with list disk to avoid accidentally wiping the wrong drive. Disconnect unnecessary drives to minimize risk.
- Use Administrative Privileges:
- Run DiskPart with administrator rights to ensure full access to disk operations.
- Understand Command Impact:
- Familiarize yourself with commands using help or <command> /? to avoid unintended consequences. For example, clean wipes all data without confirmation.
- Scripting Tips:
- When scripting, use the noerr parameter to allow scripts to continue despite errors, and add a 15-second pause (timeout /t 15) between consecutive scripts to ensure proper execution.
- Avoid System/Boot Volumes:
- DiskPart cannot delete or modify system, boot, or paging file volumes to prevent system instability.
- Use Quick Format Sparingly:
- The quick parameter in format skips a full sector check, which is faster but less thorough. Use a full format for new or suspect drives to ensure integrity.
- Test in a Safe Environment:
- If unfamiliar with DiskPart, practice on a non-critical disk or virtual machine to avoid data loss.
Limitations of DiskPart
- No Undo Functionality:
- DiskPart does not offer an undo option for destructive operations like clean or delete.
- No Direct Formatting of Entire Disks:
- DiskPart cannot format an entire disk directly; you must create and select a partition first, then use the format command or rely on the Windows format command post-DiskPart.
- Complexity for Beginners:
- The command-line interface and syntax can be daunting for users unfamiliar with command prompts.
- Limited Data Recovery:
- While DiskPart can fix some logical errors, it is not a data recovery tool. Use third-party tools for recovering data after accidental deletion.
- MBR Limitations:
- For MBR disks, DiskPart is limited to 4 primary partitions, and converting to GPT requires wiping the disk.
DiskPart vs. Disk Management
The Disk Management GUI (diskmgmt.msc) is a simpler alternative for basic tasks but lacks the advanced capabilities of DiskPart:
- DiskPart Advantages:
- More granular control (e.g., setting up RAID or mirrored volumes).
- Supports scripting for automation.
- Works in recovery environments where GUI tools are unavailable.
- Can handle tasks like restriping data in RAID setups, unlike Disk Management’s concatenation approach.
- Disk Management Advantages:
- User-friendly graphical interface.
- Provides confirmation prompts for destructive operations, reducing the risk of errors.
- Suitable for casual users performing basic tasks like formatting or resizing partitions.
For advanced users, DiskPart is preferred for its precision and scripting capabilities, while Disk Management is better for quick, simple tasks.
Accessing DiskPart
DiskPart can be accessed in several ways, depending on the environment:
- Standard Windows Environment:
- Open Command Prompt or PowerShell as an administrator:
- Press Win + R, type cmd or powershell, and press Ctrl + Shift + Enter.
- Type diskpart and press Enter.
- Alternatively, search for “DiskPart” in the Windows Search bar, right-click, and select “Run as administrator.”
- Open Command Prompt or PowerShell as an administrator:
- Windows Recovery Environment (WinRE):
- Boot from a Windows installation media or recovery drive.
- Select “Repair your computer” > “Troubleshoot” > “Command Prompt.”
- Type diskpart to launch the utility.
- Windows Setup:
- During Windows installation, press Shift + F10 to open a Command Prompt and type diskpart.
Troubleshooting Common DiskPart Errors
- “No disk selected”:
- Ensure you’ve used select disk <number> before running commands. Always verify the disk number with list disk.
- “The disk is write-protected”:
- Use attributes disk clear readonly to remove the read-only attribute.
- “Cannot delete a protected partition”:
- System, boot, or paging file partitions cannot be deleted. Use a third-party tool or reinstall Windows to modify these.
- “DiskPart has encountered an error”:
- Check syntax with <command> /? or ensure the disk is online and accessible. Use online disk if the disk is offline.
- Conversion Errors:
- Converting between MBR and GPT or basic and dynamic disks requires the disk to be empty. Back up data and use clean before converting.
Concepts of disks, partitions, volumes, and virtual hard disks (VHDs)
1. Disks
Definition
A disk refers to a physical or virtual storage device recognized by the operating system, such as a hard disk drive (HDD), solid-state drive (SSD), USB flash drive, or virtual hard disk (VHD). Disks are the highest-level storage objects in DiskPart and serve as containers for partitions and volumes.
Key Characteristics
- Types:
- Physical Disks: Hardware devices like HDDs, SSDs, or USB drives.
- Virtual Disks: Emulated disks, such as VHDs or VHDXs, used in virtualization or for testing.
- Attributes:
- Online/Offline: Indicates whether the disk is accessible. DiskPart can set a disk online or offline using online disk or offline disk.
- Basic vs. Dynamic:
- Basic Disks: Use traditional partition tables (MBR or GPT) and support primary/extended partitions.
- Dynamic Disks: Support advanced volume types (e.g., mirrored, striped, or RAID-5) and are used for complex storage configurations, primarily in Windows Server environments.
- Partition Style:
- Master Boot Record (MBR): Supports up to 4 primary partitions (or 3 primary + 1 extended with logical drives), limited to 2TB disks, and used in legacy BIOS systems.
- GUID Partition Table (GPT): Supports up to 128 partitions, disks larger than 2TB, and is required for UEFI systems.
- Disk Number: Each disk is assigned a unique number (e.g., Disk 0, Disk 1) by Windows, visible in list disk.
DiskPart Operations
- List Disks: list disk displays all disks, their status, size, free space, and partition style.
- Select Disk: select disk <number> sets focus on a specific disk for further operations.
- Clean: clean removes all partitions and data, returning the disk to an unallocated state.
- Convert: convert gpt or convert mbr changes the partition style; convert dynamic or convert basic changes the disk type.
- Attributes: attributes disk set readonly or attributes disk clear readonly manages read-only status.
2. Partitions
Definition
A partition is a logical division of a disk’s storage space, defined in the disk’s partition table (MBR or GPT). Partitions are used to organize data and can contain one or more volumes. Each partition has a specific type (e.g., primary, extended, logical) and is typically formatted with a file system.
Key Characteristics
- Types:
- Primary Partition: A bootable or data partition on a basic disk (up to 4 on MBR, 128 on GPT).
- Extended Partition: A container for logical partitions on MBR disks (only one per disk, used when more than 4 partitions are needed).
- Logical Partition: A partition within an extended partition on MBR disks.
- System-Specific Partitions:
- EFI System Partition (ESP): Required for UEFI booting on GPT disks, typically FAT32.
- Recovery Partition: Stores recovery tools, often NTFS.
- Microsoft Reserved Partition (MSR): A small, unformatted partition on GPT disks for system use.
- Attributes:
- Active: On MBR disks, a primary partition marked as active is bootable (set with active).
- Size: Defined in megabytes (MB) or gigabytes (GB), with a minimum size (e.g., 100 MB for EFI partitions).
- File System: Partitions are formatted with file systems like NTFS, FAT32, or exFAT using format.
DiskPart Operations
- List Partitions: list partition shows partitions on the selected disk.
- Create Partition: create partition primary [size=<N>], create partition extended, or create partition logical creates partitions.
- Delete Partition: delete partition removes the selected partition (cannot delete system/boot partitions).
- Format: format fs=ntfs quick formats a partition with a specified file system.
- Active: active marks a primary partition as bootable on MBR disks.
Example: Creating and Formatting a Partition
DISKPART> select disk 1DISKPART> create partition primary size=102400DiskPart succeeded in creating the specified partition.
DISKPART> format fs=ntfs label="Data" quickDiskPart successfully formatted the volume.
DISKPART> assign letter=DDiskPart successfully assigned the drive letter.
Explanation: A 100 GB primary partition is created on Disk 1, formatted as NTFS with the label “Data,” and assigned the drive letter D:.
3. Volumes
Definition
A volume is a storage unit that contains a file system and is accessible to the operating system, typically as a drive letter (e.g., C:) or mount point. Volumes can span one or more partitions and are used on both basic and dynamic disks.
Key Characteristics
- Relationship to Partitions:
- On basic disks, a volume typically corresponds to a single partition (e.g., a primary partition formatted as NTFS).
- On dynamic disks, volumes can span multiple disks (e.g., striped, mirrored, or RAID-5 volumes).
- Types:
- Simple Volume: A single volume on one disk, equivalent to a partition on a basic disk.
- Spanned Volume: Combines space from multiple disks into one volume (data is written sequentially).
- Striped Volume: Distributes data across multiple disks for performance (no redundancy).
- Mirrored Volume: Duplicates data across two disks for redundancy.
- RAID-5 Volume: Stripes data with parity across three or more disks for performance and fault tolerance.
- Attributes:
- Drive Letter or Mount Point: Volumes are assigned a drive letter (e.g., D:) or mounted to a folder path.
- File System: Typically NTFS, FAT32, or exFAT, applied via formatting.
- Status: Can be Healthy, Failed, or Formatting, as shown in list volume.
DiskPart Operations
- List Volumes: list volume displays all volumes across all disks.
- Select Volume: select volume <number or letter> sets focus on a specific volume.
- Extend/Shrink: extend size=<N> or shrink desired=<N> adjusts volume size if space is available.
- Delete Volume: delete volume removes a volume (cannot delete system/boot volumes).
- Assign/Remove: assign letter=<letter> or remove letter=<letter> manages drive letters.
4. Virtual Hard Disks (VHDs)
Definition
A virtual hard disk (VHD) is a file that emulates a physical disk, used primarily in virtualization (e.g., Hyper-V) or for backup and testing purposes. VHDs (and their successor, VHDX) can be managed by DiskPart as if they were physical disks.
Key Characteristics
- File-Based: Stored as a .vhd or .vhdx file on a physical disk (e.g., C:\VHDs\test.vhd).
- Types:
- Fixed VHD: Allocates all space upfront (e.g., a 10 GB VHD uses 10 GB on disk immediately).
- Dynamic VHD: Expands as data is added, up to a specified maximum size.
- Differencing VHD: Stores changes relative to a parent VHD, useful for testing.
- Usage:
- Attached as a disk in Windows, appearing in list disk.
- Can be partitioned, formatted, and used like physical disks.
- Commonly used in virtual machines, backup solutions, or for creating portable storage environments.
- VHD vs. VHDX:
- VHD: Older format, supports up to 2TB, used in older Windows versions.
- VHDX: Newer format, supports up to 64TB, offers better performance and resilience (DiskPart supports both, but VHDX requires Windows 8 or later).
DiskPart Operations
- Create VHD: create vdisk file=<path> maximum=<size> creates a VHD file.
- Attach/Detach VHD: attach vdisk mounts the VHD as a disk; detach vdisk unmounts it.
- Manage VHD: Once attached, VHDs are treated like physical disks, supporting commands like create partition, format, and convert.
Relationships Between Disks, Partitions, Volumes, and VHDs
Understanding how these objects interact is key to using DiskPart effectively:
- Disks as Containers:
- Disks (physical or VHD) are the top-level objects that contain partitions or volumes.
- A disk must be selected before creating or managing partitions/volumes.
- Partitions vs. Volumes:
- On basic disks, a partition typically corresponds to a single volume (e.g., a primary partition formatted as NTFS becomes a volume with a drive letter).
- On dynamic disks, volumes can span multiple partitions or disks (e.g., a spanned volume combines space from two disks).
- Partitions define the physical layout in the disk’s partition table, while volumes are logical units with file systems.
- VHDs as Virtual Disks:
- VHDs appear as disks in DiskPart once attached, inheriting all disk-related commands (e.g., create partition, convert gpt).
- They are stored as files on a physical disk, which can itself have partitions and volumes.
- Hierarchy:
- Disk → Contains partitions (on basic disks) or volumes (on dynamic disks).
- Partitions → Formatted to create volumes with file systems.
- VHDs → Act as disks when attached, containing their own partitions and volumes.
Visual Representation
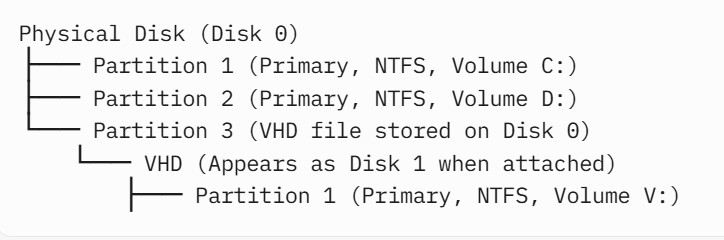
How DiskPart Manages These Objects
DiskPart uses a focus-based approach, requiring users to select an object (disk, partition, volume, or VHD) before performing operations. This ensures commands are applied to the correct target, reducing errors. Key workflows include:
- Disk Management:
- Select a disk (select disk <number>) to clean, convert, or view details.
- Example: clean wipes all partitions, preparing the disk for new configurations.
- Partition Management:
- Select a disk, then create or delete partitions (create partition primary, delete partition).
- Example: Creating a recovery partition and a main partition for Windows installation.
- Volume Management:
- Select a volume (select volume <number or letter>) to format, extend, or assign drive letters.
- Example: Extending a volume to use unallocated space.
- VHD Management:
- Create and attach a VHD (create vdisk, attach vdisk), then treat it like a physical disk.
- Example: Setting up a VHD for testing a new OS environment.
Difference between Partition and Volume
The terms partition and volume are often used interchangeably in casual contexts, but in technical terms, especially within the context of storage management tools like DiskPart, they have distinct meanings and roles.
Definitions
- Partition:
- A partition is a logical division of a physical disk’s storage space, defined in the disk’s partition table (either Master Boot Record (MBR) or GUID Partition Table (GPT)).
- It represents a contiguous region of the disk, identified by a starting offset and size, and is typically used to organize the disk into manageable sections.
- Partitions are low-level structures managed at the disk level and are not necessarily accessible to the operating system until formatted with a file system and associated with a volume.
- Examples: Primary partitions, extended partitions (MBR only), EFI System Partition (ESP), Microsoft Reserved Partition (MSR).
- Volume:
- A volume is a storage unit that has been formatted with a file system (e.g., NTFS, FAT32, exFAT) and is accessible to the operating system, typically with a drive letter (e.g., C:) or mount point.
- A volume is a higher-level abstraction that may correspond to a single partition, multiple partitions (e.g., spanned or striped volumes on dynamic disks), or even a portion of a partition.
- Volumes are what the operating system and applications interact with to store and retrieve data.
- Examples: A C: drive containing the Windows operating system, a D: drive for data storage, a USB drive with a FAT32 volume.
Technical Differences
The differences between partitions and volumes can be categorized based on their structure, functionality, and management in systems like Windows and DiskPart. Below is a detailed breakdown:
1. Structural Level
- Partition:
- Exists at the disk level in the partition table (MBR or GPT), defining physical boundaries on the disk (start offset and size).
- Defined by entries in the disk’s partition table, which specify the type (e.g., primary, ESP, MSR) and location.
- Does not inherently have a file system; it is a raw division of disk space until formatted.
- Example: On a GPT disk, a partition might be a 100 MB EFI System Partition (ESP) or a 222 GB primary partition, as seen in list partition.
- Volume:
- Exists at the operating system level, representing a formatted storage unit with a file system.
- May correspond to a single partition, multiple partitions (e.g., spanned volumes), or a virtual construct on dynamic disks.
- Recognized by the operating system with a drive letter, mount point, or volume label, making it accessible for file operations.
- Example: A volume might be the C: drive (NTFS, 222 GB) corresponding to a primary partition, as seen in list volume.
2. File System
- Partition:
- Does not inherently have a file system; it is a raw allocation of disk space.
- Requires formatting (e.g., with format fs=ntfs) to become part of a volume with a file system.
- Some partitions, like the Microsoft Reserved Partition (MSR) on GPT disks, are not formatted and do not host volumes.
- Example: A newly created primary partition (create partition primary) has no file system until formatted.
- Volume:
- Always has a file system (e.g., NTFS, FAT32, exFAT, ReFS) to organize data for the operating system.
- Created when a partition is formatted, or when multiple partitions are combined (e.g., spanned or striped volumes).
- Example: A volume labeled “Data” with NTFS, accessible as D:, as seen in detail volume.
3. Relationship to Disks
- Partition:
- Directly tied to a single physical or virtual disk, as defined in the disk’s partition table.
- Limited to the disk’s boundaries and cannot span multiple disks unless the disk is converted to a dynamic disk.
- Example: A 931 GB disk might have three partitions (ESP, MSR, primary), each confined to that disk.
- Volume:
- Can span multiple partitions or disks, especially on dynamic disks (e.g., spanned, striped, mirrored, or RAID-5 volumes).
- On basic disks, a volume typically corresponds to a single partition, but on dynamic disks, it can aggregate space across disks.
- Example: A spanned volume might combine space from Disk 1 and Disk 2, as seen in extend disk=<N>.
4. Management in DiskPart
- Partition:
- Managed with commands like create partition primary, delete partition, select partition, and detail partition.
- Operations focus on the physical layout of the disk (e.g., creating, resizing, or deleting partitions).
- Limited to basic disks for most operations; partitions on dynamic disks are managed indirectly via volumes.
- Example: list partition shows partitions like System (100 MB), Reserved (16 MB), or Primary (222 GB).
- Volume:
- Managed with commands like select volume, format, extend, shrink, assign, and detail volume.
- Operations focus on the logical storage unit (e.g., formatting, assigning drive letters, or extending).
- Works on both basic and dynamic disks, with more flexibility on dynamic disks (e.g., spanning multiple disks).
- Example: list volume shows volumes like C: (Windows, NTFS) or D: (Data, NTFS).
5. Limitations and Constraints
- Partition:
- MBR Disks: Limited to four primary partitions (or three primary and one extended with logical partitions).
- GPT Disks: Support up to 128 partitions, but partitions like ESP or MSR have specific roles and cannot be used for general data.
- Cannot be directly accessed by the operating system until formatted and associated with a volume.
- Example: The MSR on a GPT disk is unformatted and not associated with a volume.
- Volume:
- Requires a file system to be accessible, limiting it to formatted partitions or dynamic disk configurations.
- On basic disks, a volume is typically tied to a single partition; on dynamic disks, it can span multiple partitions or disks.
- System, boot, or paging file volumes have restrictions (e.g., cannot be extended or deleted while Windows is running).
- Example: A volume cannot be extended if it uses FAT32, as seen in extend limitations.
6. Boot and System Roles
- Partition:
- On MBR disks, a primary partition can be marked “active” for booting (e.g., using active).
- On GPT disks, the EFI System Partition (ESP) is used for UEFI booting, identified by its GUID in detail partition.
- Partitions like the MSR or Recovery partitions have specific system roles but are not directly bootable.
- Example: The ESP on a GPT disk is formatted as FAT32 and hosts UEFI boot files.
- Volume:
- A volume can be designated as the system or boot volume, visible in detail volume (e.g., “Info: System” or “Info: Boot”).
- The system volume contains boot loader files (e.g., ESP on GPT disks), while the boot volume contains the operating system (e.g., C:).
- Example: The C: volume on a GPT disk is typically a basic data partition formatted as NTFS, marked as the boot volume.
7. Visibility in Operating System
- Partition:
- Not directly visible in File Explorer or applications unless formatted and assigned a drive letter or mount point.
- System partitions (e.g., ESP, MSR) are often hidden and not assigned drive letters, as seen in detail partition (Hidden: Yes).
- Example: The MSR on a GPT disk is not visible in File Explorer.
- Volume:
- Visible to the operating system and applications as a drive (e.g., C:, D:) or mount point, assuming it has a file system and drive letter.
- Can be accessed for file operations once assigned a letter or mount point via assign.
- Example: A volume labeled “Data” (D:) is visible in File Explorer after formatting and assignment.

Practical Examples in DiskPart
Below are examples illustrating the differences between partitions and volumes in DiskPart, focusing on GPT disks, as discussed in prior responses.
Example 1: Creating a Partition and Volume
Scenario: Create a new primary partition on a GPT disk and format it to create a volume.


Outcome:
- Partition: Partition 1 is a 100 GB basic data partition on Disk 1, with no file system initially.
- Volume: After formatting, Partition 1 becomes Volume 1 (D:), a 100 GB NTFS volume, accessible to the operating system.
Example 2: Spanned Volume on Dynamic Disks
Scenario: Create a spanned volume across two partitions on dynamic disks.


Outcome:
- Partition: Partition 1 on Disk 1 is a 100 GB basic data partition, part of the spanned volume.
- Volume: Volume S is a 200 GB NTFS spanned volume, combining Partition 1 on Disk 1 and a partition on Disk 2.
Practical Implications in DiskPart
- Command Scope:
- Use list partition and detail partition to manage the physical layout of a disk (e.g., creating or deleting partitions).
- Use list volume and detail volume to manage logical storage units (e.g., formatting, extending, or assigning drive letters).
- Example: create partition primary creates a partition, but format and assign create and configure the volume.
- GPT Disks:
- On GPT disks, partitions like the ESP or MSR are not always associated with volumes (e.g., MSR is unformatted), while primary partitions typically host volumes.
- Example: The ESP (Partition 1) hosts a FAT32 volume, but the MSR (Partition 2) has no volume, as seen in detail partition.
- Dynamic Disks:
- On dynamic disks, volumes can span multiple partitions or disks, making detail volume more comprehensive than detail partition for understanding the full storage structure.
- Example: A spanned volume shows multiple disks in detail volume, but detail partition only shows the partition on the selected disk.
- Troubleshooting:
- Use detail partition to check GPT partition types (e.g., ESP, Recovery) for UEFI boot issues.
- Use detail volume to verify file system health or drive letter assignments for access issues.
How DiskPart Works: Technical Mechanics
DiskPart’s functionality is based on a combination of user commands, Windows storage APIs, and direct interaction with disk hardware. Below is a detailed breakdown of its operational mechanics:
1. Command-Line Interface
- DiskPart runs in a CLI environment, accessed by typing diskpart in a Command Prompt or WinRE.
- It operates in an interactive mode, where users enter commands one at a time, or in script mode, where commands are executed from a text file (e.g., diskpart /s script.txt).
- Commands are executed sequentially, with each command performing a specific action on the selected storage object.
2. Focus-Based Operation
- DiskPart uses a focus model, requiring users to select a specific object (disk, partition, volume, or VHD) before performing operations.
- Commands like SELECT DISK, SELECT PARTITION, SELECT VOLUME, or SELECT VDISK set the focus, ensuring operations target the correct object.
- Example: To format a partition, you must first select the disk (select disk 1), then the partition (select partition 1), before running format.
3. Interaction with Storage Stack
- DiskPart communicates with the Windows Volume Manager and disk drivers to perform low-level operations like creating partition tables, formatting file systems, or modifying disk attributes.
- It interacts with the disk’s partition table (MBR or GPT) to define partitions and with the file system layer to create volumes (e.g., NTFS, FAT32).
- For dynamic disks, it works with the Logical Disk Manager (LDM) to manage spanned, striped, or mirrored volumes.
4. Command Execution
- Each command sends instructions to the storage subsystem, which updates the disk’s partition table, file system, or metadata.
- Commands are executed immediately, with feedback provided (e.g., “DiskPart succeeded in creating the specified partition”).
- The NOERR parameter allows commands to continue despite errors, useful in scripts.
5. Error Handling
- DiskPart provides detailed error messages (e.g., “There is not enough usable free space”) to help diagnose issues.
- System-critical objects (e.g., boot volumes) may be locked, requiring operations in WinRE or the use of override parameters.
6. Scripting and Automation
- DiskPart supports scripting by executing commands from a text file using diskpart /s <filename>.
- This enables automation of repetitive tasks, such as deploying identical disk configurations across multiple systems.
DiskPart Command Structure
DiskPart commands are categorized by function, as discussed in the prior response on common commands. Here’s a summary of how they fit into the operational workflow:
- Listing Commands (LIST DISK, LIST PARTITION, LIST VOLUME, LIST VDISK):
- Display available objects to identify targets.
- Example: list disk shows all disks, helping you select the correct one.
- Selection Commands (SELECT DISK, SELECT PARTITION, SELECT VOLUME, SELECT VDISK):
- Set focus on a specific object.
- Example: select disk 1 focuses on Disk 1 for subsequent operations.
- Creation Commands (CREATE PARTITION PRIMARY, CREATE PARTITION EFI, CREATE VDISK):
- Create new partitions or VHDs.
- Example: create partition primary size=102400 creates a 100 GB partition.
- Modification Commands (FORMAT, EXTEND, SHRINK, DELETE, ASSIGN, ACTIVE):
- Modify partitions or volumes (e.g., formatting, resizing, assigning drive letters).
- Example: format fs=ntfs quick formats a partition as NTFS.
- Information Commands (DETAIL DISK, DETAIL PARTITION, DETAIL VOLUME, DETAIL VDISK):
- Provide detailed attributes for verification.
- Example: detail partition shows partition type and offset.
- Management Commands (CLEAN, CONVERT, ATTACH/DETACH VDISK):
- Manage disk properties or VHDs.
- Example: convert gpt changes a disk to GPT.
Workflow of DiskPart
A typical DiskPart workflow follows these steps:
- Launch DiskPart:
- Open Command Prompt as administrator and type diskpart, or access it in WinRE.
- List Objects:
- Use list disk, list partition, or list volume to identify the target object.
- Select Object:
- Use select disk, select partition, or select volume to set focus.
- Perform Operations:
- Execute commands like create, format, extend, or delete.
- Verify Results:
- Use detail or list commands to confirm changes.
- Exit:
- Type exit to close DiskPart.
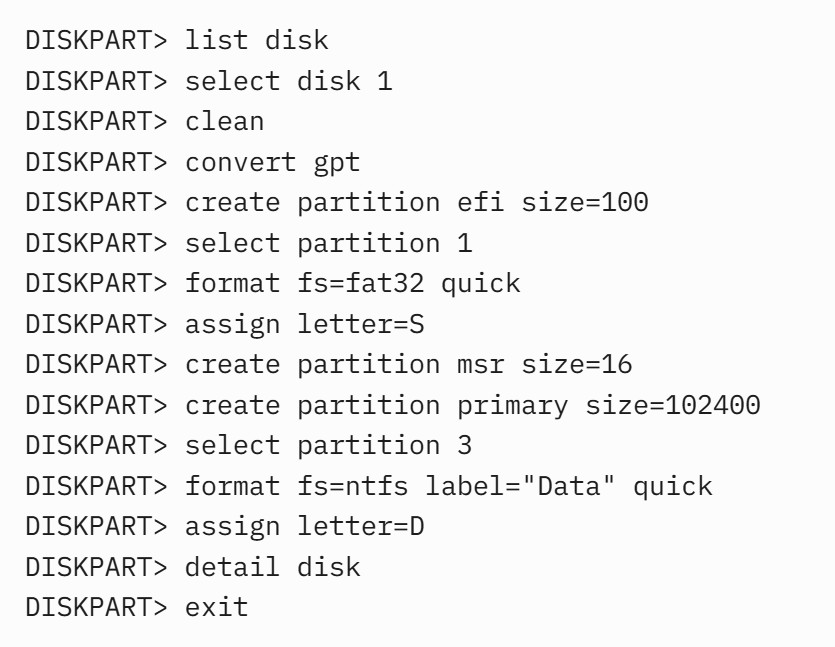
Outcome: Disk 1 is initialized as GPT with an ESP, MSR, and a 100 GB NTFS data volume (D:).
Technical Details of DiskPart Operations
1. DiskPart and Partition Tables
- MBR Disks:
- Uses a 512-byte partition table at the start of the disk, supporting up to four primary partitions (or three primary and one extended with logical partitions).
- Commands like create partition primary and active modify the MBR table.
- GPT Disks:
- Uses a GUID-based partition table, supporting up to 128 partitions and disks larger than 2TB.
- Commands like create partition efi and create partition msr create GPT-specific partitions with unique GUIDs (e.g., {c12a7328-f81f-11d2-ba4b-00a0c93ec93b} for ESP).
2. File System Operations
- DiskPart’s format command interacts with the Windows file system drivers to create file system structures (e.g., NTFS, FAT32, exFAT).
- NTFS: Supports large files, compression, encryption, and permissions; used for system and data volumes.
- FAT32: Limited to 4 GB file sizes and 32 GB partitions in DiskPart; used for bootable USBs.
- exFAT: Supports large files and cross-platform compatibility; ideal for removable drives.
3. Dynamic vs. Basic Disks
- Basic Disks:
- Use standard partition tables (MBR or GPT).
- Volumes are tied to single partitions.
- Example: create partition primary creates a single-partition volume.
- Dynamic Disks:
- Use the Logical Disk Manager (LDM) database for advanced volume types (spanned, striped, mirrored, RAID-5).
- Commands like extend disk=<N> allow volumes to span multiple disks.
- Example: convert dynamic enables spanned volume creation.
4. VHD Management
- DiskPart treats VHDs as virtual disks, allowing partitioning and formatting.
- Commands like create vdisk, attach vdisk, and detach vdisk manage VHD lifecycle.
- Example: create vdisk file=”C:\VHDs\test.vhd” maximum=10240 type=fixed creates a 10 GB VHD.
5. UEFI and GPT Support
- DiskPart is critical for UEFI systems, which require GPT disks with an EFI System Partition (ESP).
- Commands like create partition efi and format fs=fat32 set up the ESP for UEFI booting.
- Example: The ESP is typically 100 MB, FAT32, and hidden
Use Cases for DiskPart
DiskPart’s command-line interface, scripting support, and ability to operate in both standard and recovery environments make it ideal for various disk management tasks. Below are the primary use cases, organized by category, with detailed explanations and examples.
1. Initializing and Formatting New Drives
Use Case: Setting up a new hard disk drive (HDD), solid-state drive (SSD), or USB drive for use by initializing it, creating partitions, and formatting it with a desired file system (e.g., NTFS or FAT32).
Why Use DiskPart?
- DiskPart allows precise control over partition sizes and types.
- It can initialize disks in environments without a GUI, such as Windows Setup or Recovery Environment.
- It supports automation for setting up multiple drives consistently.
Example: Initialize and format a new 1TB SSD as a GPT disk with a single NTFS partition.


Outcome: The SSD is now a GPT disk with a single NTFS partition, labeled “Data,” and accessible as drive D:.
2. Resizing Partitions or Volumes
Use Case: Extending or shrinking partitions to reallocate disk space, such as expanding a system partition running low on space or creating unallocated space for a new partition.
Why Use DiskPart?
- DiskPart can extend or shrink volumes without requiring third-party tools, provided there is contiguous unallocated space (for extending) or sufficient free space (for shrinking).
- It’s useful in recovery environments where GUI tools are unavailable.
Example: Shrink a 500 GB volume by 100 GB to create unallocated space, then create a new partition in that space.


Outcome: The original 500 GB volume is reduced to 400 GB, and a new 100 GB NTFS partition is created as drive E:.
Note: Extending a volume requires contiguous unallocated space immediately following the volume. Use extend size=<N> to expand a volume into available space.
3. Converting Between MBR and GPT Partition Styles
Use Case: Converting a disk from Master Boot Record (MBR) to GUID Partition Table (GPT) for compatibility with modern UEFI systems or to support drives larger than 2TB, or converting from GPT to MBR for legacy BIOS systems.
Why Use DiskPart?
- DiskPart can perform conversions without third-party tools, though it requires wiping the disk.
- It’s essential for preparing disks during Windows installation or system upgrades.
Example: Convert a 4TB disk from MBR to GPT for use with UEFI.


Outcome: The disk is now a GPT disk, ready for use with UEFI systems or large partitions.
Warning: Converting between MBR and GPT with DiskPart requires a full disk wipe. Use third-party tools like MiniTool Partition Wizard for non-destructive conversion if data preservation is needed.
4. Wiping a Drive for Repurposing or Disposal
Use Case: Completely erasing a disk’s data before repurposing it (e.g., for a new OS installation) or disposing of it to prevent data recovery.
Why Use DiskPart?
- The clean command securely wipes all partitions and data by writing zeros to every sector, making recovery difficult without specialized tools.
- It’s faster and more reliable than formatting alone for secure erasure.
Example: Wipe a disk before selling a computer.
- Identify the disk to wipe:
- Select the disk:
DISKPART> select disk 1
- Clean the disk:
DISKPART> clean

Outcome: All partitions and data on Disk 1 are erased, leaving it unallocated and ready for repurposing or safe disposal.
Note: For enhanced security, use clean all to perform a full wipe, which takes longer but ensures data is overwritten more thoroughly.
5. Creating Bootable Partitions or Drives
Use Case: Setting up a partition or USB drive as bootable for installing Windows or running a recovery environment, particularly for MBR disks where an “active” partition is required.
Why Use DiskPart?
- DiskPart can mark a partition as active (for MBR disks), which is necessary for BIOS-based systems to boot.
- It’s commonly used during Windows Setup to prepare bootable media.
Example: Create a bootable USB drive for Windows installation.


Outcome: The USB drive is formatted as FAT32, marked as active, and ready to receive Windows installation files, making it bootable for BIOS systems.
Note: For UEFI systems, use GPT and format the partition as FAT32 with an EFI System Partition (ESP) instead of marking it active.
6. Automating Disk Configuration for Deployment
Use Case: Automating disk setup during large-scale Windows deployments, such as in enterprise environments or for creating standardized system images with tools like Sysprep or Microsoft Deployment Toolkit (MDT).
Why Use DiskPart?
- DiskPart supports scripting, allowing consistent disk configurations across multiple systems.
- It’s integral to unattended Windows installations, where disk setup is scripted in answer files.
Example: Script to create a GPT disk with a recovery partition and a Windows partition.
- Create a text file (e.g., diskpart_setup.txt):
- Run the script:
diskpart /s diskpart_setup.txt

Outcome: Disk 0 is wiped, converted to GPT, and configured with a 300 MB recovery partition (T:) and a main Windows partition (C:), ready for Windows installation.
Best Practice: Add a timeout /t 15 command between consecutive scripts to ensure proper execution, and always verify the disk number to avoid data loss.
7. Troubleshooting and Repairing Disk Issues in Recovery Environments
Use Case: Fixing disk-related issues, such as corrupted partitions or missing boot configurations, in the Windows Recovery Environment (WinRE) or during Windows Setup.
Why Use DiskPart?
- DiskPart is available in WinRE and Windows Setup, where GUI tools are inaccessible.
- It can repair partition tables, assign drive letters, or prepare disks for system recovery.
Example: Assign a drive letter to a system partition in WinRE to run repair commands.
- Boot into WinRE (e.g., from a Windows installation USB, select “Repair your computer” > “Troubleshoot” > “Command Prompt”).
- Launch DiskPart:
- Select the Windows volume (no drive letter assigned):
DISKPART> select volume 0
- Assign a drive letter:
DISKPART> assign letter=C
- Exit DiskPart and run repair commands (e.g., chkdsk C: /f or bootrec /rebuildbcd).

Outcome: The Windows volume is accessible as C:, enabling further troubleshooting with tools like chkdsk or bootrec.
8. Managing Dynamic Disks and Advanced Configurations
Use Case: Configuring dynamic disks for advanced storage setups, such as striped, mirrored, or RAID-5 volumes, in Windows Server or high-end workstation environments.
Why Use DiskPart?
- DiskPart can convert basic disks to dynamic disks and create complex volume types that Disk Management may not support fully.
- It provides precise control over volume creation and extension across multiple disks.
Example: Create a mirrored volume across two disks.


Outcome: A’s mirrored volume is created across Disk 0 and Disk 1, providing data redundancy.
Note: Mirrored volumes require identical unallocated space on both disks and are supported only on dynamic disks.
9. Managing Virtual Hard Disks (VHDs)
Use Case: Creating and managing VHDs for virtualization or backup purposes, such as attaching a VHD for testing or recovery.
Why Use DiskPart?
- DiskPart can create, attach, and detach VHDs, allowing users to treat them as physical disks.
- It’s useful for scripting VHD operations in automated workflows.
Example: Create and attach a 10 GB VHD.

Outcome: A 10 GB VHD is created, attached, and formatted as a GPT disk with an NTFS partition, accessible as V:.
10. Fixing Drive Letter Conflicts or Missing Drive Letters
Use Case: Resolving issues where a volume lacks a drive letter or has an incorrect one, preventing access in File Explorer.
Why Use DiskPart?
- DiskPart can assign, change, or remove drive letters, even for volumes not visible in Disk Management.
- It’s effective in recovery scenarios where drive letters are missing.
Example: Assign a drive letter to a volume without one.
- List volumes:
- Select the volume without a drive letter:
DISKPART> select volume 1
- Assign a drive letter:
DISKPART> assign letter=D

Outcome: The “Data” volume is now accessible as D: in File Explorer.
LIST Command Usage
The LIST command in the DiskPart utility is a fundamental command used to display information about storage objects such as disks, partitions, volumes, and virtual hard disks (VHDs). It is essential for identifying and verifying the objects you want to manage before performing operations like selecting, creating, formatting, or deleting. Since DiskPart operates in a focus-based manner, the LIST command helps users ensure they are targeting the correct disk, partition, or volume, reducing the risk of errors, especially with destructive commands like clean or delete.
Overview of the LIST Command
The LIST command in DiskPart displays a list of objects within a specific category (e.g., disks, partitions, volumes, or VHDs). It is typically one of the first commands used in a DiskPart session to gather information about the system’s storage configuration. The command is non-destructive, meaning it only retrieves and displays information without modifying any objects. The LIST command is particularly useful for:
- Identifying the number, status, size, and other attributes of disks, partitions, or volumes.
- Verifying the correct object before selecting it with the select command.
- Troubleshooting disk-related issues in environments like the Windows Recovery Environment (WinRE).
The LIST command has four primary variations, each targeting a different type of storage object:
- list disk
- list partition
- list volume
- list vdisk
Each variation provides specific details about the corresponding objects, and the output includes an asterisk (*) to indicate the object currently in focus (if any).
Syntax and Variations
The LIST command’s syntax is straightforward, with no additional parameters required for its basic usage. Below are the four variations:
- LIST DISK
- Purpose: Displays a list of all disks (physical and virtual) recognized by the system.
- Syntax: list disk
- Output: Shows disk number, status, size, free space, dynamic disk status, and partition style (MBR or GPT).
- LIST PARTITION
- Purpose: Displays a list of partitions on the currently selected disk.
- Syntax: list partition
- Output: Shows partition number, size, type, offset, and whether it’s active or in focus.
- Requirement: A disk must be selected using select disk <number> before running this command.
- LIST VOLUME
- Purpose: Displays a list of all volumes across all disks.
- Syntax: list volume
- Output: Shows volume number, drive letter, label, file system, type, size, status, and additional information.
- LIST VDISK
- Purpose: Displays a list of all virtual hard disks (VHDs or VHDXs) attached to the system.
- Syntax: list vdisk
- Output: Shows VHD file details, including file path, size, type (fixed or dynamic), and status.
Note: The list command by itself (without a specific object) is not valid; you must specify disk, partition, volume, or vdisk. For detailed help, use help list or list <object> /? (e.g., list disk /?) at the DiskPart prompt.
Detailed Explanation of Each LIST Command
Below, I’ll explain each LIST command variation, including its output format, key fields, and practical use cases, with examples to illustrate their application.
1. LIST DISK
- Purpose: Provides an overview of all disks, helping you identify the disk to select for further operations (e.g., cleaning, partitioning, or converting).
- Output Fields:
- Disk ###: The disk number assigned by Windows (e.g., Disk 0, Disk 1).
- Status: Indicates the disk’s state (e.g., Online, Offline, No Media).
- Size: Total capacity of the disk (e.g., 223 GB, 931 GB).
- Free: Unallocated space available for new partitions.
- Dyn: Indicates if the disk is dynamic (marked with an asterisk * if true).
- Gpt: Indicates if the disk uses GPT partitioning (marked with an asterisk * if true; otherwise, MBR).
- Asterisk (*): Marks the disk currently in focus (if any).
- Example:

- Explanation:
- Disk 0 is a 223 GB disk with no free space, using MBR (no GPT asterisk).
- Disk 1 is a 931 GB disk, fully unallocated, using GPT, and currently selected (marked with *).
- Disk 2 is a removable drive with no media inserted (e.g., an empty card reader).
- Use Case: Before wiping a disk to create new partitions, use list disk to confirm the disk number and ensure you’re targeting the correct drive (e.g., to avoid accidentally cleaning the system disk).
2. LIST PARTITION
- Purpose: Shows the partitions on the currently selected disk, useful for verifying partition layout before creating, deleting, or formatting partitions.
- Output Fields:
- Partition ###: The partition number (e.g., Partition 1).
- Type: The partition type (e.g., Primary, Extended, Logical, System, Reserved).
- Size: The partition’s size (e.g., 300 MB, 100 GB).
- Offset: The starting position of the partition on the disk (in KB, MB, or GB).
- Asterisk (*): Marks the partition currently in focus (if any).
- Requirement: You must select a disk with select disk <number> before running list partition.
- Example:

- Explanation:
- Disk 0 has three partitions: a 100 MB EFI System Partition (ESP), a 16 MB Microsoft Reserved Partition (MSR), and a 222 GB primary partition.
- Partition 3 is currently selected (marked with *).
- Use Case: Use list partition to check the partition layout before deleting a partition or formatting it for a new file system.
3. LIST VOLUME
- Purpose: Displays all volumes across all disks, providing details about their drive letters, labels, and file systems. This is useful for managing volumes, assigning drive letters, or troubleshooting access issues.
- Output Fields:
- Volume ###: The volume number (e.g., Volume 0).
- Ltr: The drive letter assigned to the volume (e.g., C, D), or blank if none.
- Label: The volume’s name (e.g., “Windows,” “Data”).
- Fs: The file system (e.g., NTFS, FAT32, exFAT).
- Type: The volume type (e.g., Partition, Removable, DVD-ROM).
- Size: The volume’s size (e.g., 223 GB).
- Status: The volume’s state (e.g., Healthy, Failed, Formatting).
- Info: Additional details (e.g., System, Boot, Page File).
- Asterisk (*): Marks the volume currently in focus (if any).
- Example:

- Explanation:
- Volume 0 (C:) is the system volume, formatted as NTFS, with 222 GB.
- Volume 1 (D:) is a data volume, currently selected (marked with *).
- Volume 2 (R:) is a recovery partition, 300 MB.
- Volume 3 is a USB drive with no drive letter, formatted as FAT32.
- Use Case: Use list volume to identify a volume that needs a drive letter assigned or to check the health of volumes during troubleshooting.
4. LIST VDISK
- Purpose: Lists all attached virtual hard disks (VHDs or VHDXs), showing their file paths and properties. This is useful for managing VHDs in virtualization or testing scenarios.
- Output Fields:
- Vdisk ###: The VHD number.
- File: The path to the VHD file (e.g., C:\VHDs\test.vhd).
- State: The VHD’s status (e.g., Attached, Detached).
- Size: The maximum size of the VHD.
- Type: Fixed, Dynamic, or Differencing.
- Parent: The parent VHD file (for differencing VHDs).
- Asterisk (*): Marks the VHD currently in focus (if any).
- Example:

- Explanation:
- Vdisk 0 is a 10 GB fixed VHD, attached and appearing as a disk.
- Vdisk 1 is a 20 GB dynamic VHDX, currently selected (marked with *).
- Use Case: Use list vdisk to verify which VHDs are attached before detaching or managing them (e.g., creating partitions within a VHD).
Best Practices for Using the LIST Command
- Always Start with LIST: Use list disk, list partition, or list volume at the beginning of a DiskPart session to understand the current storage configuration and avoid targeting the wrong object.
- Verify Focus: Check for the asterisk (*) in the output to confirm which object (if any) is currently selected before running commands.
- Combine with SELECT: Use LIST to identify the correct object number or letter, then use select disk, select partition, or select volume to set focus.
- Use in Recovery Environments: In WinRE or Windows Setup, use list volume to identify volumes when troubleshooting boot issues or assigning drive letters.
- Cross-Check with Other Tools: Compare list disk or list volume output with Disk Management (diskmgmt.msc) or wmic diskdrive list to ensure accuracy.
Example : Checking Partition Layout Before Formatting
Scenario: You need to format a specific partition on Disk 0 but want to verify its number and type first.
- Select the disk:
DISKPART> select disk 0
- List partitions:
- Select and format the primary partition:
DISKPART> select partition 3DISKPART> format fs=ntfs label="Windows" quickDISKPART> assign letter=C

Outcome: The list partition command confirms Partition 3 is the primary partition to format, preventing accidental changes to the system or reserved partitions.
SELECT Command Usage
The SELECT command in the DiskPart utility is a core command used to set focus on a specific storage object—such as a disk, partition, volume, or virtual hard disk (VHD)—before performing operations like creating, formatting, deleting, or modifying. DiskPart operates in a focus-based manner, meaning most commands require an object to be selected first to ensure actions are applied to the correct target. The SELECT command is critical for navigating and managing storage configurations accurately, preventing errors, especially with destructive commands like clean or delete.
Overview of the SELECT Command
The SELECT command in DiskPart shifts the focus to a specific object, making it the target for subsequent commands. It is a non-destructive command that does not modify the object but is a prerequisite for most DiskPart operations. The SELECT command is used in conjunction with the list command, which displays available objects (disks, partitions, volumes, or VHDs) and their identifiers (e.g., numbers or letters). By selecting the correct object, users can ensure precise management of storage resources, which is critical in scenarios like partitioning a new drive, formatting a volume, or attaching a VHD.
The SELECT command has four primary variations, each targeting a different type of storage object:
- select disk
- select partition
- select volume
- select vdisk
Each variation requires an identifier (e.g., a disk number, partition number, volume number or letter, or VHD file path) to specify the target object. The selected object remains in focus until another SELECT command is issued or the DiskPart session ends.
Syntax and Variations
The SELECT command’s syntax is straightforward but requires the correct identifier for the target object. Below are the four variations:
- SELECT DISK
- Purpose: Sets focus on a specific disk (physical or virtual) identified by its disk number.
- Syntax: select disk <number>
- <number>: The disk number from the list disk output (e.g., 0, 1).
- Alternative: select disk system (selects the system disk) or select disk next (selects the next disk in the list).
- Output: Confirms the disk is now selected (e.g., “Disk 1 is now the selected disk”).
- SELECT PARTITION
- Purpose: Sets focus on a specific partition on the currently selected disk, identified by its partition number.
- Syntax: select partition <number>
- <number>: The partition number from the list partition output (e.g., 1, 2).
- Output: Confirms the partition is now selected (e.g., “Partition 1 is now the selected partition”).
- Requirement: A disk must be selected first using select disk.
- SELECT VOLUME
- Purpose: Sets focus on a specific volume, identified by its volume number or drive letter.
- Syntax: select volume <number | letter>
- <number>: The volume number from the list volume output (e.g., 0, 1).
- <letter>: The drive letter assigned to the volume (e.g., C, D).
- Output: Confirms the volume is now selected (e.g., “Volume 1 is now the selected volume”).
- SELECT VDISK
- Purpose: Sets focus on a specific virtual hard disk (VHD or VHDX), identified by its file path.
- Syntax: select vdisk file=<path>
- <path>: The full path to the VHD file (e.g., “C:\VHDs\test.vhd”).
- Output: Confirms the VHD is now selected (e.g., “Virtual Disk is now selected”).
Note: For detailed help, use help select or select <object> /? (e.g., select disk /?) at the DiskPart prompt. The SELECT command does not accept wildcards or partial matches, so the identifier must be exact.
Detailed Explanation of Each SELECT Command
Below, I’ll explain each SELECT command variation, including its purpose, usage, and practical considerations, with examples to illustrate their application.
1. SELECT DISK
- Purpose: Selects a disk (physical or attached VHD) for operations like cleaning, converting (MBR to GPT or basic to dynamic), or creating partitions. This is often the first step in disk management tasks.
- Key Considerations:
- Use list disk to identify the disk number, size, and status before selecting.
- An asterisk (*) in the list disk output indicates the currently selected disk.
- Selecting the wrong disk can lead to data loss with commands like clean.
- Special options like select disk system (system disk) or select disk next (next disk in sequence) are useful in scripts or recovery environments.
- Example:
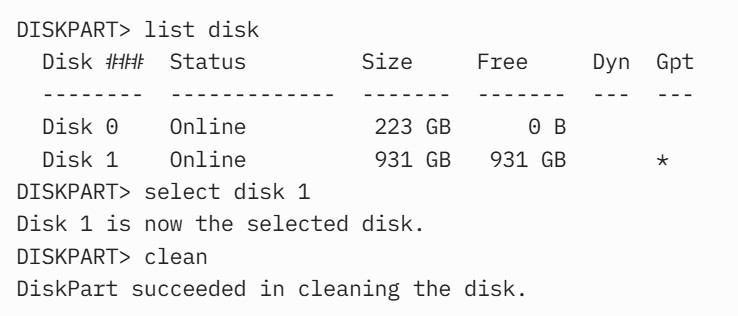
- Explanation:
- list disk shows Disk 1 as a 931 GB GPT disk with full free space.
- select disk 1 sets focus on Disk 1, allowing the clean command to wipe it.
- Use Case: Use select disk when initializing a new SSD, converting a disk to GPT, or wiping a drive for repurposing.
2. SELECT PARTITION
- Purpose: Selects a partition on the currently selected disk for operations like formatting, deleting, or marking as active (for MBR disks). This is critical for partition-specific tasks.
- Key Considerations:
- A disk must be selected first with select disk, or DiskPart returns an error (“No disk is currently selected”).
- Use list partition to identify the partition number and type (e.g., Primary, System).
- Cannot select partitions on dynamic disks directly; use select volume for dynamic disk volumes.
- System or boot partitions may have restrictions (e.g., cannot be deleted).
- Example:

- Explanation:
- select disk 0 sets focus on Disk 0.
- list partition shows three partitions, with Partition 3 being a 222 GB primary partition.
- select partition 3 sets focus on Partition 3, which is then formatted as NTFS.
- Use Case: Use select partition when formatting a specific partition, marking it active for booting, or deleting an unwanted partition.
3. SELECT VOLUME
- Purpose: Selects a volume (across any disk) for operations like assigning a drive letter, extending, shrinking, or formatting. This is useful for managing logical storage units with file systems.
- Key Considerations:
- Volumes can be identified by number (from list volume) or drive letter (e.g., C, D).
- Works for both basic and dynamic disks, unlike select partition, which is limited to basic disks.
- Use list volume to check the volume’s status (e.g., Healthy) and ensure it’s not a system or boot volume, which may have restrictions.
- Useful in recovery environments to assign drive letters to volumes not visible in File Explorer.
- Example:

- Explanation:
- list volume shows Volume 1 as a 400 GB NTFS volume with no drive letter.
- select volume 1 sets focus on Volume 1, which is then assigned the drive letter D:.
- Use Case: Use select volume to assign a drive letter to a volume not appearing in File Explorer or to extend a volume into unallocated space.
4. SELECT VDISK
- Purpose: Selects a virtual hard disk (VHD or VHDX) for operations like attaching, detaching, or managing its partitions. This is essential for virtualization or testing scenarios.
- Key Considerations:
- Requires the full file path to the VHD (e.g., “C:\VHDs\test.vhd”), as shown in list vdisk.
- Once selected, the VHD can be attached (attach vdisk) and treated like a physical disk for partitioning or formatting.
- Use list vdisk to verify the VHD’s status (Attached or Detached) before selecting.
- Example:

- Explanation:
- list vdisk shows a 10 GB fixed VHD that is currently attached.
- select vdisk file=”C:\VHDs\test.vhd” sets focus on the VHD, which is then detached.
- Use Case: Use select vdisk when managing VHDs for virtual machines, backups, or testing environments.
Command Usage: create partition primary
The CREATE PARTITION PRIMARY command in the DiskPart utility is used to create a primary partition on a selected disk. Primary partitions are fundamental storage divisions on a disk that can contain a file system (e.g., NTFS, FAT32) and are often used to store operating systems, applications, or data. This command is particularly important for initializing disks, setting up bootable partitions, or organizing storage for general use. Since DiskPart operates in a focus-based manner, the CREATE PARTITION PRIMARY command requires a disk to be selected first, and it can be customized with parameters to control the partition’s size, alignment, and other attributes.
Overview of CREATE PARTITION PRIMARY
The CREATE PARTITION PRIMARY command creates a primary partition on the currently selected disk, utilizing unallocated space. Primary partitions are essential for both Master Boot Record (MBR) and GUID Partition Table (GPT) disks:
- On MBR disks, up to four primary partitions can be created (or three primary and one extended partition for logical drives).
- On GPT disks, up to 128 primary partitions are supported, with no concept of extended or logical partitions.
Once created, the primary partition can be formatted with a file system (e.g., NTFS) and assigned a drive letter or mount point, making it a volume accessible to the operating system. The command is commonly used in scenarios like:
- Setting up a new disk for operating system installation.
- Creating a bootable partition for MBR disks (marked with the active command).
- Allocating storage for data or applications.
The command automatically shifts focus to the newly created partition, allowing immediate operations like formatting or assigning a drive letter.
Syntax
The syntax for the CREATE PARTITION PRIMARY command is:
- CREATE PARTITION PRIMARY [SIZE=<N>] [OFFSET=<N>] [ID={ <BYTE>|<GUID> }] [ALIGN=<N>] [NOERR]
Parameters
- SIZE=<n>
- </n>: Specifies the size of the partition in megabytes (MB). If omitted, the partition uses all available unallocated space on the disk.
- OFFSET=<n>
- </n>: Specifies the starting offset (in kilobytes, KB) from the beginning of the disk where the partition begins. If omitted, DiskPart chooses the next available offset, typically aligning with optimal performance boundaries.
- ID={<byte> | <guid>}
- </guid></byte>: Specifies the partition type identifier:
- For MBR disks: A byte value (e.g., 0x07 for NTFS).
- For GPT disks: A GUID (e.g., {ebd0a0a2-b9e5-4433-87c0-68b6b72699c7} for a basic data partition).
- If omitted, defaults to a basic data partition (NTFS-compatible on MBR, basic data on GPT).
- </guid></byte>: Specifies the partition type identifier:
- ALIGN=<n>
- </n>: Aligns the partition to a specified boundary (in KB) for performance optimization (e.g., ALIGN=1024 aligns to 1 MB). If omitted, DiskPart uses default alignment (typically 1 MB for modern disks).
- NOERR: Allows the command to continue despite errors, useful in scripts to prevent halting execution. Without NOERR, errors cause the command to fail.
Requirements
- A disk must be selected using select disk <number> before running the command.
- Sufficient unallocated space must be available on the disk for the specified size (or all unallocated space if SIZE is omitted).
- For MBR disks, no more than four primary partitions (or three if an extended partition exists) can be created.
Output
- Success: “DiskPart succeeded in creating the specified partition.”
- Error: Descriptive error messages (e.g., “There is not enough usable free space on the specified disk”).
Detailed Explanation
The CREATE PARTITION PRIMARY command is a key step in disk initialization and partitioning workflows. Here’s a detailed breakdown of its functionality and considerations:
- Purpose:
- Creates a primary partition, which can be formatted to become a volume (e.g., C: drive).
- On MBR disks, primary partitions are required for bootable systems (marked with active).
- On GPT disks, primary partitions are the standard partition type, supporting up to 128 partitions.
- Focus Behavior:
- After creating the partition, DiskPart automatically shifts focus to the new partition, allowing immediate commands like format or assign.
- Use list partition to verify the new partition’s properties (e.g., size, type).
- Partition Types:
- On MBR disks, the partition is created with a default type of 0x07 (NTFS/HPFS) unless specified with the ID parameter.
- On GPT disks, the partition is created as a basic data partition (GUID: {ebd0a0a2-b9e5-4433-87c0-68b6b72699c7}) unless a custom GUID is provided.
- Alignment:
- The ALIGN parameter ensures the partition starts at an optimal boundary, improving performance on modern SSDs or 4K-sector drives.
- Default alignment (typically 1 MB) is sufficient for most cases, but advanced users may specify custom alignments (e.g., ALIGN=4096 for specific storage configurations).
- Restrictions:
- Cannot create a primary partition if the MBR disk already has four primary partitions or an extended partition with no free space.
- Requires unallocated space; use clean to remove existing partitions if needed.
- System or boot partitions have restrictions on deletion or modification, but new primary partitions can be created freely in unallocated space.
Practical Use Cases
The CREATE PARTITION PRIMARY command is used in various scenarios, leveraging its ability to define primary storage divisions. Key use cases include:
- Initializing a New Disk:
- Create a primary partition on a new HDD or SSD for data storage or OS installation.
- Example: Set up a single partition for a data drive, as shown in Example 1.
- Setting Up Bootable Drives:
- Create a primary partition on an MBR disk and mark it active for legacy BIOS booting (e.g., USB drives or system disks).
- Example: Prepare a USB drive for Windows installation, as shown in Example 3.
- Partitioning for Multiple Purposes:
- Create multiple primary partitions to separate data, backups, or applications.
- Example: Divide a disk into a 100 GB data partition and a backup partition, as shown in Example 2.
- Optimizing SSD Performance:
- Use the ALIGN parameter to ensure partitions align with the SSD’s erase block size (e.g., 4K or 1 MB boundaries).
- Example: Create an aligned partition for an SSD, as shown in Example 4.
- Automating Disk Setup:
- Use in scripts to create standardized partition layouts for Windows deployments.
- Example Script: text
select disk 1cleanconvert gptcreate partition primary size=300format fs=ntfs label="Recovery" quickassign letter=Rcreate partition primaryformat fs=ntfs label="Windows" quickassign letter=C
- Creating Partitions in Recovery Environments:
- Use in WinRE to repair or recreate partitions for system recovery.
- Example: Create a new primary partition to replace a corrupted one during troubleshooting.
Example: Creating Multiple Primary Partitions with Specific Sizes
Scenario: Create two primary partitions on Disk 1: one 100 GB for data and another using the remaining space for backups.


Outcome: Disk 1 has two primary partitions: a 100 GB partition (D:) and an 831 GB partition (E:), both formatted as NTFS.
FORMAT Command
The FORMAT command in the DiskPart utility is used to format a selected partition or volume with a specified file system, such as NTFS, FAT32, or exFAT, preparing it for data storage or use as a bootable volume. Formatting creates a new file system structure, erasing any existing data on the selected partition or volume, and is a critical step in making a partition usable by the operating system. The FORMAT command is typically used after creating a partition (e.g., with create partition primary) and before assigning a drive letter (e.g., with assign). Since DiskPart operates in a focus-based manner, the FORMAT command requires a partition or volume to be selected first.
Overview of the FORMAT Command
The FORMAT command in DiskPart initializes a partition or volume with a new file system, enabling it to store files and folders. It is a destructive command, as it overwrites the existing file system and data, making recovery difficult without specialized tools. The command is versatile, supporting multiple file systems and customization options, and is used in scenarios such as:
- Preparing a new partition for data storage or operating system installation.
- Reformatting an existing volume to change its file system (e.g., from FAT32 to NTFS).
- Creating bootable media, such as a USB drive for Windows installation.
- Repairing a corrupted file system in recovery environments.
The FORMAT command automatically operates on the currently selected partition or volume, requiring prior use of select partition or select volume. After formatting, the partition or volume is ready to be assigned a drive letter or mount point to become accessible as a volume in Windows.
Syntax
The syntax for the FORMAT command is:
- FORMAT [FS=<filesystem>] [LABEL=<label>] [UNIT=<N>] [QUICK] [COMPRESS] [OVERRIDE] [DUPLICATE] [NOERR]
Parameters
- FS=<filesystem>
- </filesystem>: Specifies the file system to apply. Supported options include:
- NTFS: The default and recommended file system for Windows, supporting large files, compression, encryption, and permissions.
- FAT32: Compatible with older systems and removable drives, limited to 4 GB file sizes and 32 GB partition sizes (in DiskPart).
- FAT: Legacy file system, rarely used, limited to 2 GB partitions.
- exFAT: Optimized for flash drives, supports large files and partitions, ideal for cross-platform compatibility.
- ReFS: Resilient File System, used in Windows Server for advanced storage scenarios (not commonly used on client systems).
- If omitted, NTFS is the default.
- </filesystem>: Specifies the file system to apply. Supported options include:
- LABEL=: Specifies a name for the volume (e.g., “Data,” “Windows”). If omitted, the volume has no label.
- UNIT=<n>
- </n>: Specifies the allocation unit size (cluster size) in bytes (e.g., 4096, 8192). If omitted, DiskPart chooses a default based on the volume size and file system (e.g., 4 KB for NTFS).
- QUICK: Performs a quick format, skipping the full sector-by-sector check. Faster but less thorough, as it only creates the file system structure without verifying disk integrity.
- COMPRESS: Enables NTFS compression for all files on the volume (NTFS only). Useful for saving space but may impact performance.
- OVERRIDE: Forces formatting of volumes that are locked or in use (e.g., by another process). Use with caution, as it may cause data loss or system instability.
- DUPLICATE: For UDF file systems (rarely used), ensures metadata is duplicated for redundancy (not applicable to NTFS or FAT32).
- NOERR: Allows the command to continue despite errors, useful in scripts to prevent halting execution. Without NOERR, errors cause the command to fail.
Requirements
- A partition or volume must be selected using select partition or select volume before running the command.
- The target partition or volume must be in a state that allows formatting (e.g., not a system or boot volume in use).
- Administrative privileges are required to run DiskPart and execute the FORMAT command.
Output
- Success: “DiskPart successfully formatted the volume.”
- Progress: Displays a percentage completion (e.g., “50 percent completed”) for full formats.
- Error: Descriptive error messages (e.g., “The volume is in use by another process” or “The specified file system is not supported”).
Detailed Explanation
The FORMAT command is a critical step in preparing a partition or volume for use. Here’s a detailed breakdown of its functionality and considerations:
- Purpose:
- Initializes a new file system, erasing existing data and metadata.
- Configures the volume for specific use cases (e.g., NTFS for Windows, FAT32 for bootable USBs, exFAT for cross-platform drives).
- Ensures the volume is ready for assigning a drive letter or mount point.
- Focus Behavior:
- The command operates on the currently selected partition or volume, set by select partition or select volume.
- Use list partition or list volume to verify the selected object before formatting to avoid data loss on the wrong target.
- File System Choices:
- NTFS: Preferred for internal drives, system partitions, and large storage due to its robustness, support for large files (>4 GB), and features like encryption and permissions.
- FAT32: Used for removable drives or legacy systems, but limited to 4 GB file sizes and 32 GB partitions in DiskPart (though larger partitions can be formatted with other tools).
- exFAT: Ideal for USB drives or SD cards needing large file support and cross-platform compatibility (Windows, macOS).
- ReFS: Used in specific Windows Server scenarios for resiliency but not common on client systems.
- Quick vs. Full Format:
- Quick Format: Skips checking for bad sectors, creating only the file system structure (faster, typically seconds to minutes).
- Full Format: Scans the entire volume for bad sectors, ensuring disk integrity (slower, can take hours for large drives). Use full format for new or suspect drives.
- Restrictions:
- Cannot format system, boot, or paging file volumes while Windows is running, as they are in use.
- In the Windows Recovery Environment (WinRE), restrictions may be relaxed, but caution is needed to avoid disrupting the system.
- The OVERRIDE parameter can bypass some restrictions but risks instability.
Practical Use Cases
The FORMAT command is used in various scenarios, leveraging its ability to initialize file systems. Key use cases include:
- Preparing New Partitions:
- Format a newly created partition for data storage or OS installation.
- Example: Format a primary partition as NTFS for a new SSD, as shown in Example 1.
- Creating Bootable Media:
- Format a partition as FAT32 or NTFS for bootable USB drives or system partitions.
- Example: Prepare a USB drive for Windows installation, as shown in Example 2.
- Reformatting for Compatibility:
- Change a volume’s file system (e.g., NTFS to exFAT) for specific use cases like cross-platform storage.
- Example: Reformat a volume to exFAT, as shown in Example 3.
- Ensuring Disk Integrity:
- Perform a full format to check for bad sectors on new or suspect drives.
- Example: Full format with custom cluster size, as shown in Example 4.
- Troubleshooting in Recovery Environments:
Best Practices
- Verify Selection: Use list partition or list volume and select partition or select volume to confirm the correct target before formatting, as the command is destructive.
- Backup Data: Always back up data on the target partition or volume, as formatting erases all contents.
- Choose Appropriate File System:
- Use NTFS for internal drives and system partitions.
- Use FAT32 for bootable USBs or legacy compatibility.
- Use exFAT for removable drives needing large file support and cross-platform compatibility.
- Use QUICK for Speed: For trusted drives, use the QUICK parameter to save time, but perform a full format for new or potentially faulty drives.
- Optimize Cluster Size: Specify UNIT for specific workloads (e.g., larger clusters like 64 KB for media storage, smaller clusters like 4 KB for small files).
- Avoid System Volumes: Do not format system, boot, or paging file volumes while Windows is running, as this can cause system instability.
- Scripting with NOERR: In scripts, use the NOERR parameter to handle errors gracefully:
format fs=ntfs quick noerr - Test in Safe Environments: Practice formatting on non-critical drives or virtual machines to avoid accidental data loss.
Practical Examples of FORMAT Command Usage
Below are practical examples demonstrating the use of the FORMAT command in various scenarios, illustrating its flexibility and integration with other DiskPart commands.
Example 1: Formatting a New Primary Partition
Scenario: Format a newly created primary partition on a 1TB SSD (Disk 1) as NTFS for data storage.


Outcome: The primary partition on Disk 1 is formatted as NTFS, labeled “Data,” and accessible as D:.
Example 2: Full Format with Custom Allocation Unit Size
Scenario: Perform a full format on a partition to check for bad sectors, using a 64 KB allocation unit size for large file storage.
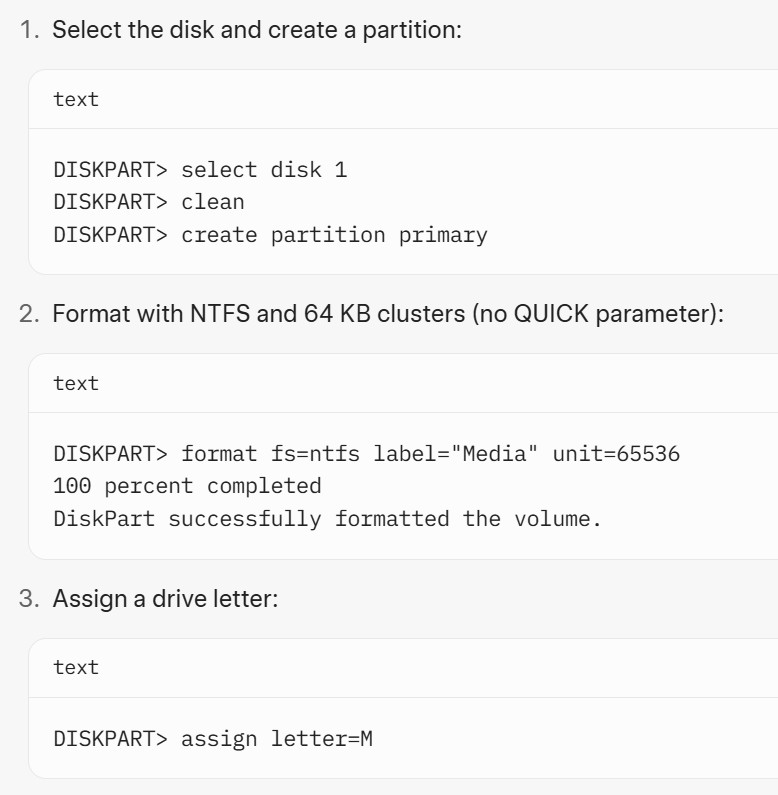
Outcome: The partition is formatted as NTFS with a 64 KB cluster size, thoroughly checked for bad sectors, and accessible as M:.
EXTEND Command
The EXTEND command in the DiskPart utility is used to increase the size of a selected volume or partition by incorporating adjacent unallocated space on the same disk. This command is particularly useful for expanding storage capacity without data loss, provided there is contiguous unallocated space immediately following the volume or partition. The EXTEND command is commonly used to address scenarios where a volume is running out of space or to utilize newly available unallocated space after shrinking another volume or deleting a partition. Since DiskPart operates in a focus-based manner, the EXTEND command requires a volume or partition to be selected first.
Overview of the EXTEND Command
The EXTEND command in DiskPart enlarges a selected volume or partition by adding unallocated space to it, provided the space is contiguous (immediately adjacent) on the same disk. This non-destructive command preserves existing data on the volume or partition, making it a valuable tool for dynamically adjusting storage without reformatting or recreating partitions. Key features include:
- Supports both basic disks (extending partitions) and dynamic disks (extending volumes, including spanned or striped configurations).
- Works with file systems like NTFS and ReFS, but not FAT or FAT32 due to their structural limitations.
- Commonly used to expand system, data, or dynamic volumes when additional space is needed.
The command is typically used after selecting a volume (select volume) or partition (select partition) and requires unallocated space to be available immediately after the target. If no unallocated space exists, you may need to shrink or delete another partition to create it.
Syntax
The syntax for the EXTEND command is:
- EXTEND [SIZE=<N>] [DISK=<N>] [NOERR]
Parameters
- SIZE=<n>
- </n>: Specifies the amount of unallocated space to add to the volume or partition, in megabytes (MB). If omitted, the command uses all available contiguous unallocated space.
- DISK=<n>
- </n>: For dynamic disks, specifies the disk number to extend a volume onto (used for spanned volumes across multiple disks). If omitted, the command extends onto the current disk.
- NOERR: Allows the command to continue despite errors, useful in scripts to prevent halting execution. Without NOERR, errors cause the command to fail.
Requirements
- A volume or partition must be selected using select volume or select partition before running the command.
- The target volume or partition must use a supported file system (NTFS or ReFS). FAT, FAT32, and exFAT are not supported for extension.
- Contiguous unallocated space must exist immediately following the selected volume or partition on the same disk.
- For dynamic disks, the disk must be converted to dynamic (using convert dynamic) if extending across multiple disks.
- Administrative privileges are required to run DiskPart and execute the EXTEND command.
Output
- Success: “DiskPart successfully extended the volume.”
- Error: Descriptive error messages (e.g., “The volume cannot be extended because the file system does not support it” or “There is not enough usable free space”).
Detailed Explanation
The EXTEND command is a powerful tool for managing disk space dynamically. Here’s a detailed breakdown of its functionality and considerations:
- Purpose:
- Increases the size of a volume or partition to accommodate growing storage needs (e.g., expanding a C: drive running low on space).
- Supports basic disks (extending a single partition) and dynamic disks (extending simple, spanned, or striped volumes).
- Preserves existing data, making it a non-destructive operation when conditions are met.
- Focus Behavior:
- Operates on the currently selected volume (select volume) or partition (select partition).
- Use list volume or list partition to verify the selected object and check for adjacent unallocated space.
- File System Support:
- NTFS and ReFS: These file systems support dynamic resizing, allowing the EXTEND command to work seamlessly.
- FAT/FAT32/exFAT: These file systems do not support extension, requiring reformatting to NTFS or ReFS before extending.
- If the volume uses an unsupported file system, you must back up data, reformat to NTFS, and restore the data before extending.
- Contiguous Space Requirement:
- The unallocated space must be immediately adjacent to the volume or partition (on the right side in disk layout).
- If unallocated space is non-contiguous, you may need to delete or move partitions using third-party tools, as DiskPart cannot relocate partitions.
- Dynamic Disks:
- For spanned volumes (spanning multiple disks), the DISK parameter specifies which disk to extend onto.
- Requires the disk to be dynamic, and all involved disks must have sufficient unallocated space.
- Restrictions:
- Cannot extend system or boot volumes while Windows is running, as they are locked. Use the Windows Recovery Environment (WinRE) or bootable media for such tasks.
- Cannot extend volumes on removable media (e.g., USB drives) or volumes with unsupported file systems.
- Extension across multiple disks is only supported on dynamic disks for spanned volumes.
Practical Use Cases
The EXTEND command is used in various scenarios to manage disk space dynamically. Key use cases include:
- Expanding a Data Volume:
- Increase the size of a data volume running low on space, as shown in Example 1.
- Example: Extend a D: drive to store additional files without reformatting.
- Utilizing Unallocated Space:
- Incorporate unallocated space created by shrinking or deleting another partition, as shown in Example 2.
- Example: Use space freed up after resizing a partition for another volume.
- Managing Spanned Volumes on Dynamic Disks:
- Extend a volume across multiple disks for large storage pools, as shown in Example 3.
- Example: Create a large spanned volume for media or backup storage.
- Recovering Space in Recovery Environments:
- Extend volumes in WinRE to recover space or adjust partition layouts, as shown in Example 4.
- Example: Expand a data partition after troubleshooting a disk issue.
Best Practices
- Verify Unallocated Space: Use list disk to confirm contiguous unallocated space is available immediately after the target volume or partition.
- Check File System: Ensure the volume uses NTFS or ReFS, as FAT/FAT32/exFAT are not supported. Reformat if necessary (back up data first).
- Backup Data: Although EXTEND is non-destructive, back up critical data before execution to guard against unexpected errors.
- Use SIZE for Control: Specify the SIZE parameter to extend by a specific amount, avoiding unintended consumption of all unallocated space.
- Dynamic Disks for Spanning: Convert disks to dynamic for spanned volumes, and verify unallocated space on target disks with list disk.
- Avoid System Volumes: Do not attempt to extend system or boot volumes while Windows is running; use WinRE or bootable media.
- Scripting with NOERR: In scripts, use the NOERR parameter to handle errors gracefully:
extend size=102400 noerr
- Verify Extension: After extending, use list volume or list partition to confirm the new size.
Limitations and Considerations
- Contiguous Space Requirement: Unallocated space must be immediately adjacent to the volume or partition. Non-contiguous space requires third-party tools to relocate partitions.
- File System Limitation: Only NTFS and ReFS volumes can be extended. FAT/FAT32/exFAT volumes must be reformatted to NTFS, which erases data.
- System/Boot Restrictions: System, boot, or paging file volumes cannot be extended while Windows is running. Use WinRE for such tasks.
- Dynamic Disk Dependency: Extending across multiple disks requires dynamic disks and sufficient unallocated space on the target disk.
- No Undo: While EXTEND is non-destructive, there’s no direct way to undo an extension without shrinking the volume (using shrink) or reformatting.
Practical Examples of EXTEND Command Usage
Below are practical examples demonstrating the use of the EXTEND command in various scenarios, illustrating its integration with other DiskPart commands.
Example 1: Extending a Volume on a Basic Disk
Scenario: Extend a 400 GB NTFS data volume (Volume 1, D:) by 100 GB using adjacent unallocated space on Disk 1.
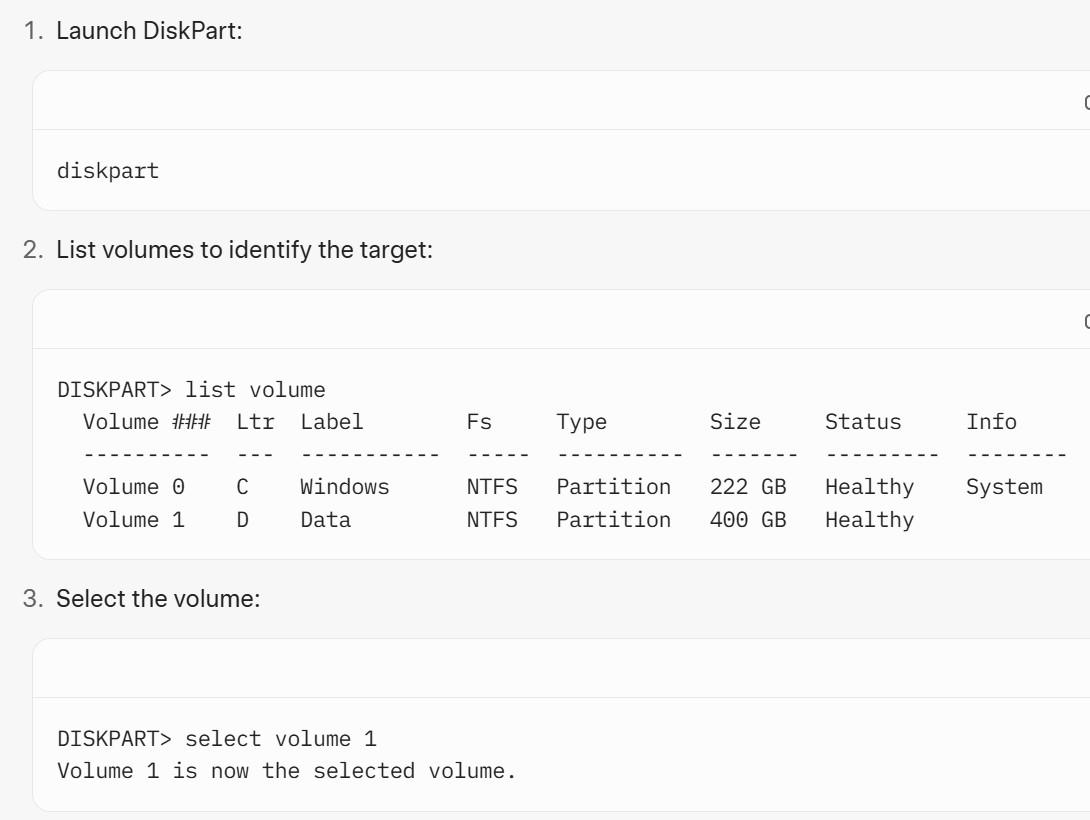
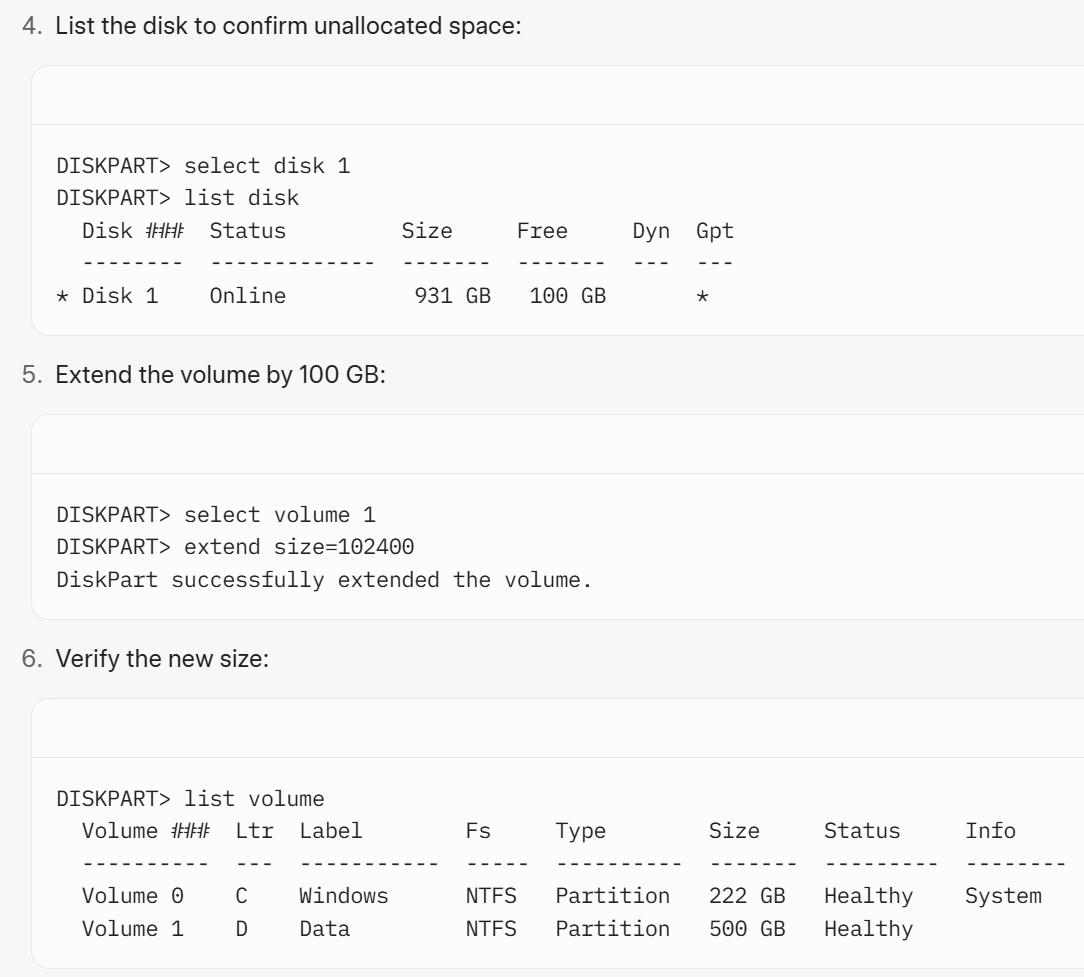
Outcome: The “Data” volume (D:) is extended from 400 GB to 500 GB, incorporating 100 GB of unallocated space.
Example 2: Extending a Volume Using All Available Space
Scenario: Extend a volume to use all contiguous unallocated space on a basic disk.


DETAIL Command
The DETAIL command in the DiskPart utility is used to display detailed information about a selected storage object, such as a disk, partition, volume, or virtual hard disk (VHD). This command provides comprehensive attributes and properties that are not shown in the summary output of the LIST command, making it an essential tool for troubleshooting, verifying configurations, and understanding the state of storage objects before performing operations. Since DiskPart operates in a focus-based manner, the DETAIL command requires a disk, partition, volume, or VHD to be selected first using the SELECT command.
Overview of the DETAIL Command
The DETAIL command in DiskPart retrieves and displays in-depth properties of the currently selected storage object. It is a non-destructive command, meaning it only queries information without modifying the object, making it ideal for:
- Verifying the configuration of a disk, partition, volume, or VHD before performing operations like formatting, extending, or deleting.
- Troubleshooting issues in environments like the Windows Recovery Environment (WinRE) by examining detailed attributes (e.g., file system, health status, or boot settings).
- Gathering information for documentation or scripting purposes.
The DETAIL command has four primary variations, each targeting a different type of storage object:
- detail disk
- detail partition
- detail volume
- detail vdisk
Each variation provides specific attributes relevant to the selected object, complementing the summary information provided by the LIST command. The DETAIL command is often used after LIST and SELECT to confirm the correct object is targeted and to understand its properties in depth.
Syntax and Variations
The DETAIL command’s syntax is straightforward, with no additional parameters required for its basic usage. Below are the four variations:
- DETAIL DISK
- Purpose: Displays detailed information about the currently selected disk.
- Syntax: detail disk
- Output: Includes disk attributes (e.g., manufacturer, model, size, partition style) and a list of partitions or volumes on the disk.
- Requirement: A disk must be selected using select disk <number>.
- DETAIL PARTITION
- Purpose: Displays detailed information about the currently selected partition on the selected disk.
- Syntax: detail partition
- Output: Includes partition attributes (e.g., type, size, offset, hidden status).
- Requirement: A disk and partition must be selected using select disk <number> and select partition <number>.
- DETAIL VOLUME
- Purpose: Displays detailed information about the currently selected volume.
- Syntax: detail volume
- Output: Includes volume attributes (e.g., file system, health, drive letter, capacity) and the disk(s) it resides on.
- Requirement: A volume must be selected using select volume <number | letter>.
- DETAIL VDISK
- Purpose: Displays detailed information about the currently selected virtual hard disk (VHD or VHDX).
- Syntax: detail vdisk
- Output: Includes VHD attributes (e.g., file path, size, type, parent VHD for differencing disks).
- Requirement: A VHD must be selected using select vdisk file=<path>.
Note: The detail command by itself (without a specific object) is not valid; you must specify disk, partition, volume, or vdisk. For detailed help, use help detail or detail <object> /? (e.g., detail disk /?) at the DiskPart prompt.
Detailed Explanation of Each DETAIL Command
Below, I’ll explain each DETAIL command variation, including its output fields, key attributes, and practical considerations, with examples to illustrate their application.
1. DETAIL DISK
- Purpose: Provides comprehensive details about the selected disk, including its hardware properties, partition style, and the partitions or volumes it contains. Useful for verifying disk configuration before operations like cleaning or converting.
- Output Fields:
- Disk Name/Manufacturer: The disk’s brand and model (e.g., “Samsung SSD”).
- Location Path: The physical connection path (e.g., PCIe, SATA).
- Target Name: The disk’s identifier in the system.
- Disk ID: A unique identifier (GUID for GPT, signature for MBR).
- Type: The disk type (e.g., SATA, USB, Virtual).
- Status: The disk’s state (e.g., Online, Offline, No Media).
- Partition Style: MBR or GPT.
- Capacity: Total size of the disk.
- Unallocated Space: Free space not assigned to partitions.
- Reserved Space: Space reserved by the system (e.g., for GPT metadata).
- Volumes/Partitions: A list of volumes or partitions on the disk, including their numbers, letters, and sizes.
- Example:
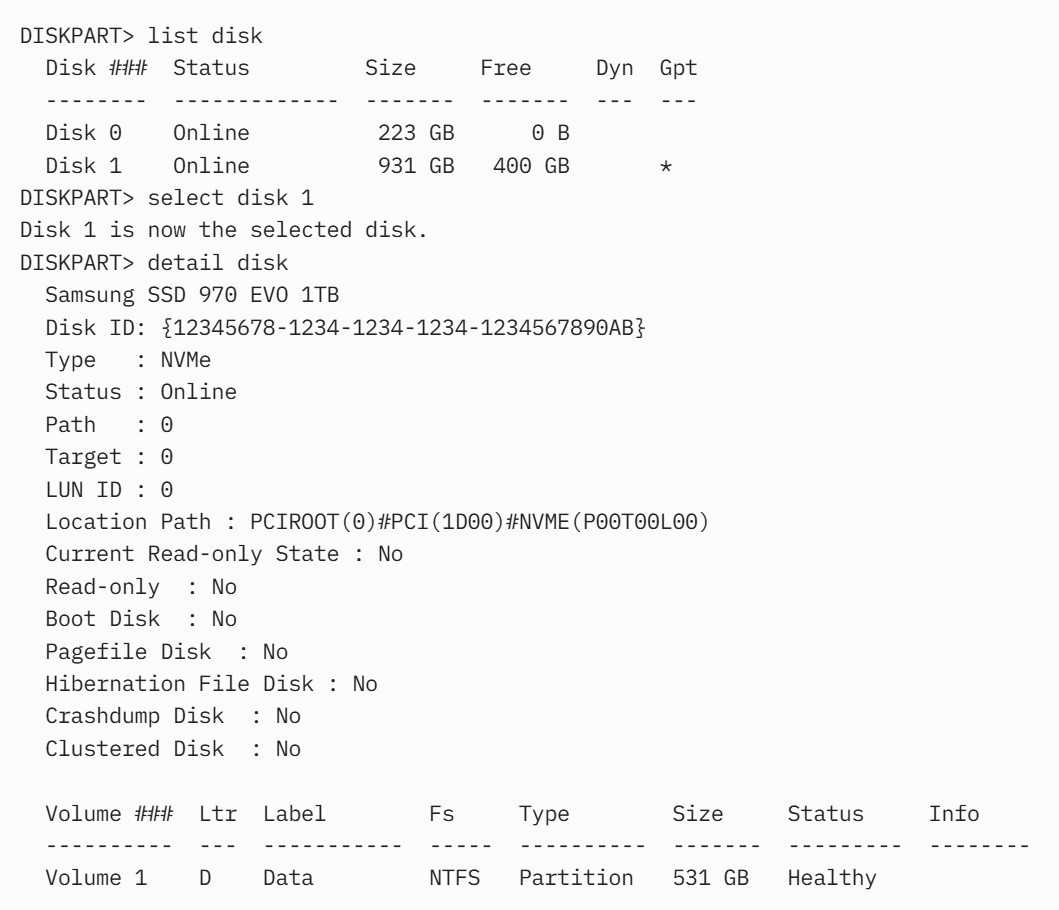
Explanation:
- Disk 1 is a 1TB Samsung SSD, using GPT, with 400 GB unallocated space.
- It contains one volume (D:), a 531 GB NTFS partition.
- Attributes like “Boot Disk: No” indicate it’s not the system disk.
Use Case: Use detail disk to verify a disk’s partition style (MBR or GPT) or unallocated space before creating new partitions.
2. DETAIL PARTITION
- Purpose: Shows detailed properties of the selected partition, useful for confirming its type, size, or attributes before formatting or deleting.
- Output Fields:
- Partition Number: The partition’s identifier (e.g., Partition 1).
- Type: The partition type (e.g., Primary, System, Reserved) or GUID for GPT disks.
- Hidden: Whether the partition is hidden (e.g., Yes for system or reserved partitions).
- Active: Whether the partition is bootable (MBR only, Yes/No).
- Offset: The starting position on the disk (in KB, MB, or GB).
- Size: The partition’s size.
- Volume Information: The associated volume (if formatted), including drive letter and file system.
- Example:
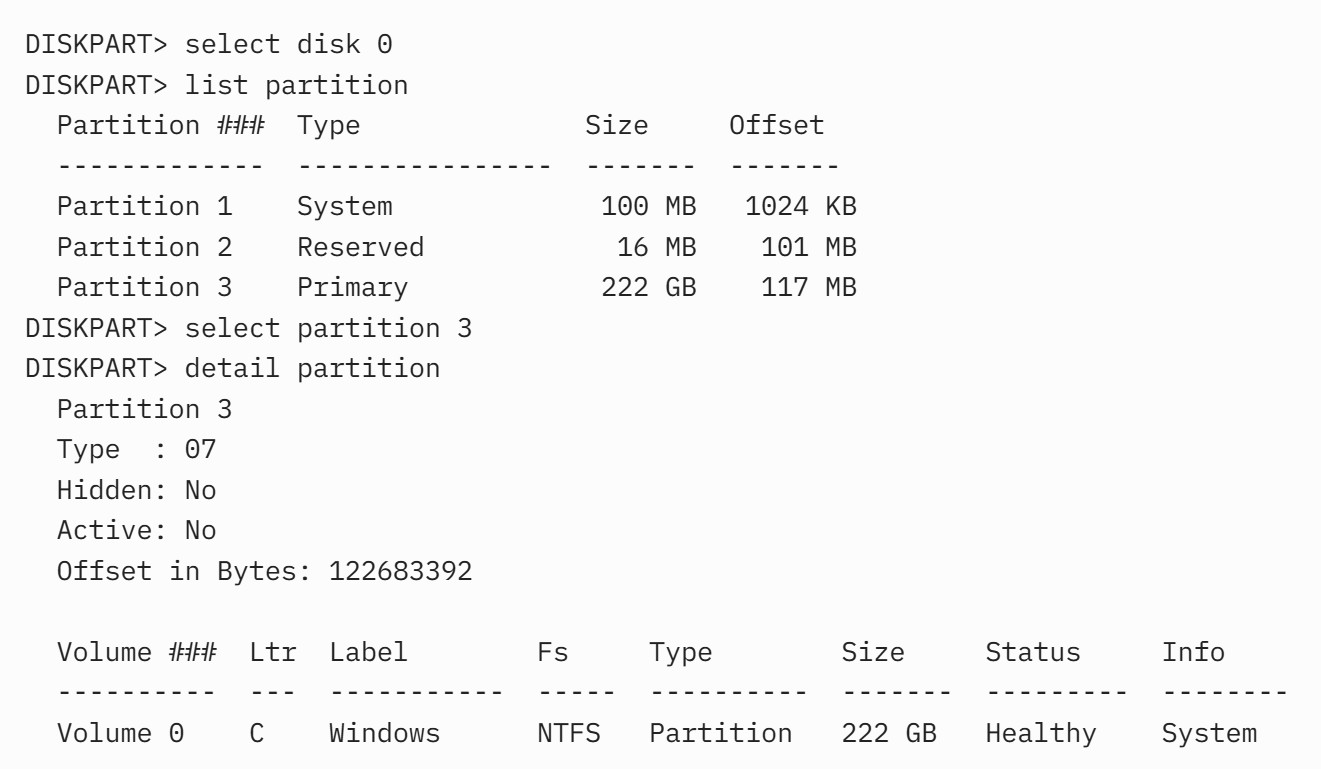
Explanation:
- Partition 3 is a primary partition, not hidden, not active, with an offset of ~117 MB.
- It corresponds to Volume 0 (C:), a 222 GB NTFS volume, marked as the system volume.
Use Case: Use detail partition to check if a partition is bootable (active) or hidden before modifying it.
3. DETAIL VOLUME
- Purpose: Provides detailed properties of the selected volume, including its file system, health, and disk location. Useful for troubleshooting or verifying volume configuration.
- Output Fields:
- Volume Number: The volume’s identifier (e.g., Volume 1).
- Drive Letter: The assigned letter (e.g., D) or none if unassigned.
- Label: The volume’s name (e.g., “Data”).
- File System: The file system (e.g., NTFS, FAT32).
- Type: The volume type (e.g., Partition, Removable).
- Size: The volume’s capacity.
- Status: The volume’s state (e.g., Healthy, Failed).
- Info: Additional details (e.g., System, Boot, Page File).
- Disk Information: The disk(s) hosting the volume, including disk number and partition details.
Example:
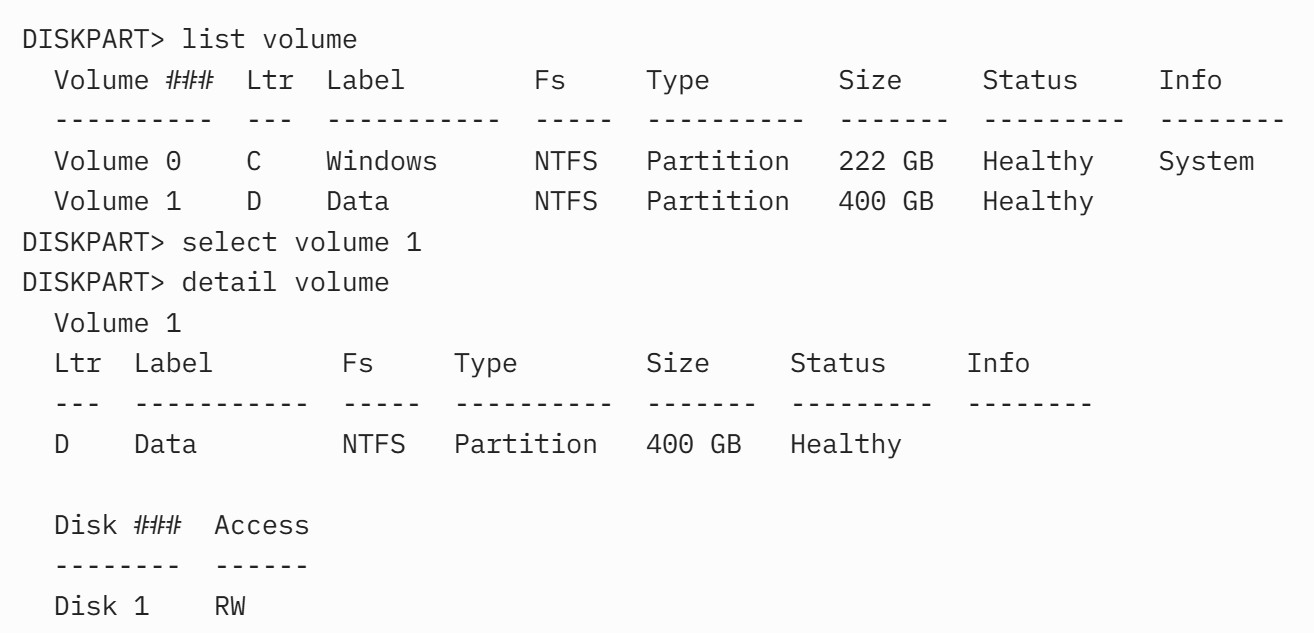
Explanation:
- Volume 1 (D:) is a 400 GB NTFS partition, healthy, located on Disk 1 with read/write access.
- No special attributes (e.g., System, Boot) are present.
Use Case: Use detail volume to verify a volume’s file system or health before extending or reformatting.
4. DETAIL VDISK
- Purpose: Shows detailed properties of the selected VHD, including its file path, type, and parent (for differencing disks). Useful for managing virtual disks in virtualization or testing scenarios.
- Output Fields:
- Virtual Disk File: The path to the VHD file (e.g., “C:\VHDs\test.vhd”).
- Name: The VHD’s identifier.
- Disk ID: The VHD’s unique identifier.
- Type: Fixed, Dynamic, or Differencing.
- State: Attached or Detached.
- Size: Maximum size of the VHD.
- Minimum Size: For differencing disks, the size of the parent VHD.
- Parent File: For differencing disks, the path to the parent VHD.
- Associated Disk: The disk number assigned when attached (e.g., Disk 2).
- Example:
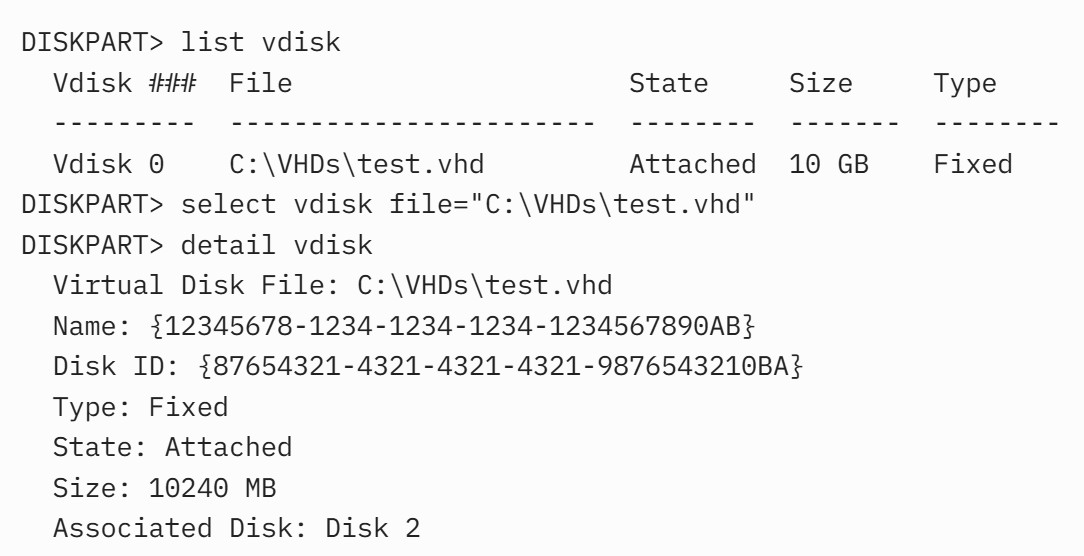
Explanation:
- The VHD is a 10 GB fixed disk, attached as Disk 2, with no parent (not a differencing disk).
Use Case: Use detail vdisk to confirm a VHD’s type or state before attaching, detaching, or partitioning it.
Practical Use Cases
The DETAIL command is used in various scenarios to gather detailed information about storage objects. Key use cases include:
- Verifying Disk Configuration:
- Check a disk’s partition style, unallocated space, or volume list before operations like cleaning or converting, as shown in Example 1.
- Example: Confirm a disk is GPT before creating partitions.
- Troubleshooting Boot Issues:
- Verify partition attributes (e.g., Active, Hidden) for bootable media or system disks, as shown in Example 2.
- Example: Ensure a USB partition is active for legacy BIOS booting.
- Diagnosing Volume Issues:
- Check volume health, file system, or disk location in WinRE or during troubleshooting, as shown in Example 3.
- Example: Confirm a volume’s status before assigning a drive letter.
- Managing VHDs:
- Verify VHD properties (e.g., type, state) before attaching or partitioning, as shown in Example 4.
- Example: Check if a VHD is fixed or dynamic for virtualization setup.
- Automating Documentation:
- Use in scripts to log detailed configurations for auditing or deployment.
Best Practices
- Use with LIST and SELECT: Run list disk, list partition, list volume, or list vdisk to identify the target, then select the object before using detail to confirm its properties.
- Verify Before Operations: Always use DETAIL to check attributes (e.g., file system, health, active status) before destructive commands like clean or format.
- Check System/Boot Status: Confirm whether a disk or volume is a system or boot object (e.g., “Boot Disk: Yes”) to avoid restricted operations.
- Use in Recovery Environments: In WinRE, use detail volume to diagnose volumes that fail to mount or have missing drive letters.
DETAIL PARTITION for GPT Disks
The DETAIL PARTITION command in DiskPart retrieves detailed properties of the currently selected partition on a GPT disk, such as its type, size, offset, hidden status, and associated volume information. For GPT disks, the command is particularly important because:
- GPT disks use GUIDs to identify partition types, unlike MBR disks, which use byte codes (e.g., 0x07 for NTFS).
- GPT disks support specialized partitions like the EFI System Partition (ESP), Microsoft Reserved Partition (MSR), and basic data partitions, each with distinct roles.
- The command helps verify partition attributes for UEFI boot configurations, recovery partitions, or data storage, ensuring compatibility and correctness.
The command is non-destructive, making it safe for troubleshooting, configuration verification, or documentation. It requires a disk and partition to be selected first using select disk and select partition, typically after identifying the target with list disk and list partition.
Output Fields for GPT Disks
When executed on a partition of a GPT disk, the detail partition command provides the following fields, tailored to the GPT partitioning scheme:
- Partition Number: The partition’s identifier (e.g., Partition 1), as shown in list partition.
- Type: The partition type, identified by a GUID for GPT disks. Common GPT partition types include:
- EFI System Partition (ESP): {c12a7328-f81f-11d2-ba4b-00a0c93ec93b} – Used for UEFI boot loaders.
- Microsoft Reserved Partition (MSR): {e3c9e316-0b5c-4db8-817d-f92df00215ae} – Reserved for system use, unformatted.
- Basic Data Partition: {ebd0a0a2-b9e5-4433-87c0-68b6b72699c7} – Standard data partition, typically formatted as NTFS or exFAT.
- Recovery Partition: {de94bba4-06d1-4d40-a16a-bfd50179d6ac} – Used for Windows recovery tools.
- Hidden: Indicates whether the partition is hidden (Yes/No). Hidden partitions (e.g., ESP, MSR, Recovery) are not assigned drive letters and are not visible in File Explorer.
- Required: Indicates if the partition is required for system operation (Yes/No, typically Yes for ESP or MSR).
- Offset in Bytes: The starting position of the partition on the disk, measured in bytes (or converted to KB, MB, or GB for readability).
- Size: The partition’s size (e.g., 100 MB, 222 GB).
- Volume Information: If the partition is formatted and associated with a volume, details include:
- Volume Number: The volume’s identifier (e.g., Volume 0).
- Drive Letter: The assigned letter (e.g., C, D) or none if unassigned.
- Label: The volume’s name (e.g., “Windows”).
- File System: The file system (e.g., NTFS, FAT32).
- Type: The volume type (e.g., Partition).
- Size: The volume’s size (matches the partition size if it’s a single-partition volume).
- Status: The volume’s state (e.g., Healthy, Failed).
- Info: Additional attributes (e.g., System, Boot).
Note: Unlike MBR disks, GPT partitions do not have an “Active” attribute, as GPT relies on the ESP and UEFI firmware for booting, not an active partition flag.
Detailed Explanation for GPT Disks
For GPT disks, the detail partition command is particularly valuable because of the unique characteristics of GPT partitioning:
- GUID-Based Types: Each partition type is identified by a globally unique identifier (GUID), allowing precise identification of roles (e.g., ESP for UEFI booting, MSR for system metadata).
- Support for Large Disks: GPT supports disks larger than 2TB and up to 128 partitions, making detail partition essential for verifying complex layouts.
- UEFI Compatibility: GPT disks are required for UEFI systems, and detail partition helps confirm the presence of required partitions like the ESP.
- Special Partitions: GPT disks often include system-critical partitions (e.g., ESP, MSR, Recovery), and detail partition reveals their attributes, such as hidden or required status.
The command is typically used after creating or selecting a partition to verify its properties before further operations (e.g., formatting, assigning a drive letter, or troubleshooting). It is especially useful in:
- Ensuring the correct partition type for UEFI booting (e.g., ESP with FAT32).
- Verifying recovery or reserved partitions in Windows installations.
- Checking partition offsets for performance optimization (e.g., alignment on SSDs).
Practical Examples of DETAIL PARTITION on GPT Disks
Below are practical examples demonstrating the use of the detail partition command on GPT disks, illustrating its role in various scenarios.
Example 1: Verifying a GPT Disk’s Partition Layout
Scenario: Confirm the properties of partitions on a GPT disk (Disk 0) before formatting a data partition.


Outcome:
- Partition 1 is the EFI System Partition (ESP), hidden, required, and formatted as FAT32 for UEFI booting.
- Partition 3 is a basic data partition, not hidden, formatted as NTFS, and used as the Windows boot volume (C:).
End